
A good, reliable sweet shortcrust pastry recipe is a must in the repertoire of any baker. It is so versatile, a perfect base for a wide range of pies and tarts. Follow my guide, with lots of top tips to help you make beautiful rich, flakey sweet shortcrust pastry like a pro. Perfect for all the delicious bakes you have planned!
Bringing home the (pastry) dough
If you have never made shortcrust pastry before, fear not! Shows like GBBO are fabulous for showing amazing home bakers creating a range of different bakes over the years. So often though is the phrase “soggy bottoms” brought up (thanks Mary Berry!), it is no wonder pastry can seem overwhelming to make. It seems like there are so many things that could go wrong with pastry, but I promise you can make it too!
Homemade sweet shortcrust pastry is hands down so much better than shop bought, well worth the extra effort, I promise! And with such a marvellous range of shortcrust pastry desserts to be made and enjoyed, it would surely be a baking sin not to indulge in a little extra homemade deliciousness?
What is sweet shortcrust pastry?
Sweet shortcrust pastry is basically a mixture of plain flour, fat, sugar and a little water. The combination of these store cupboard ingredients in a certain way creates this amazing magical base. Perfect for a whole range of delicious desserts!
What is pâte sucrée?
Pâte sucrée is basically another name for sweet shortcrust pastry, and what I am sharing with you today. The “short” in the name is because of its texture, meaning it cuts easily and has a wonderfully light buttery, crisp and melt-in-your-mouth quality. Shortcrust pastry is pliable and easy to roll out before baking. Plus the addition of sugar makes it perfect for use in sweet bakes.
What ingredients do I need to make this sweet shortcrust pastry recipe?
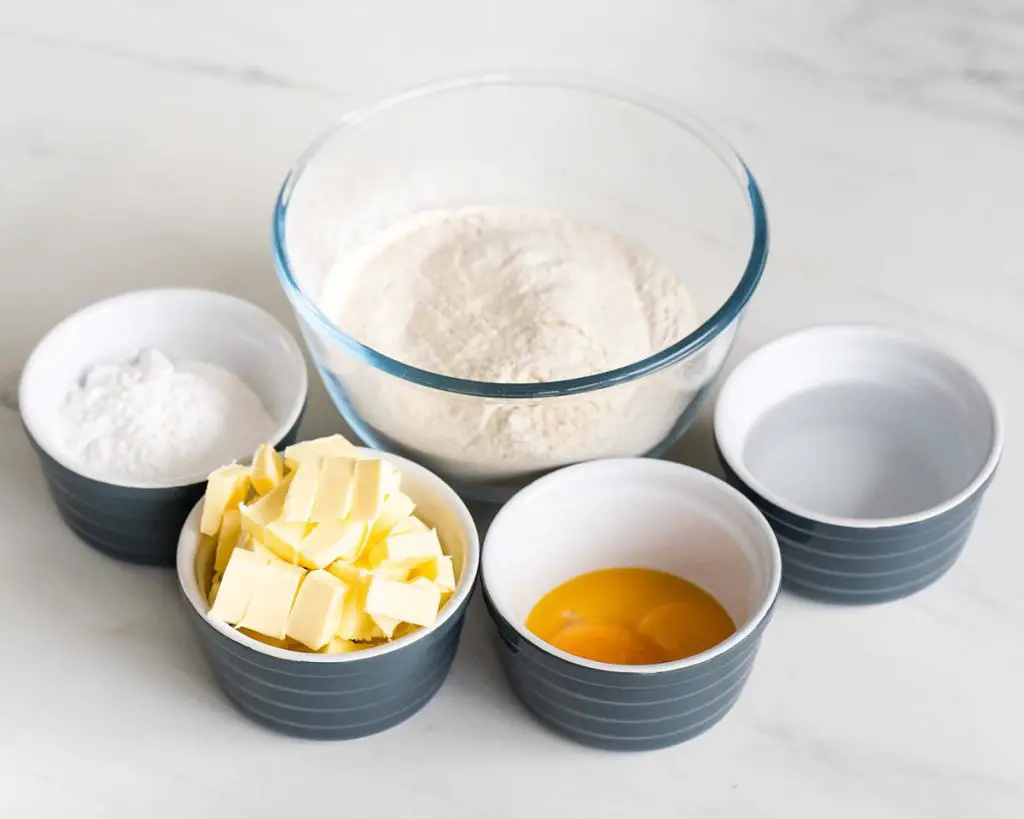
- Flour: I use plain flour to make my pastry as it I do not want any rise in it.
- Icing/Powdered Sugar: since this is a recipe for sweet shortcrust pastry, I add sugar for sweetness in the shortcrust pastry.
- Butter: I always use unsalted butter in my sweet shortcrust pastry recipe. Make sure to use cold butter when making pastry.
- Eggs: egg yolks in the pastry add richness.
- Ice cold water: make sure to use cold water when making sweet pastry for tartlets. You want to keep it as cold as possible throughout the whole making process.
What equipment do I need to make this sweet short pastry recipe?
- Food processor*: a brilliantly quick way to make the pastry, and my preferred way for speed and convenience.
- Pastry cutter/blender*: an alternative tool to cutting butter into the dry ingredients when making pastry. You can also use a knife, if you do not have either a food process or pastry blender.
- Digital kitchen scales*: my recommended method of measuring ingredients is to weigh them out using grams rather than cups. I do, however, provide cup measures too, if you prefer working with this method.
- Rolling pin*: for rolling out the pastry. If you do not have a rolling pin, you can get creative! A tall glass or even a wine bottle would work well too!
How to make this sweet shortcrust pastry recipe
It is amazing how just a few basic store cupboard ingredients can make the most beautiful creations! Combine flour, icing sugar, butter, egg and water in the right way and with the correct measurements, and you will have a beautiful flakey base for a multitude of delicious bakes!
Make the sweet shortcrust pastry dough
Step 1: Tip the flour and sugar into the food processor or mixing bowl and pulse/mix to combine. Add in the butter and pulse/blend in until the mixture resembles fine breadcrumbs. If using your hands, remember to use only your fingertips. Using the palms when rubbing the mixture together will warm it up too much.
TIP: Try freezing the butter, then grating it instead of cutting into cubes.
TIP: If using your hands, make sure your hands are cold before rubbing the mixture together. I run my hands under cold water and dry before rubbing the mixture to make them extra cool.
TIP: This step can be done with a knife or a pastry blender too.
Step 2: Once the butter has been incorporated, tip in the egg yolks and pulse or mix until just combined. Mix in the ice water 1 tbsp at a time until the dough starts to come together in clumps. Do not over mix beyond this clumping stage.
TIP: To test if the dough has enough moisture, squeeze a little of it between your fingers. It should stick together without crumbling apart if it has enough water in it.
Step 3: Tip the mixture out onto a clean work surface (no need to dust with extra flour). It will still have a few crumbly bits, and it’s all good. Gently push the dough together with your hands just until it comes together in a smooth dough. Split in two and shape lightly into two discs. Wrap tightly in cling film/plastic wrap and pop in the fridge to chill for at least 30 minutes before using.
TIP: Shaping the dough into discs before chilling makes it easier to roll out into a circle later. Shape into a rectangle if using a rectangular tin.
TIP: You can freeze it at this stage. Just wrap the dough tightly in three layers: clingfilm, foil and clingfilm again, then pop in your freezer. Defrost overnight in the fridge then continue from this step.
Lining the tart tin
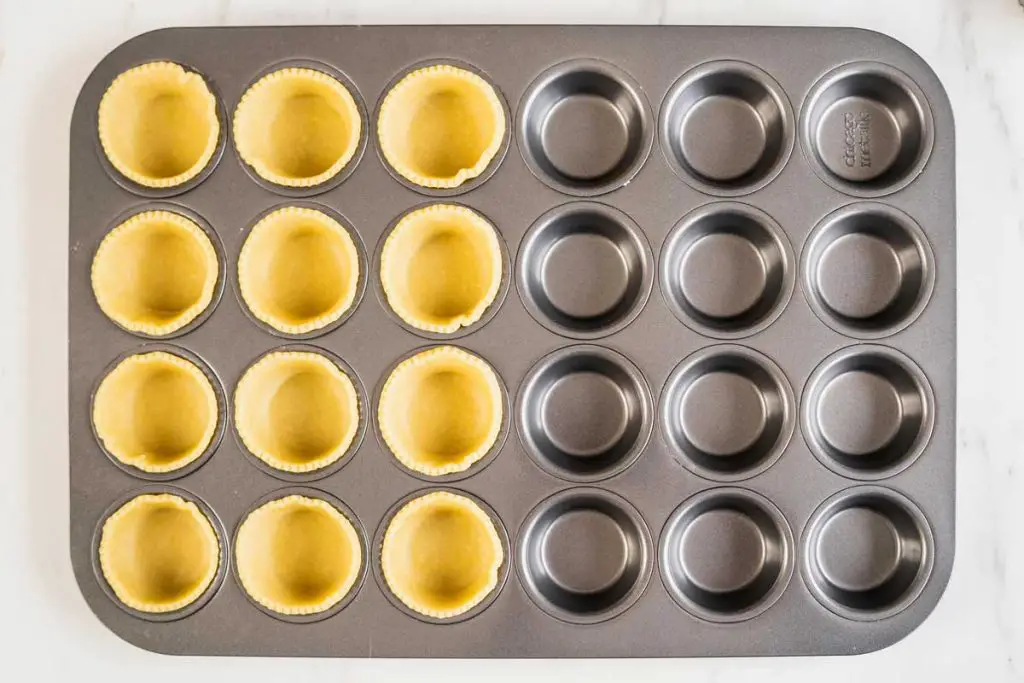
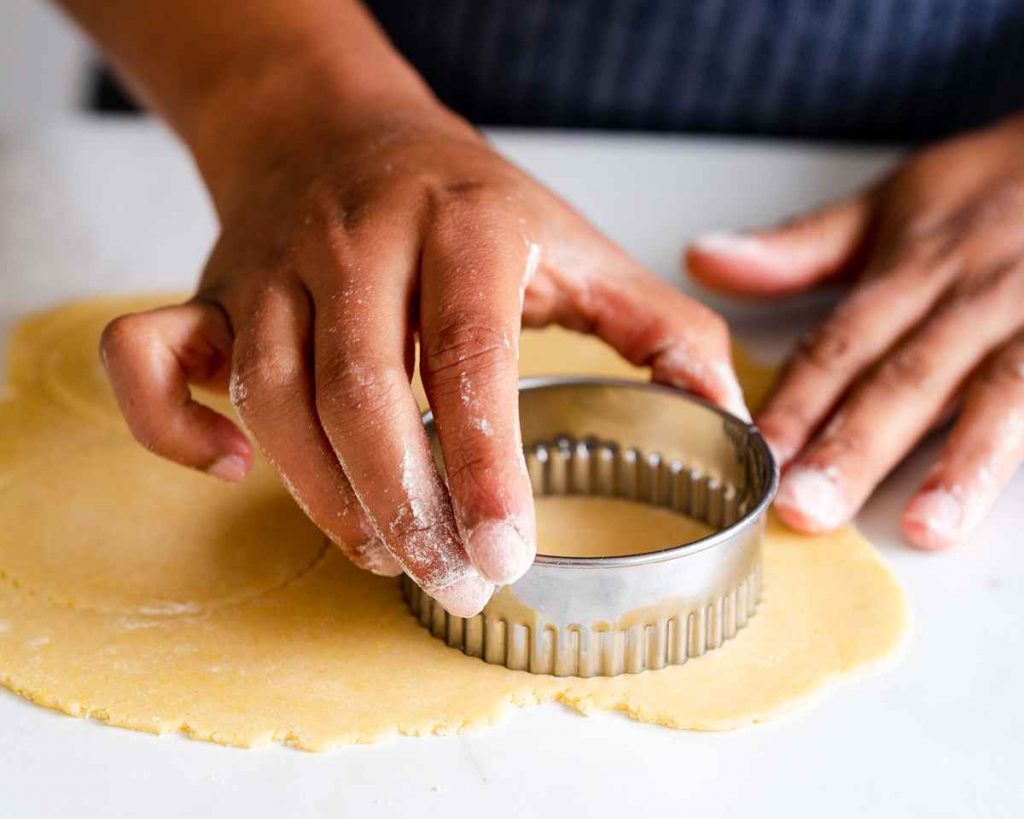
Step 1: Once the pastry has chilled, remove it from the fridge and set out for a few minutes. Lightly dust the work top with some flour, and do the same for the rolling pin. Place the chilled dough on the flour and roll it out. If using a larger tart tin, place the tin on the rolled out dough to check the size. The pastry should be wide enough to cover the base and have enough extra to hang over the edge.
TIP: Make sure to roll the dough out to an even thickness. If unevenly rolled, the pastry will not bake evenly and you will have some raw patches of dough.
Step 2: Lift the pastry and place it in the tin. Place the rolling pin in the middle of the pastry circle and fold one side of the pastry over the rolling pin. Then, carefully, lift the rolling pin and slide the tart tin under before unfolding the dough.
TIP: There is no need to grease or line the pastry tin.
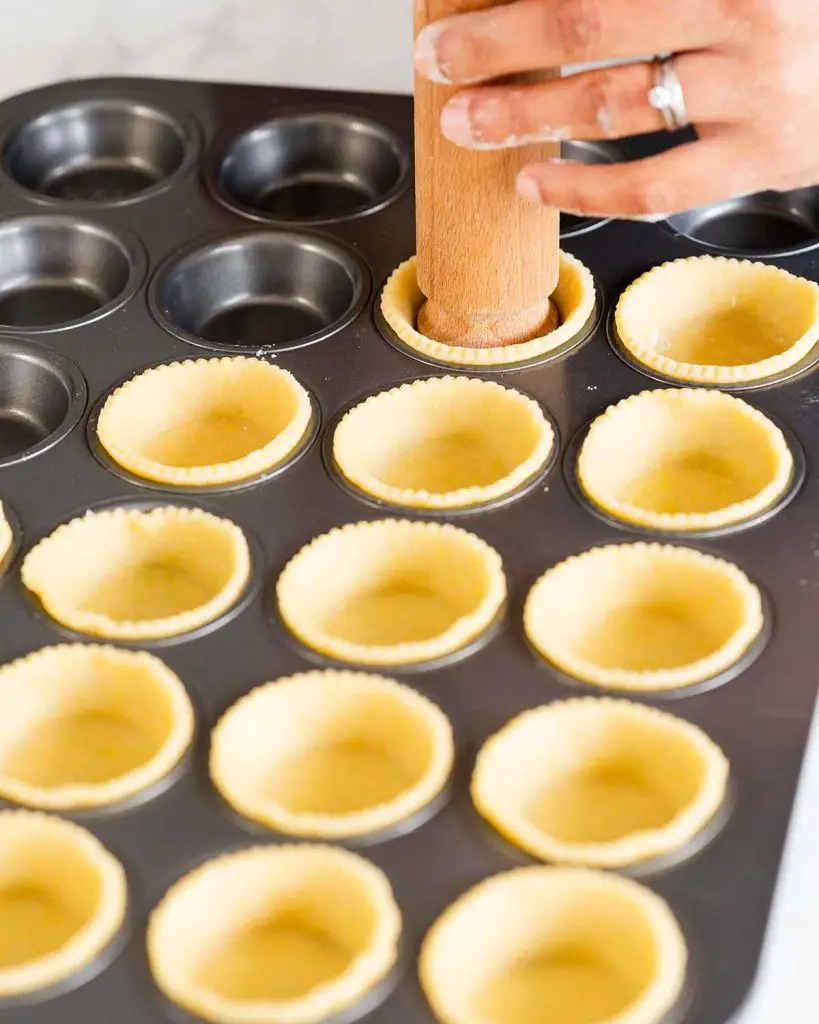
Step 3: Lift the edges of the dough and allow the weight of the pastry to lower it into the tin. Gently press the dough into the corners of the tin all around, allowing the excess to hang over the edges.
TIP: Do not pull or stretch the dough as you do this step. Instead allow the dough to fall in place then simply press it in place. Remember, gluten is like elastic! Stretching it to line the tin, will make it spring back when baking and cause shrinkage to the pastry shell.
Step 4: Trim the excess pastry off from around the tin. This can be done using a sharp knife and running it along the top edge of the tin. Or you could use a rolling pin and roll firmly across the top of the tin.
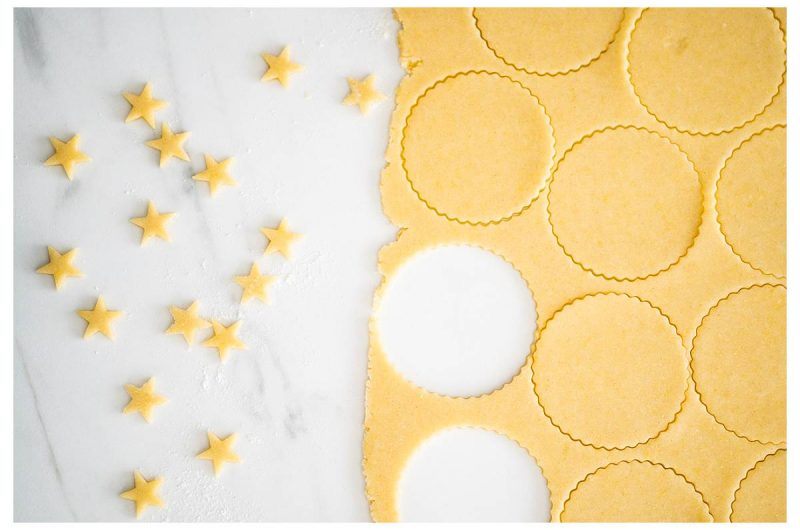
TIP: You can reuse the pastry trimmings to make smaller tartlet sized shells too! Just squeeze together and reroll, repeating the above steps.
Step 5: Place the dough lined tart tin in the fridge to chill for at least an hour before baking. Chilling the dough again allows the gluten to relax after being handled, reducing the chance of shrinkage.
TIP: If you are short on time, you can pop it in the freezer for about 20 minutes instead.
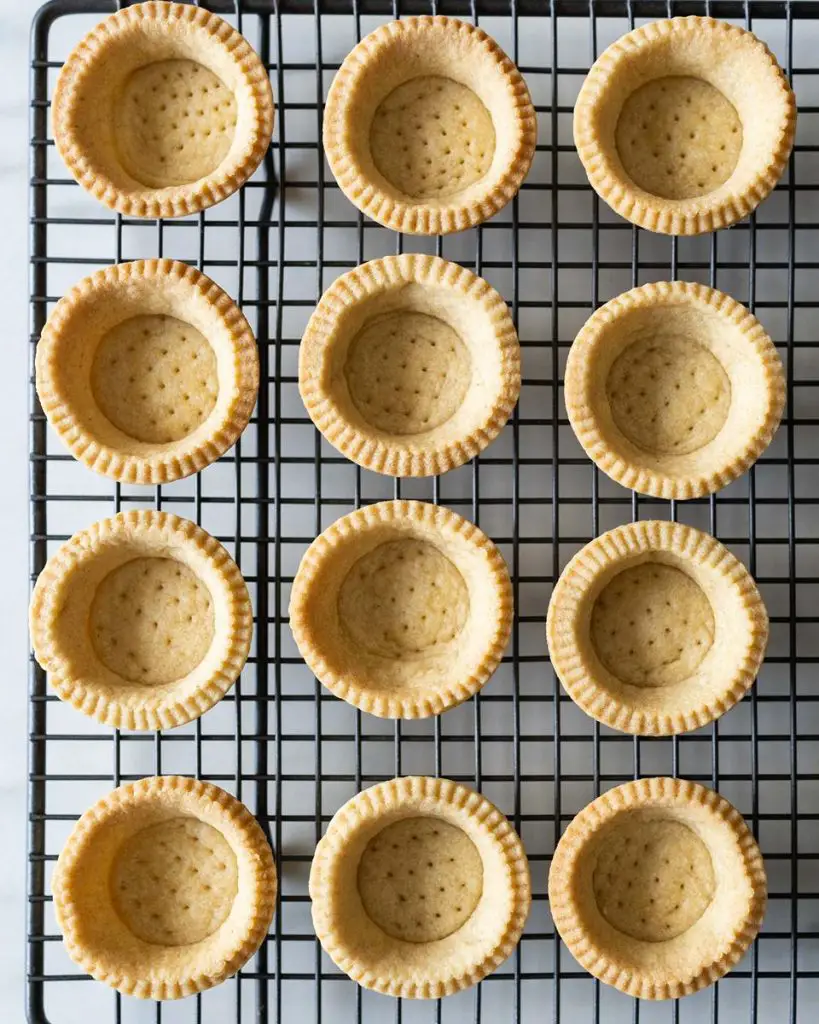
The pastry is now ready for baking!
What is blind baking?
That’s the pastry made and lining the tin. Phew! What’s next?
The majority of the time, you will now need to blind bake the pastry shell. This is basically where you partially or completely bake the shortcrust pastry base before adding in the filling.
Why do I need to blind bake my shortcrust pastry?
Adding a wet filling into an unbaked pastry case before baking leaves the middle of the pastry not bake through. This will leave you with a mushy filling and a soggy pastry base. If the filling does not require baking, you will need to fully bake the shortcrust base before filling it.
Blind baking is a way of baking up a sweet pastry recipe but controlling how the pastry rises when baking. To blind bake, you line the pastry with baking parchment so the pastry is ‘blind’, hence the name. You would then fill the pastry shell with some sort of weights and partially bake it. The weights are removed and the pastry is baked again until it is a beautiful golden biscuity colour. For most pastry recipes, you will need to follow these steps before adding in the fillings.
Preparing the pastry for blind baking
There are two methods people take before baking their pastry. Some people like to ‘dock’ the pastry base, which basically means pricking it all over with a fork. Others like to line the base with parchment and fill with baking beans before blind baking. Personally, I like to do both as extra guarantee of fabulous pastry! Let me explain the workings of both methods.
Docking or pricking the pastry before baking means you put little holes in the dough. This allows the steam to escape and evaporate as the pastry bakes. When the steam is not trapped within the pastry, it will not rise and puff up. This means the pastry will remain flatter and keep the flakey texture.
Lining and using weights restricts the pastry from rising and puffing up, giving similar results to docking. You can use baking beans, uncooked rice or dried lentils or beans as weights for pastry.
I use both these methods! I find it helps to weigh the pastry down and support the sides as it bakes for best results. Then, once the paper and weights are removed, the pastry can easily crisp up whilst holding its shape.
How to blind bake shortcrust pastry
Step 1: First, prick the chilled pastry base all over with a fork.
Step 2: Scrunch up a piece of parchment paper that is large enough to completely cover the base, sides and leave you with an overhang of paper around the tin. Gently place over the pastry, easing into the inner edges.
TIP: Scrunching the paper allows it to mould better to the pastry case, reaching the inner edges and corners of the tart.
Step 3: Fill the paper with the weights, arranging so the weights sit against the sides of the pastry. Ensure it is filled to the brim, so the pastry side is supported by the weights too.
Step 4: Bake in a preheated oven at 180C/350F for 10 minutes until the pastry is firm.
TIP: It will still look a little raw. This step is to ‘set’ the pastry so it hold sits shape without the support of the paper and weights.
Step 5: Remove the tin from the oven. Using the overhang, carefully lift the paper and weights inside out of the pastry case and set aside to cool. Return the pastry to the oven.
Step 6: If the filling needs baking too: bake the pastry case for 10-12 more minutes until the pastry is just starting to turn brown. It will feel slightly soft when pressed. Remove from the oven and cool for a couple of minutes. Add in the tart filling and bake for the amount of time recommended by the recipe.
Step 7: If the filling does not need baking: bake the pastry case for a further 15-20 minutes. It will be crisp and golden brown. Allow the pastry crust to cool completely before adding in the no-bake filling for your tart.
How to store and freeze sweet shortcrust pastry
Uncooked pastry dough: once shaped into a disc and wrapped in cling film, the dough can be stored in the fridge for up to three days. When you are ready to bake, leave it at room temperature for about 20 minutes to soften, making it easier to roll.
Freezing unbaked shortcrust pastry: pastry dough can be frozen before being baked as well as after baking. To freeze the dough, follow the steps in making it until wrapping in cling film. Then wrap tightly with tin foil, followed by another tight layer of cling film. Place in the freezer and freeze for up to one month.
Freezing a baked pastry case: once you have a baked pastry shell, allow it to cool completely. Gently wrap each individual pastry case in cling film, then place in an airtight container before freezing. Freeze for up to one month.
How to thaw shortcrust pastry: to thaw unbaked pastry, remove it from the freezer and thaw in the fridge overnight. For a baked pastry case, carefully unwrap it and leave it to come to room temperature on a wire rack before using.

Additional top tips for making this sweet shortcrust pastry recipe
- Prepare: Make sure the tools and ingredients are prepared before you start mixing. This is important when making this sweet short pastry recipe, as you want to keep it as cold as possible.
- Weigh: Measuring out the ingredients using a scale rather than cups will result in a far better pastry as the quantities of ingredients will be accurate.
- Ice cold: Make sure you use cold butter and ice water when making pastry. Remember it is important to keep the pastry as cold as possible throughout the process of bringing it together.
- Less is more: Add water only as required when making any pastry. The water is only to bring the dough together, purely for moisture in the pastry.
- Hands off: Remember to handle the dough as little as possible. Whether mixing, rolling and lining the tin, pastry dough does not need to be worked a lot.
- Work quickly: Linking in with the above points, this is important. If the dough gets too warm when being handled, the baked pastry will be greasy and heavy not light, flakey and crispy.
- Rest: The pastry need to be chilled, especially after it has been mixed, rolled and pressed into the tin. This allows the gluten in the flour to relax and helps cause less shrinking later when the pastry is baked. Hence popping it in the fridge/freezer for a second chill before baking is really important.
- Bake: Baking the pastry before adding a wet filling allows the pastry to cook. It also prevents a soggy bottom and soaking wet pastry. I always blind bake and then bake my pastry before adding a filling that needs baking, such as a custard. The pastry will also need baking before filling if the filling sets without baking, such as for a chocolate ganache. I bake my pastry and filling when making more firm filled bakes, such as mince pies or jam tarts.
- Top it up: Fill the pastry to the top with baking bean, dried rice or lentils when blind baking. This will help reduce shrinkage around the pastry walls as the beans help the pastry hold its shape whilst baking.
Troubleshooting
If you have any other questions about making this easy sweet shortcrust pastry, please leave me a comment below, I would love to help. And if you do use this recipe to make sweet shortcrust pastry dessert, please do let me know how it turns out!
Sweet shortcrust pastry recipes from my blog for you to enjoy
Do check out these yummy recipes on my blog using pastry:
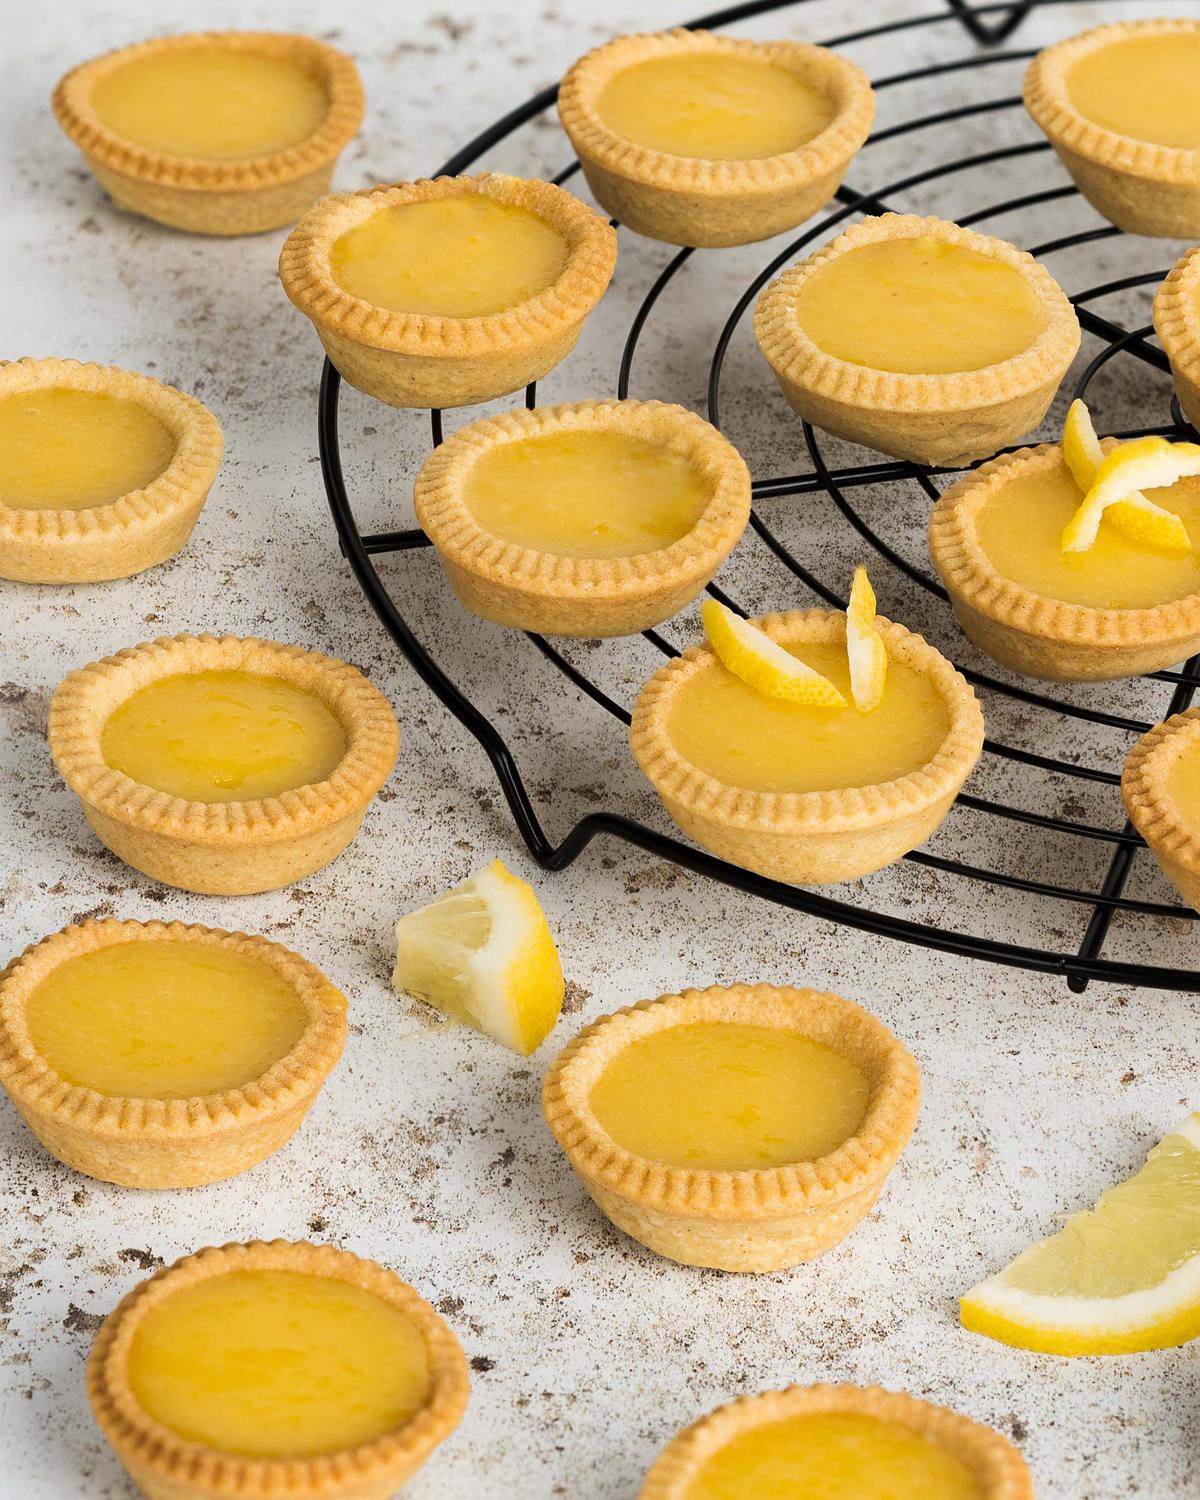
Lemon curd tarts: A delightfully joyful bake, these lemon curd tarts are sure to make you smile! A beautiful buttery mini shortcrust pastry shell filled to the brim with a bright and zingy lemon curd. The whole thing just melts in your mouth and is pure sunshine in a mouthful!
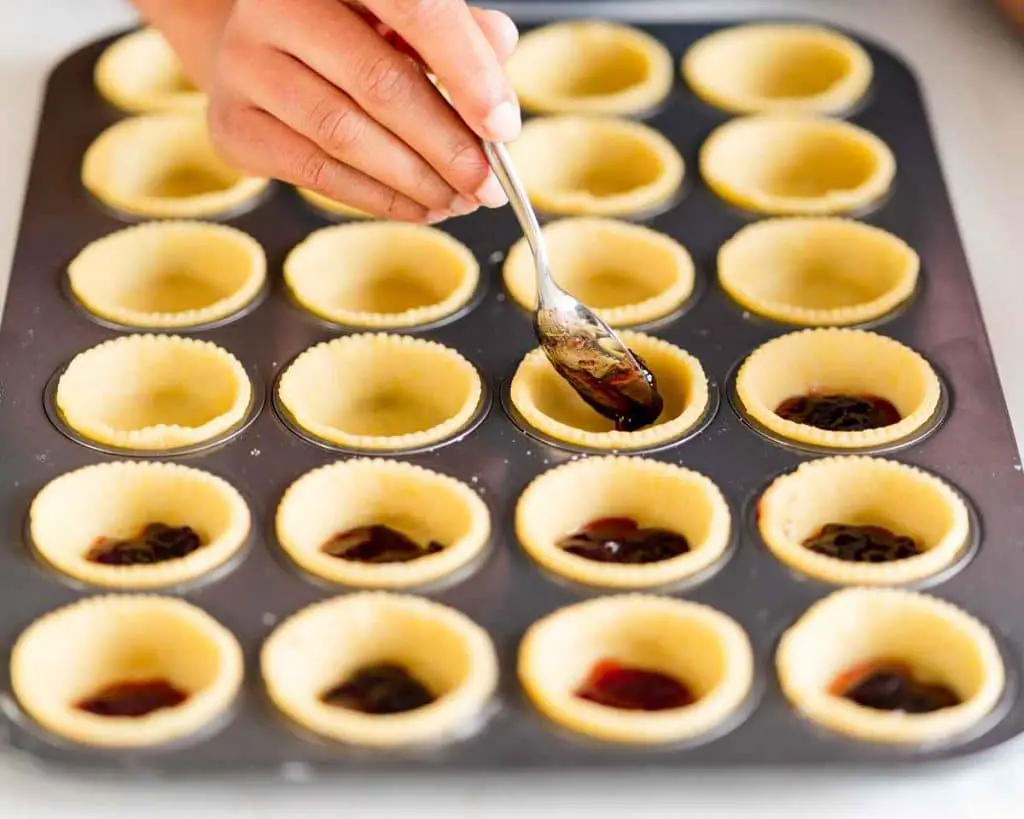
Mini jam tarts: These adorable little jam tarts are too cute to resist! Beautiful buttery shortcrust pastry filled with your favourite jam, or even a selection of different jams. Perfect little mouthfuls of joy!
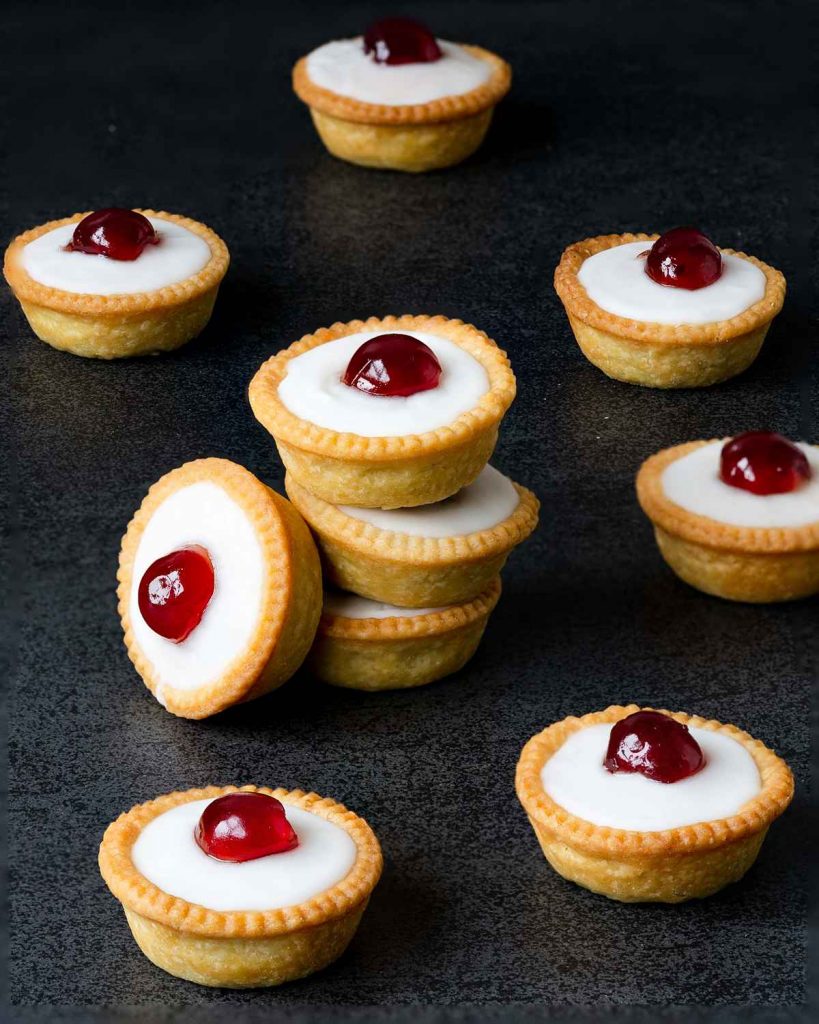
Mini cherry bakewell tarts: This cherry bakewell tartlets recipe is the only one you will ever need for perfect mini cherry bakewell tarts. Beautiful buttery pastry, rich cherry jam, scrumptious almond frangipane. All topped with a layer of icing and, of course, the obligatory cherry on top!
Happy baking, my friends! x
Recommended equipment I use to make shortcrust pastry *
| Food processor | Pastry cutter/blender |
| Digital kitchen scales | Rolling pin |
Sweet Shortcrust Pastry
10
minutes15
minutes1
hour1
hour30
minutesBasic sweet shortcrust pastry, complete with tips. Perfect every time!
Keep the screen of your device on
Ingredients
250 g (1½ cups + 1 tbsp) plain (all-purpose) flour
60 g (¼ cup + 3 tbsp) icing (powdered) sugar
125 g (½ cup + 1 tbsp) unsalted butter, cold and cubed
2 large eggs, yolks only
2-4 tbsp ice (ie very very cold!) water
Directions
- Make the sweet shortcrust pastry dough
- Tip the flour and sugar into the food processor or mixing bowl and pulse/mix to combine. Add in the butter and pulse/blend in until the mixture resembles fine breadcrumbs. If using your hands, remember to use only your fingertips. Using the palms when rubbing the mixture together will warm it up too much.
TIP: Try freezing the butter, then grating it instead of cutting into cubes.
TIP: If using your hands, make sure your hands are cold before rubbing the mixture together. I run my hands under cold water and dry before rubbing the mixture to make them extra cool.
TIP: This step can be done with a knife or a pastry blender too. - Once the butter has been incorporated, tip in the egg yolks and pulse or mix until just combined. Mix in the ice water 1 tbsp at a time until the dough starts to come together in clumps. Do not over mix beyond this clumping stage.
TIP: To test if the dough has enough moisture, squeeze a little of it between your fingers. It should stick together without crumbling apart if it has enough water in it. - Tip the mixture out onto a clean work surface (no need to dust with extra flour). It will still have a few crumbly bits, and it’s all good. Gently push the dough together with your hands just until it comes together in a smooth dough. Split in two and shape lightly into two discs. Wrap tightly in cling film/plastic wrap and pop in the fridge to chill for at least 30 minutes before using.
TIP: Shaping the dough into discs before chilling makes it easier to roll out into a circle later. Shape into a rectangle if using a rectangular tin.
TIP: You can freeze it at this stage. Just wrap the dough tightly in three layers: clingfilm, foil and clingfilm again, then pop in your freezer. Defrost overnight in the fridge then continue from this step. - Lining the tart tin
- Once the pastry has chilled, remove it from the fridge and set out for a few minutes. Lightly dust the work top with some flour, and do the same for the rolling pin. Place the chilled dough on the flour and roll it out. If using a larger tart tin, place the tin on the rolled out dough to check the size. The pastry should be wide enough to cover the base and have enough extra to hang over the edge.
TIP: Make sure to roll the dough out to an even thickness. If unevenly rolled, the pastry will not bake evenly and you will have some raw patches of dough. - Lift the pastry and place it in the tin. Place the rolling pin in the middle of the pastry circle and fold one side of the pastry over the rolling pin. Then, carefully, lift the rolling pin and slide the tart tin under before unfolding the dough.
TIP: There is no need to grease or line the pastry tin. - Lift the edges of the dough and allow the weight of the pastry to lower it into the tin. Gently press the dough into the corners of the tin all around, allowing the excess to hang over the edges.
TIP: Do not pull or stretch the dough as you do this step. Instead allow the dough to fall in place then simply press it in place. Remember, gluten is like elastic! Stretching it to line the tin, will make it spring back when baking and cause shrinkage to the pastry shell. - Trim the excess pastry off from around the tin. This can be done using a sharp knife and running it along the top edge of the tin. Or you could use a rolling pin and roll firmly across the top of the tin.
TIP: You can reuse the pastry trimmings to make smaller tartlet sized shells too! Just squeeze together and reroll, repeating the above steps. - Place the dough lined tart tin in the fridge to chill for at least an hour before baking. Chilling the dough again allows the gluten to relax after being handled, reducing the chance of shrinkage.
TIP: If you are short on time, you can pop it in the freezer for about 20 minutes instead. - To bake the pastry
- First, prick the chilled pastry base all over with a fork.
- Scrunch up a piece of parchment paper that is large enough to completely cover the base, sides and leave you with an overhang of paper around the tin. Gently place over the pastry, easing into the inner edges.
TIP: Scrunching the paper allows it to mould better to the pastry case, reaching the inner edges and corners of the tart. - Fill the paper with the weights, arranging so the weights sit against the sides of the pastry. Ensure it is filled to the brim, so the pastry side is supported by the weights too.
- Bake in a preheated oven at 180C/350F for 10 minutes until the pastry is firm.
TIP: It will still look a little raw. This step is to ‘set’ the pastry so it hold sits shape without the support of the paper and weights. - Remove the tin from the oven. Using the overhang, carefully lift the paper and weights inside out of the pastry case and set aside to cool. Return the pastry to the oven.
- If the filling needs baking too: bake the pastry case for 10-12 more minutes until the pastry is just starting to turn brown. It will feel slightly soft when pressed. Remove from the oven and cool for a couple of minutes. Add in the tart filling and bake for the amount of time recommended by the recipe.
- If the filling does not need baking: bake the pastry case for a further 15-20 minutes. It will be crisp and golden brown. Allow the pastry crust to cool completely before adding in the no-bake filling for your tart.
Notes
- Prepare: Make sure the tools and ingredients are prepared before you start mixing. This is important when making this sweet short pastry recipe, as you want to keep it as cold as possible.
- Weigh: Measuring out the ingredients using a scale rather than cups will result in a far better pastry as the quantities of ingredients will be accurate.
- Ice cold: Make sure you use cold butter and ice water when making pastry. Remember it is important to keep the pastry as cold as possible throughout the process of bringing it together.
- Less is more: Add water only as required when making any pastry. The water is only to bring the dough together, purely for moisture in the pastry.
- Hands off: Remember to handle the dough as little as possible. Whether mixing, rolling and lining the tin, pastry dough does not need to be worked a lot.
- Work quickly: Linking in with the above points, this is important. If the dough gets too warm when being handled, the baked pastry will be greasy and heavy not light, flakey and crispy.
- Rest: The pastry need to be chilled, especially after it has been mixed, rolled and pressed into the tin. This allows the gluten in the flour to relax and helps cause less shrinking later when the pastry is baked. Hence popping it in the fridge/freezer for a second chill before baking is really important.
- Bake: Baking the pastry before adding a wet filling allows the pastry to cook. It also prevents a soggy bottom and soaking wet pastry. I always blind bake and then bake my pastry before adding a filling that needs baking, such as a custard. The pastry will also need baking before filling if the filling sets without baking, such as for a chocolate ganache. I bake my pastry and filling when making more firm filled bakes, such as mince pies or jam tarts.
- Top it up: Fill the pastry to the top with baking bean, dried rice or lentils when blind baking. This will help reduce shrinkage around the pastry walls as the beans help the pastry hold its shape whilst baking.
Always good to turn to this recipe . Foolproof!
Happy to be able to help! What did you use this pastry for?
I have a fear of making pastry dough because of how easy it is to overwork it. I’ve used this recipe twice now. Once to make the cherry bakewells and then to make a batch of poptarts. It was easy to put together both times. The instructions are clear. The dough came out very easy to roll out and work with. It tasted great and the texture was nice and flaky. My confidence definitely got a boost.