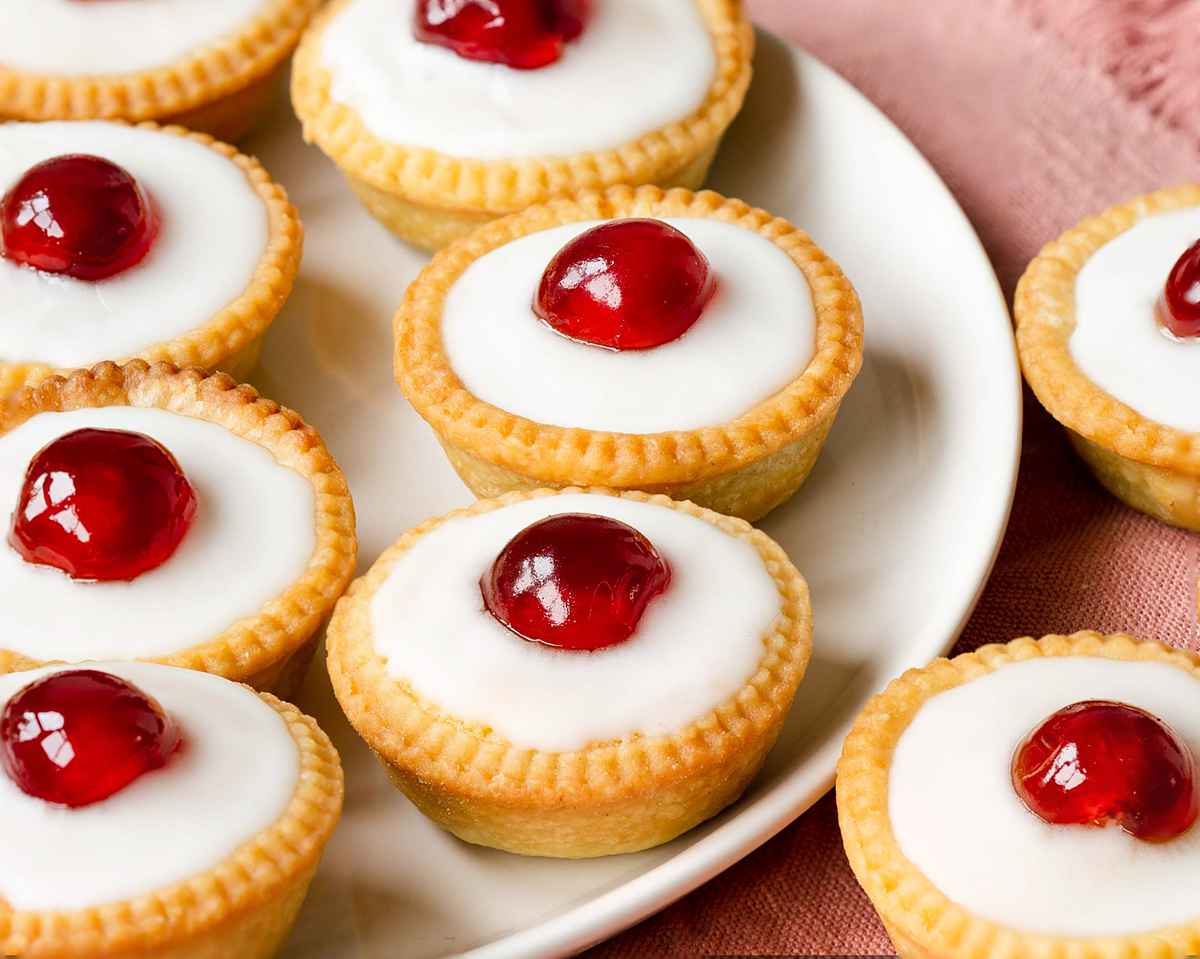
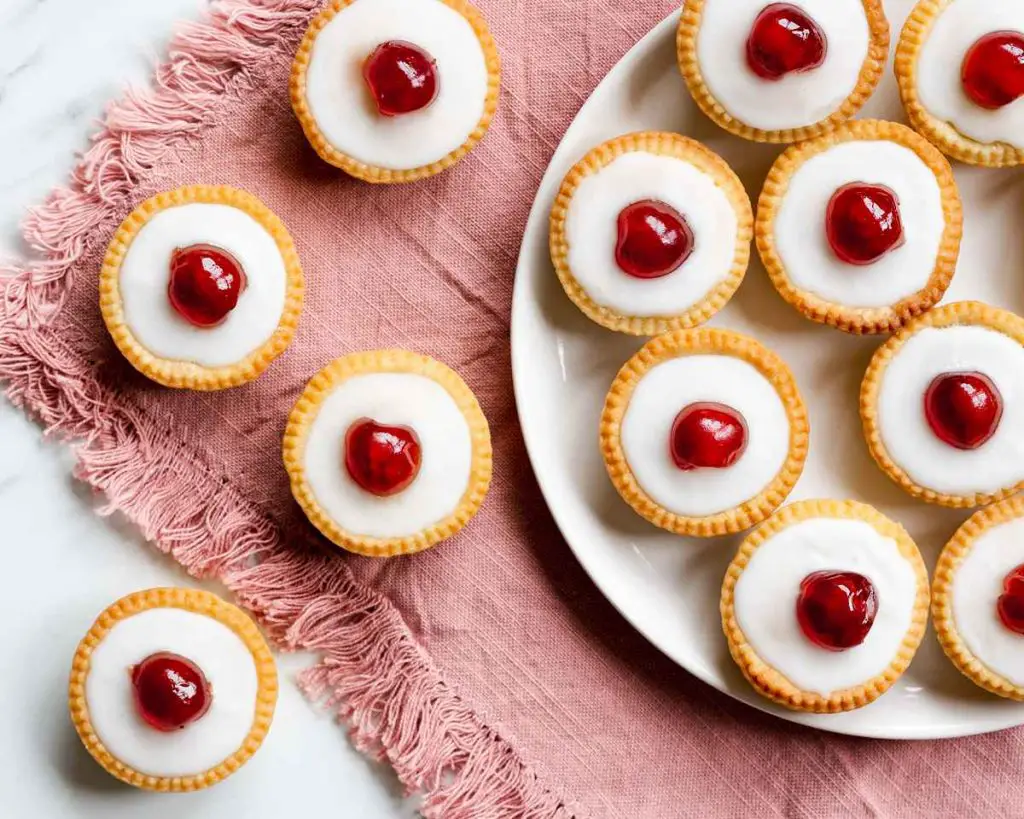
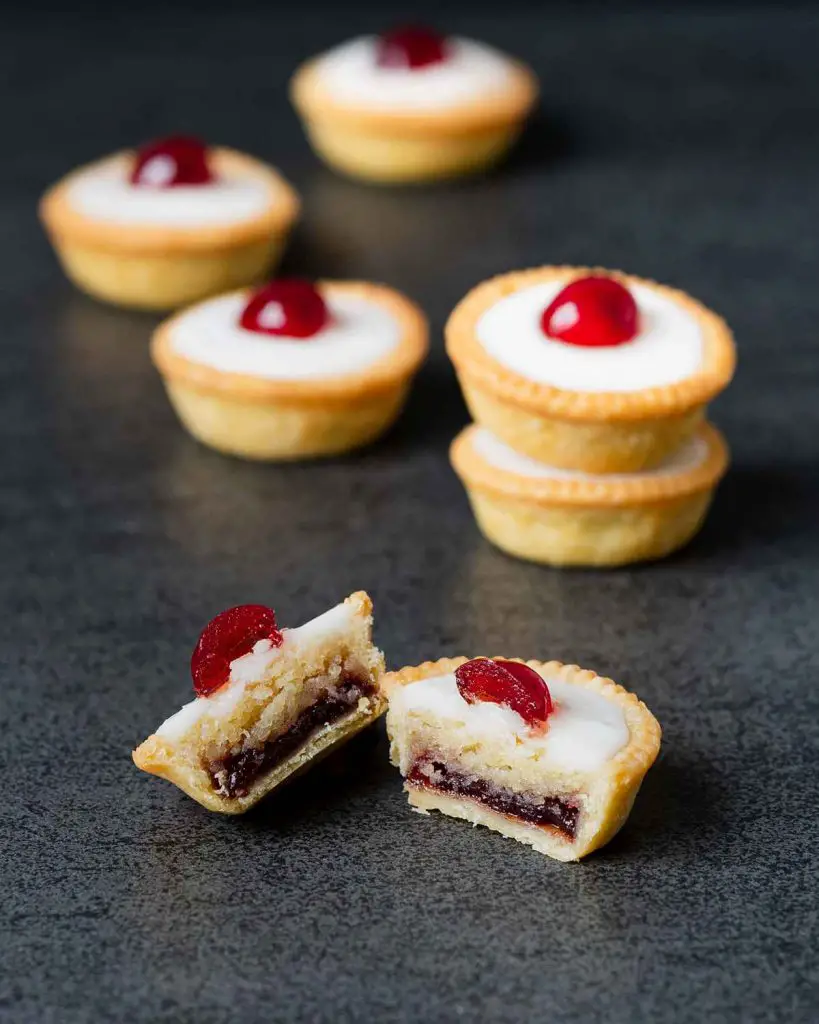
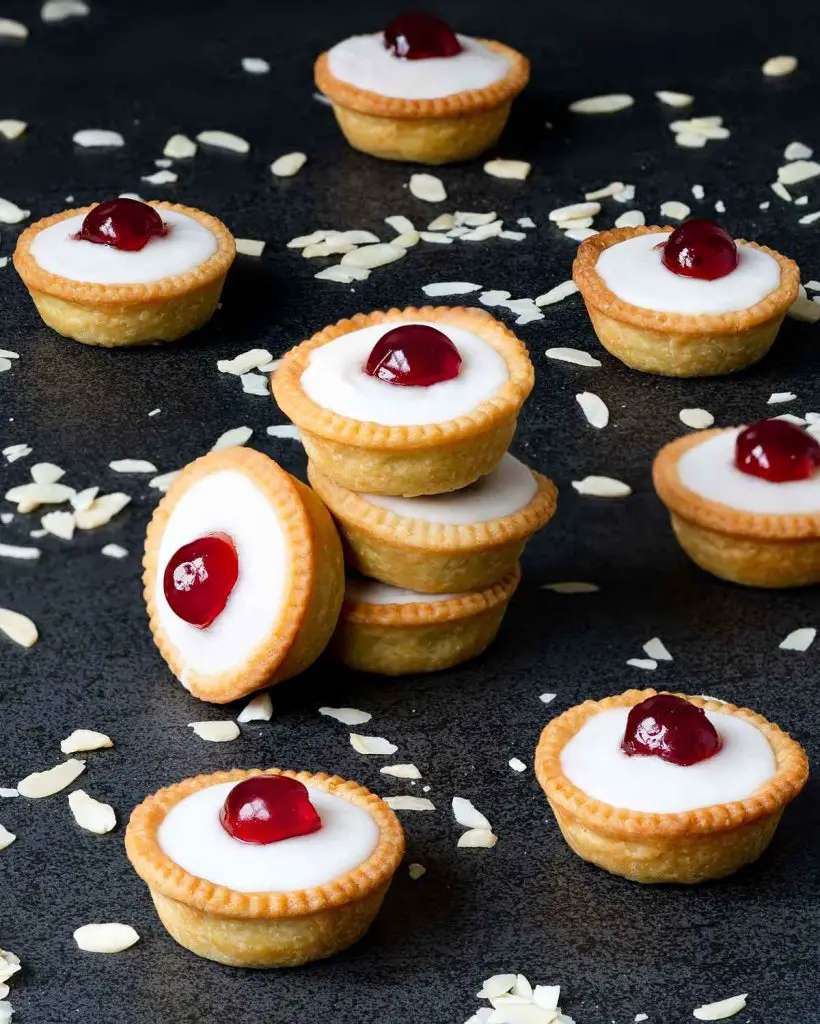
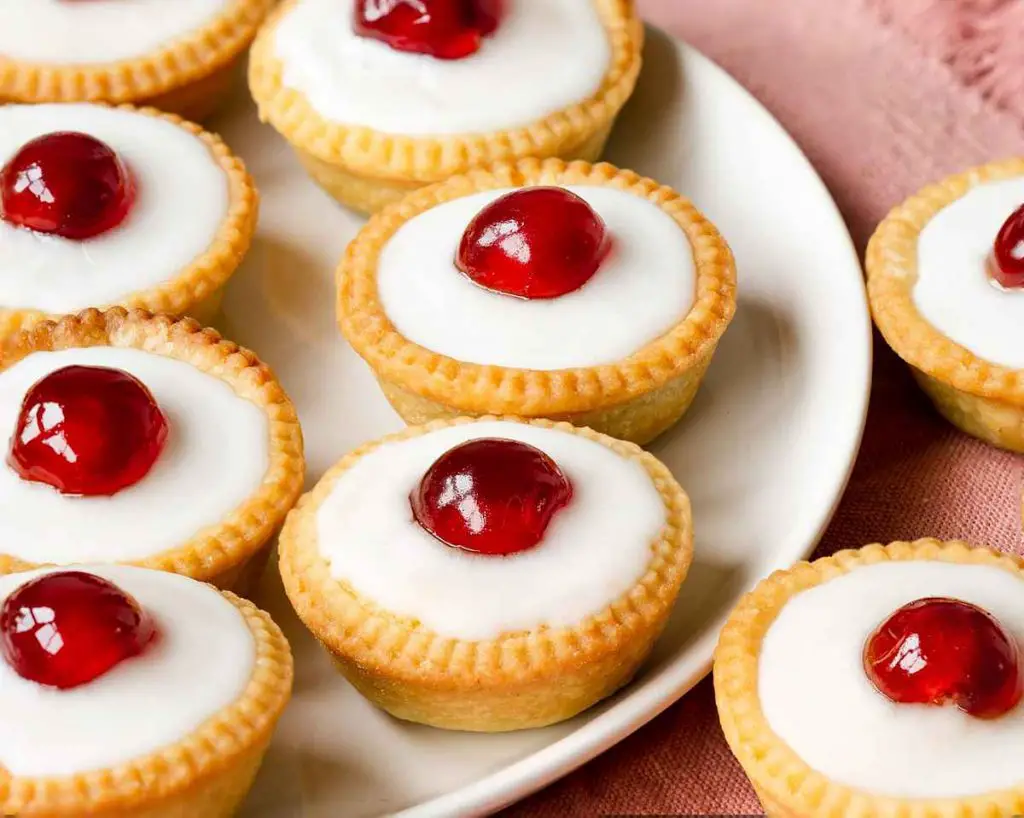
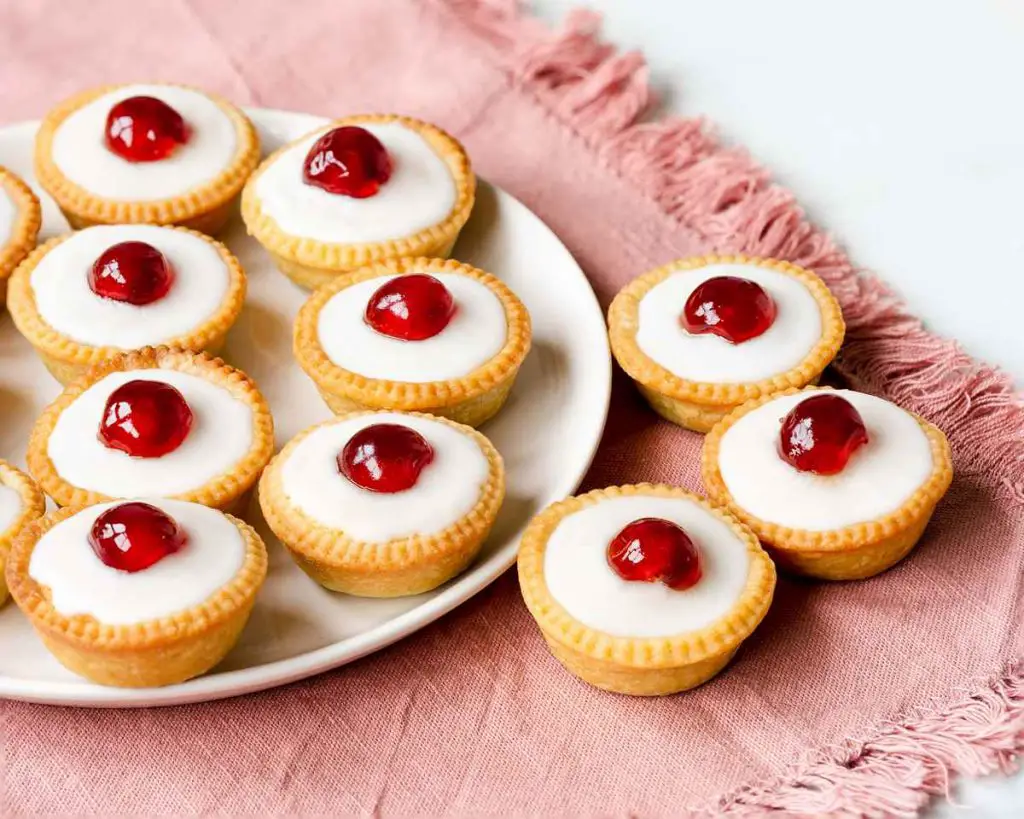
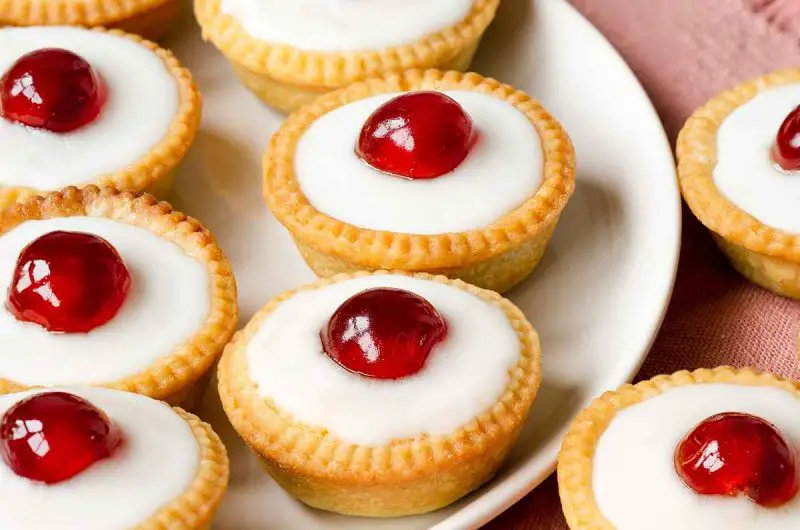
This cherry bakewell tartlets recipe is the only one you will ever need for the perfect mini cherry bakewell tarts. Beautiful buttery pastry, rich cherry jam, scrumptious almond frangipane. All topped with a layer of icing and, of course, the obligatory cherry on top!
Where are cherry bakewells from?
They are very much a British flavour combination. The flavour combination originated in a little town in the north of the UK called Bakewell, which is what it is named after. There are now many variations of how these flavours are put together, from tarts and cakes to puddings and even ice cream. However you choose to enjoy the flavours, combination of sweet cherry and delicious almond is certainly a popular one!
If you too are a bakewell fan, do check out the other recipes on my blog at the end of this post to see what else you can make to include these flavours.
What ingredients do I need to make this cherry bakewell tartlets recipe?
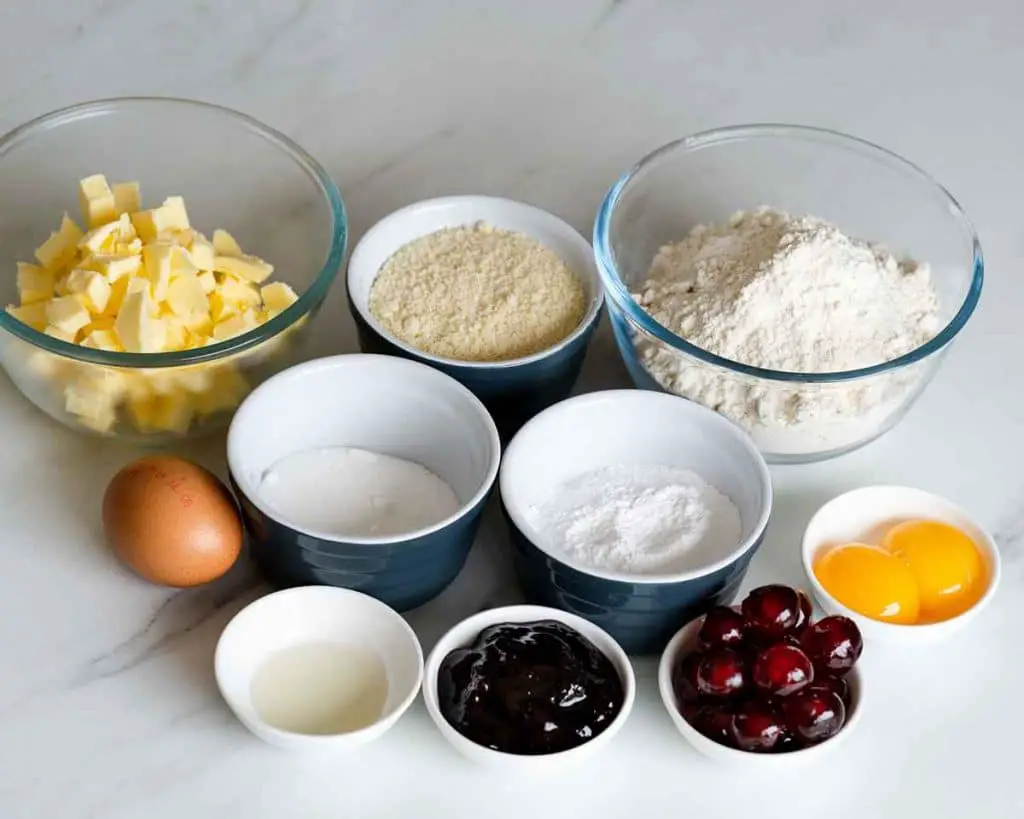
- Flour: I use plain flour for my pastry this tart as it I do not want any rise in it.
- Icing/powdered sugar: for sweetness in your pastry and to make your icing.
- Butter: I always use unsalted butter in my baking, as it allows me full control of the saltiness in the bake. When making these tarts, use cold butter to make the pastry and room temperature for the frangipane.
- Eggs: yolks in the pastry add richness and flavour, and in the frangipane it helps with the structure of it.
- Ice cold water: I use cold water when making your pastry as you want to keep it as cold as possible throughout the making process.
- Caster sugar: for sweetness in your frangipane.
- Ground almonds: gives your frangipane texture and flavour. Yum!
- Almond extract: a little additional almond flavour is heavenly!
- Cherry jam/conserve: because cherry bakewell!
- Milk: used to create the icing for the top of your bakewell tartlets.
- Glacé cherries: halved and placed on top for decoration.
What equipment do I need to make cherry bakewell tartlets?
- Food processor*: a super quick way to make your pastry. You can use the pastry blender detailed below if you prefer too.
- Pastry blender*: an alternative to using a food processor or your fingers. A pastry blender will allow you to cut your butter into your flour without warming it up too much.
- Digital kitchen scales*: I would strongly encourage you to weigh out your ingredients when baking rather than measuring by cups. However, I do provide volume (cup) measurements too if this is your preference when baking.
- Measuring spoons*: for measuring smaller quantites such as tablespoons (tbsp) and teaspoons (tsp). A set of dedicated measuring spoons is more accurate than using your everyday eating spoons. Definitely worth the small investment!
- Sieve*: to remove any lumps from your dry ingredients so everything mixes together more easily and smoothly.
- Rolling pin*: to roll out your pastry. You can use a glass or even a wine bottle if you do not have a rolling pin to hand!
- Pastry cutters*: for cutting out your pastry before lining your tin. Here too, you can use a glass if you do not have a set of cutters, but these are the ones I use.
- Mini tart tin*: to make and bake your mini cherry bakewell tartlets in.
- Mixing bowl*: for making your frangipane in.
- Handheld electric mixer*: helps you get a lovely smooth frangipane with ease.
- Piping bag*: a useful tool to help you get your frangipane into your mini tartlet shells neatly.
- Small mixing bowl*: just a little one needed to mix your icing in.
- Whisk*: allows you to mix together a lovely smooth icing for the top of your tarts.
How to make cherry bakewells
Whilst there are a few steps in making these bakewell tarts, they are all really simple and I share lots of tips with you along the way. For detailed instructions and tips with making pastry, please do have a look at my sweet shortcrust pastry post.
For the pastry
Step 1: First, make your pastry. I like to use a food processor, more for ease, but doing it by hand or with a pastry cutter works well too. Mix together the flour and sugar, then add in the cubes of butter and mix, cut or rub it in until your mixture resembles fine breadcrumbs. Tip in the egg yolks and mix again until just combined. Add in your ice water 1 tbsp at a time until your shortcrust pastry dough comes together in clumps. Tip out onto your clean work surface and gather together all the dough, squeezing and kneading as little as possible to bring it together. Divide your dough in two, then flatten each part into thick discs and wrap both separately in cling film. Pop the dough in the fridge for at least 30 minutes to rest. If you wish, you can freeze your dough at this point for another day.
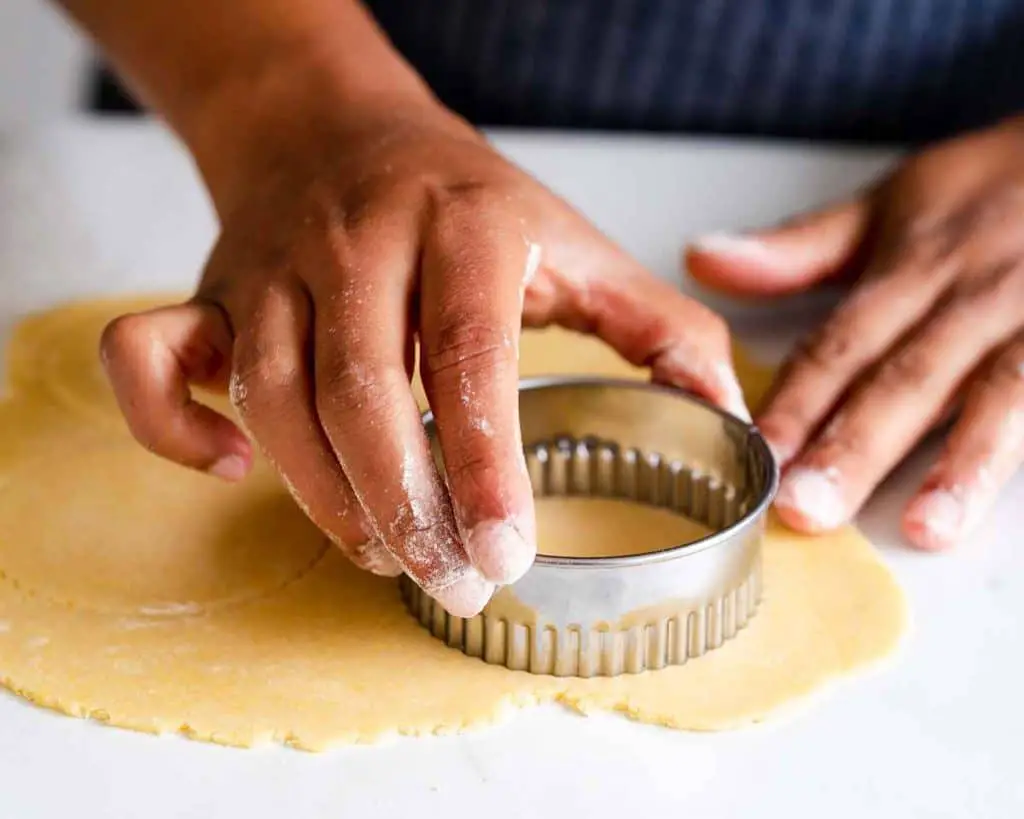
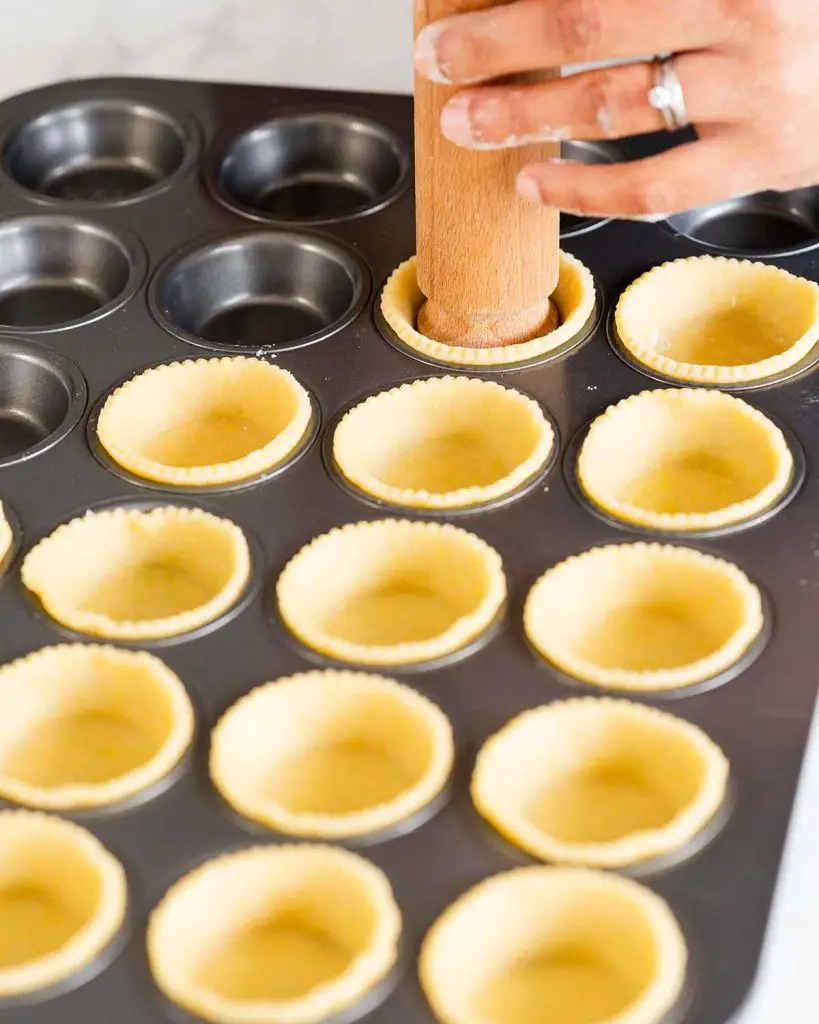
Step 2: Once your dough has chilled, preheat your oven to 180C/350F. Dust your work surface with a little flour and roll out one of your pastry discs until about 3mm thick. Stamp out rounds of dough and ease them into your mini tart tin. I use the end of my rolling pin to help push them in evenly, but using your fingers gently works well too. Once you have filled your tray, pop it into the fridge to chill again whilst you prepare the fillings.
For the frangipane
Step 1: Whilst your dough is getting its second chill, make your frangipane. In your mixing bowl, soften your butter, then add in sugar, ground almonds, egg and almond essence. Beat all the ingredients together until completely combined. Your mixture will be thick. Transfer to a small piping bag, if using, then set it aside.
Step 2: In a small separate bowl, place some of your jam/conserve and stir to loosen, adding a teaspoon of water if needed. This is an optional step, but can make it a little easier to spread your jam into your pastry cases if needed.
To bring it together
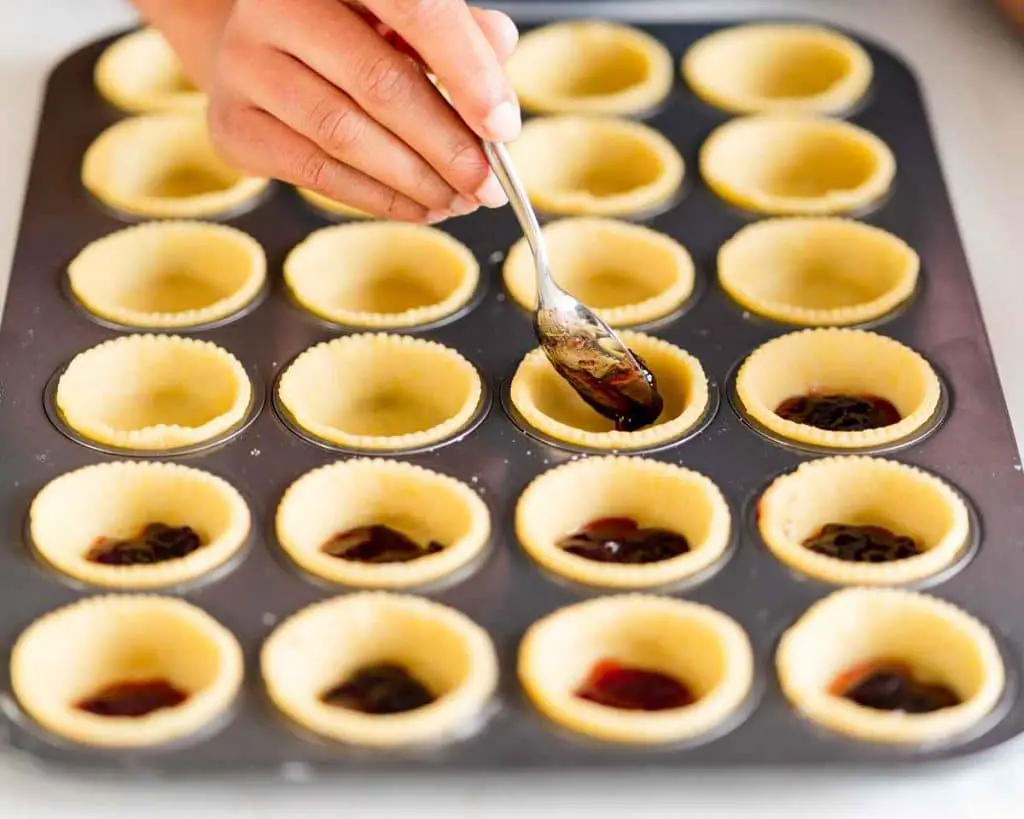
Step 1: Time to assemble! Remove your tin out of the fridge. Place a small amount of jam/conserve at the bottom of each mini tart case. You only need enough for a layer of jam to cover the bottom of the pastry shell, no need to fill too much more. Pipe on the frangipane, filling it no more than ⅔ full. Using a small knife, gently ease the frangipane all the way to the edge of the pastry case, sealing the jam at the bottom. This is an important detail to avoid your jam bubbling up and bursting through the frangipane, making for messy tartlets.
Step 2: Bake your cherry bakewell tarts for 10-15 minutes (mine bake for nearly 15 minutes) until your pastry is golden and your filling is only JUST a little wobbly. Remove from the oven and allow to cool for a few minutes in the tin, then transfer to a wire rack to cool completely.
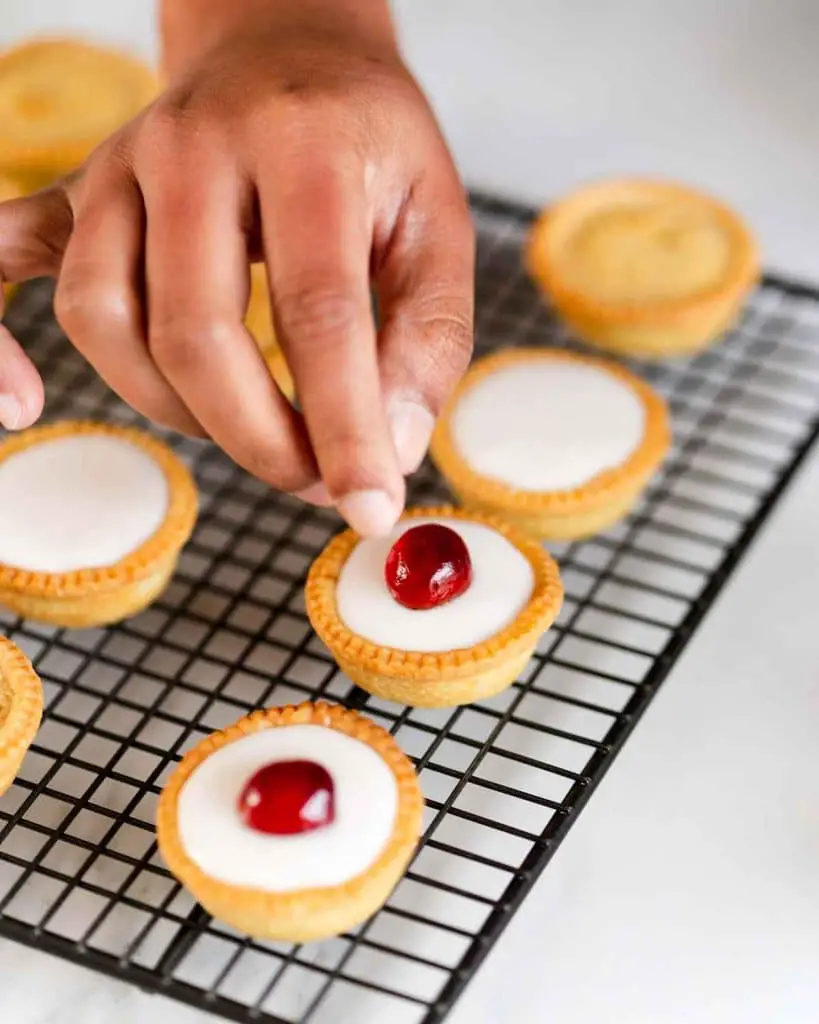
Step 3: When your tartlets are completely cool, time for the finishing touches. Mix together your icing sugar with as much milk as needed to make a thick icing consistency. Spread a layer of this icing over the top of each cool mini bakewell tart, then gently top each one with half a glazé cherry. Enjoy!
Frequently asked questions about pastry
Pastry is one of the bakes that has a few factors that could go wrong, and bit of information worth knowing. I have tried to answer as many commonly asked questions as I can, but please do use the comments below if you have any I have not answered for you here.
Why is my shortcrust pastry fragile and crumbly?
This is likely because the dough is too dry and needs a little more liquid adding to it. Break it up into crumbs again and gently mix through enough liquid until your dough naturally forms clumps before bringing back together, chilling and then rolling again.
Why is my shortcrust pastry tough?
If your pastry is tough or gummy, it is likely that too much gluten has developed. The most likely cause of this is overworking (over mixing or over kneading) your dough.
Why my shortcrust pastry sticking to my work surface/rolling pin?
The moisture in your dough makes it stick to surfaces. A very simple solution is to lightly dust your work surface and rolling pin with a little extra flour (not too much, you do not want to dry out your pastry!) and try rolling it out again. As you roll, keep turning your pastry through 90º so it doesn’t stick to your surface. If you find it is not rolling out too easily, gently lift the pastry over your rolling pin and lightly dust the surface under it with flour before rolling again. This should allow you to get beautiful thin pastry!
Do I need to blind bake my pastry?
In this recipe for cherry bakewell tarts, you do not need to blind bake your pastry.
How do I know when my pastry is baked?
Your pastry is baked when it is pale golden in colour and slightly puffy looking. If it looks a little doughy or wet, leave it to bake for a little longer.
Do cherry bakewells tartlets contain nuts?
Cherry bakewell tarts do use nuts in the frangipane layer, so yes they do contain nuts.
Are cherry bakewell tarts suitable for vegetarians?
Cherry bakewell tartlets are suitable for vegetarians. However, they do contain eggs so would not be suitable for those avoiding eggs as part of a vegetarian diet.
How long does bakewell tart last? How do I store cherry bakewell tarts?
These tarts should be stored in an airtight container and will be fine kept at room temperature for 2-3 days.
Can I freeze bakewell tartlets?
Yes absolutely! You can freeze just the pastry or the tart once made. Read on for both ways.
How to freeze pastry
Once you have made your pastry, wrap it tightly in cling film and freeze for up to a month. Thaw in the refrigerator overnight before using.
How to freeze these cherry bakewell tartlets
Freeze your bakewell tartlets before you put the icing top and cherry on them. First, allow them to cool completely, then wrap them individually securely in cling film and store in an airtight container. They can be frozen for up to two months. To thaw, remove from the freezer and unwrap each tart. Leave to come to room temperature on a cooling rack once unwrapped before enjoying.

Can I make these cherry bakewell tarts gluten and dairy free?
You can substitute the flour in the pastry for a gluten free flour, but will need to add an additional tsp of xanthan gum to your pastry. Butter and milk can be easily substituted in all the elements of this recipe for dairy free alternatives.
Additional top tips for making this cherry bakewell tarts recipe
- Make sure you have prepared your tools and ingredients before you start mixing. This is especially important when making your pastry, as you want to handle it as little as possible.
- Take time to read through this recipe so you are familiar with each step of the process. Do not skip details and instructions given as it could affect the results, especially with the pastry.
- Make sure you use cold butter and ice water when making your pastry. You want to keep your pastry as cold as possible throughout the process of making it.
- Keep your pastry as cold as possible, even after you have rolled it and lined your tin. This helps stop it from misshaping and contracting when baking. Hence popping it back in your fridge whilst making the filling is really important.
- Once you have put the frangipane layer over the jam layer, use a knife to gently level it and ease it to the edges of the pastry case. Sealing the jam is important so it does not bubble over and make a mess of your adorable little bakewell tartlets.
- When mixing your icing together, add your liquid in just a few drops at a time. Stir and check consistency before you add any more to ensure it is not too runny.
Troubleshooting
If you have any other questions about this cherry bakewell recipe, please use the comments below to ask away and I will do my best to help! And if you made and enjoyed this, please do let me know!
And if you do make this recipe for cherry bakewell tartlets, please leave a rating and review below. I would love to know how you enjoy making it and following along, plus it really helps others looking for a bakewell recipe too! You could even post a picture on Instagram and tag me when you share it with the world, you know I love seeing your bakes!
More bakewell recipes for you to enjoy
Please do check out these other cherry bakewell recipes on my blog too:
Cherry bakewell blondies: beautiful soft squidgy and chewy blondies made with yummy ground almonds and then swirled with a decadent rich cherry compote. Blondie AND Bakewell together = heaven!
Cherry bakewell flapjacks: chewy, almondy and with a beautiful rich cherry jam, these cherry bakewell flapjacks are pure comfort food. Easy to make and totally delicious, these little wonders are never around long!
And that’s all from me for today! Hope you enjoy making these as much as I enjoy sharing them with you. Happy baking, my friends! x
Recommended equipment I used *
| Food processor | Pastry cutter |
| Digital kitchen scales | Measuring spoons |
| Sieve | Rolling pin |
| Pastry cutters | Mini tart tin |
| Mixing bowl/small mixing bowl | Handheld electric mixer |
| Piping bag | Whisk |
Mini Cherry Bakewell Tarts
24
servings45
minutes15
minutes122
kcal30
minutes1
hour30
minutesA British classic, but mini! Pastry, almond and cherry… what could be better?
Keep the screen of your device on
Ingredients
- For the pastry
250 g (1½ cups + 1 tbsp) plain (all-purpose) flour
60 g (¼ cup + 3 tbsp) icing (powdered) sugar
125 g (½ cup + 1 tbsp) unsalted butter, cold and cubed
2 large eggs, yolks only
2-4 tbsp ice (ie very very cold!) water
- For the frangipane
60 g (¼ cup) unsalted butter, at room temperature
60 g (¼ cup + 1 tbsp) caster sugar
60 g (½ cup + 2 tbsp) ground almonds
1 large egg
0.5 tsp almond extract
- To bring it together
cherry jam/conserve
100 g (½ cup + 3 tbsp) icing (powdered) sugar
3-5 tsp milk
12 glacé cherries, halved, to top
Directions
- For the pastry
- First, make your pastry. I like to use a food processor, more for ease, but doing it by hand or with a pastry cutter works well too. Mix together the flour and sugar, then add in the cubes of butter and mix, cut or rub it in until your mixture resembles fine breadcrumbs. Tip in the egg yolks and mix again until just combined. Add in your ice water 1 tbsp at a time until your shortcrust pastry dough comes together in clumps. Tip out onto your clean work surface and gather together all the dough, squeezing and kneading as little as possible to bring it together. Divide your dough in two, then flatten each part into thick discs and wrap both separately in cling film. Pop the dough in the fridge for at least 30 minutes to rest. If you wish, you can freeze your dough at this point for another day.
- Once your dough has chilled, preheat your oven to 180C/350F. Dust your work surface with a little flour and roll out one of your pastry discs until about 3mm thick. Stamp out rounds of dough and ease them into your mini tart tin. I use the end of my rolling pin to help push them in evenly, but using your fingers gently works well too. Once you have filled your tray, pop it into the fridge to chill again whilst you prepare the fillings.
- For the frangipane
- Whilst your dough is getting its second chill, make your frangipane. In your mixing bowl, soften your butter, then add in sugar, ground almonds, egg and almond essence. Beat all the ingredients together until completely combined. Your mixture will be thick. Transfer to a small piping bag, if using, then set it aside.
- In a small separate bowl, place some of your jam/conserve and stir to loosen, adding a teaspoon of water if needed. This is an optional step, but can make it a little easier to spread your jam into your pastry cases if needed.
- To bring it together
- Time to assemble! Remove your tin out of the fridge. Place a small amount of jam/conserve at the bottom of each mini tart case. You only need enough for a layer of jam to cover the bottom of the pastry shell, no need to fill too much more. Pipe on the frangipane, filling it no more than ⅔ full. Using a small knife, gently ease the frangipane all the way to the edge of the pastry case, sealing the jam at the bottom. This is an important detail to avoid your jam bubbling up and bursting through the frangipane, making for messy tartlets.
- Bake your cherry bakewell tarts for 10-15 minutes (mine bake for nearly 15 minutes) until your pastry is golden and your filling is only JUST a little wobbly. Remove from the oven and allow to cool for a few minutes in the tin, then transfer to a wire rack to cool completely.
- When your tartlets are completely cool, time for the finishing touches. Mix together your icing sugar with as much milk as needed to make a thick icing consistency. Spread a layer of this icing over the top of each cool mini bakewell tart, then gently top each one with half a glazé cherry. Enjoy!
Brill
Thank you! 😊
Delicious
Thank you! 😊
Great recipe thank yiu
Absolutely delicious! Thank you.
Thank you so much, I’m delighted you’ve enjoyed them! 😊
These look lovely. No need to partially bake the pastry first?
Thank you! No need to prebake, just ensure pastry is chilled thoroughly before baking. Enjoy!
Do I actually need almonds for this recipe can I get rid of ground almonds and almond extract or should I also substitute as I am allergic to nuts.
You can try substituting ground almonds for plain flour, though I’ve never tried this. However, Cherry Bakewell is a cherry and almond flavour combination, so it would no longer be true to its name. I cannot really suggest any alternative to the almonds in this recipe.
In wartime semolina was substituted for the almonds. I am sure if you search for ‘Bakewell Tart with semolina’ you will find some recipes. I have my grandmother’s recipe book and have often made Bakewell tart with semolina substituted for the ground almonds and almond extract added for flavour. I did this originally because almonds were so expensive but over the years has meant I can make nut-free versions for friends.
My reply should have said ‘artificial almond extract’ as of course, natural has almond oil in it. Purists state always to use natural but if you have an allergy then a little of the artificial is fine, rather than nothing. Just be careful not to add to much!
Can I get rid of almonds in this recipe or are they needed
Almonds are very much a part of the Bakewell flavour, so it’s hard to get rid of them really.
Can I also use my blender as a food processor
I don’t believe your blender would be able to make pastry in the same way as a food processor would. If you haven’t a food processor, you can just use your fingertips to rub or even a knife to cut your ingredients together. This way takes a little longer, and it’s important to keep your hands as cold as possible (you don’t want to melt the butter in, but cut it through finely), but it also is just fine too.
These cherry Bakewell tarts are DELICIOUS! I really recommend you making them😍😋
Thanks so much Jade for making my recipe and leaving a review! I’m so glad you enjoyed them so much!❤️
Super easy recipe to follow,used a different jam abs doubled the frangipane to make 12 cupcake size tartlets
Thanks so much Sam, so glad you enjoyed the recipe, and love your variations! 😊
Thank you so much for sharing this recipe Andrea! The Bakewell tarts came out delicious!!! I no longer live in the UK and cannot buy Bakewell tarts where I am in the U.S. I can’t believe I took this long to try and make it. Much better than store bought! Thank you again!!!
Hi Pinar, I’m so glad you found my recipe and I could help you enjoy something so missed! Thank you for a fabulous review too, really appreciate you taking time to come back and share your experience of my recipe! 🙂
Is there any reason that I couldn’t use this recipe to make one large bakewell tart?
I don’t see why not! I would change up the baking method however: I would recommend baking the pastry (blind bake first then remove beans and bake a further 5 minutes to dry out the pastry) before baking again with the added fillings. Once fillings are added too, you will need to adjust the baking time. A full sized Bakewell is on my list to share, you’ve got ahead of me! 🙂 Hope you enjoy it, however you make it!
Thank you. These were perfect! ♥️
Highly recommend
I made these with my son and he thought they were the best he’s ever tasted! They look so good too! Thank you
Hi Karen, so glad you and your son enjoyed them! Thanks so much for leaving a review of your final results! 🙂
Hi amazing recipe, going to try it for my husband work, he is British we live in sudamericana, why not a British desert for the Christmas party! Just one question, before putting the pastry in the tin should I put some butter or flour on in?????
Hello! No need to put anything in the non-stick tin at all. Once the pastry shell as baked it will just easily slip out! Hope you enjoy making these and Happy Christmas!
Thanks so much! For my first time doing the recipe it was a complete successful desserts and my husband friend’s love it!!!
First time making these and I made them *very* last-minute for a potluck. Super easy, not at all time-consuming, and the result was phenomenal! Thanks for such a delicious recipe 🙂
Hi Kenna! So glad you enjoyed these so much! Thank you for an amazing review! 🥰
Hi, this is my first time seeing your site and recipes. I’m so happy I discovered you and would like to follow you. I have a question, I already have mini tart shells in freezer all baked . I want to prepare the cherry tarts with the jam and frangipan but if my shells are pre baked, how do I bake the filling. I’m afraid if I put filling in shells, the tarts will be over baked and to brown. Next time I’ll know how to do it your way. I can’t wait to hear back from you. I’m looking forward to you recipes as well. I’m 87 years young and still enjoy baking and reading recipes in my spare time. Gook luck and thank you for giving my concern your immediate attention as I’m expecting to serve the tarts soon.
I loved it.
Hi, are the ground almonds the same as almond flour or do I process whole almonds in the food processor?
Ground almonds have a coarser texture than almond flour (which is made with blanched almonds and is ground finer). You can swap ground almonds for almond flour, but you will get a smoother texture for it, that’s all. Hope that helps! 🙂
Hi! This recipe looks amazing—I’m going to make it for my husband’s work Christmas party. He’s British, and we live in South America, so why not bring a British dessert to the celebration? Just one question—should I butter or flour the tin before adding the pastry?
I have never buttered or floured my tin and the pastry slips out easily every time! Hope you enjoy the bake and have a fabulous time at the party! 🙂