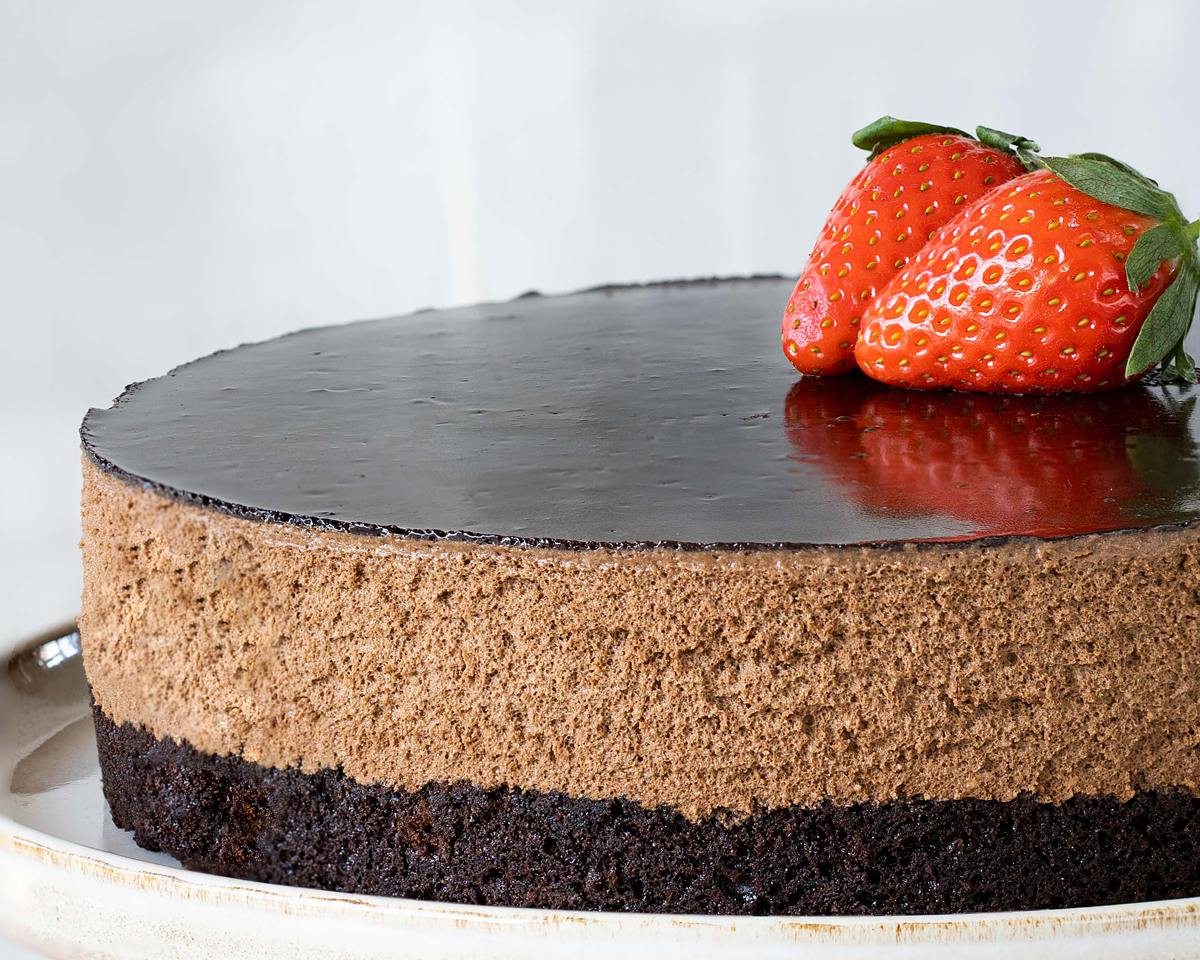
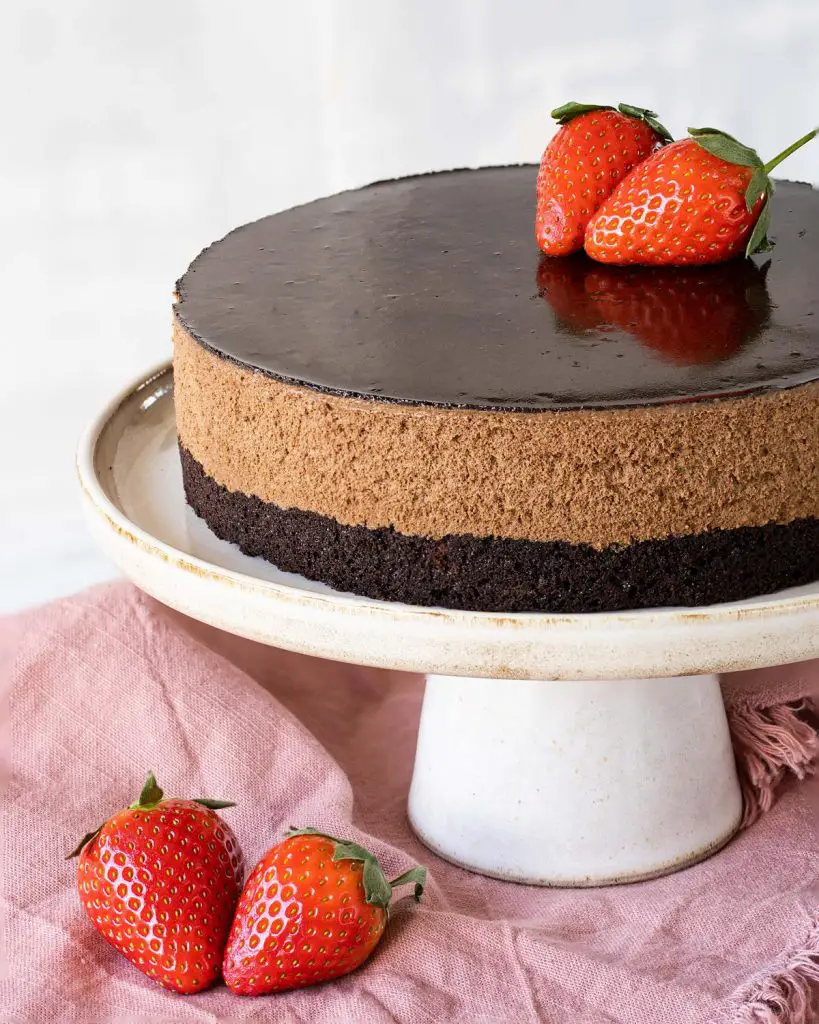
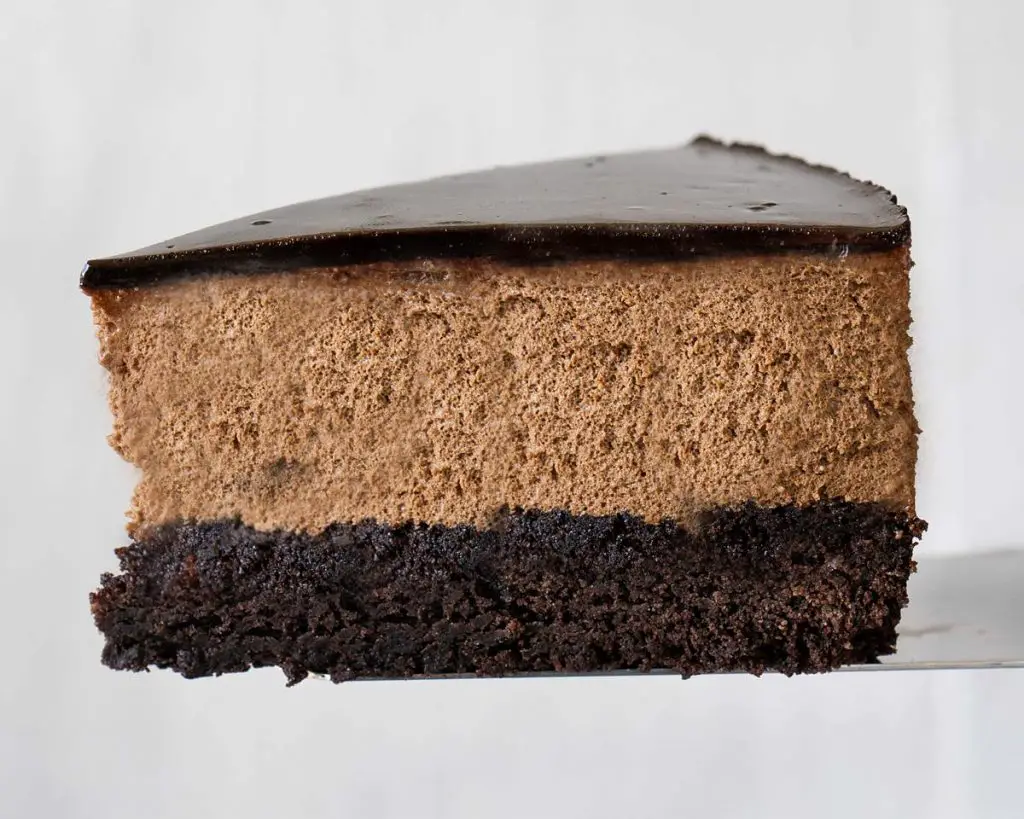
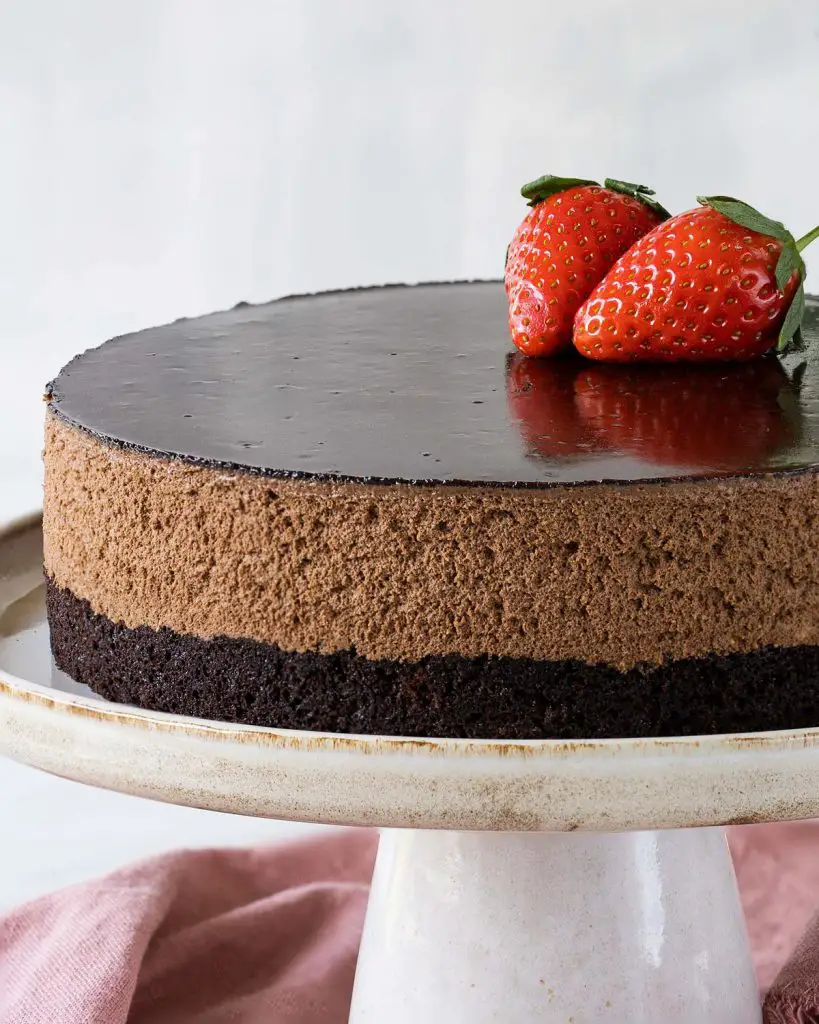
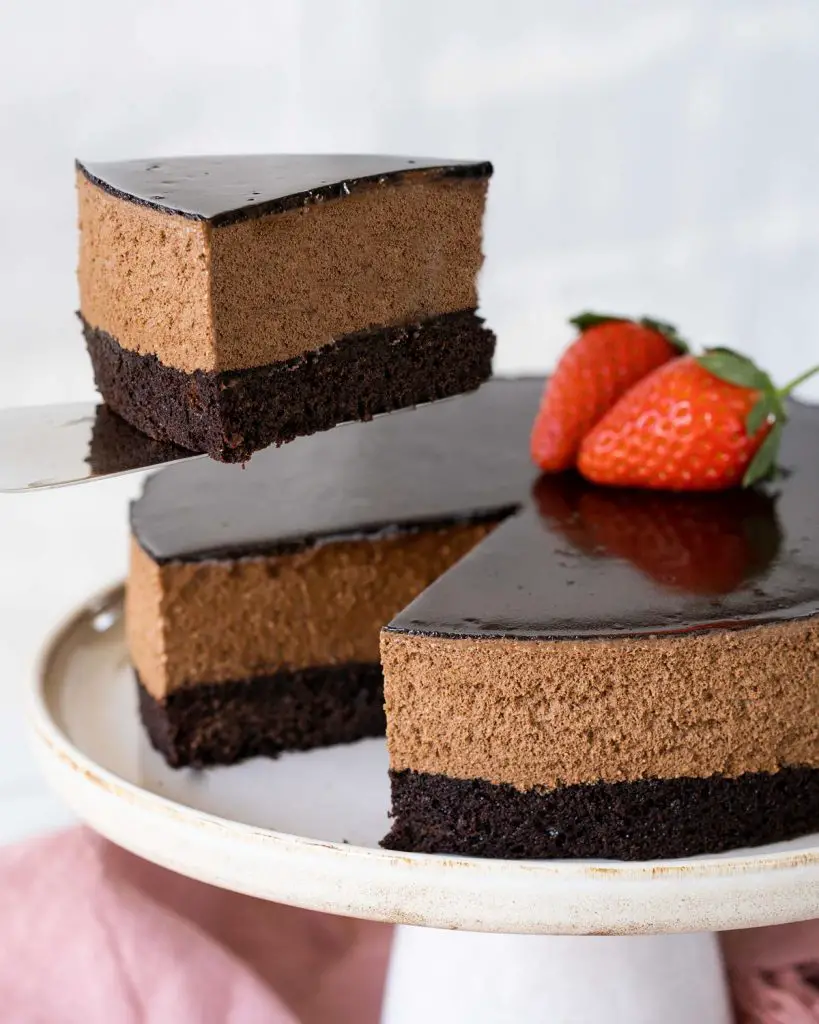
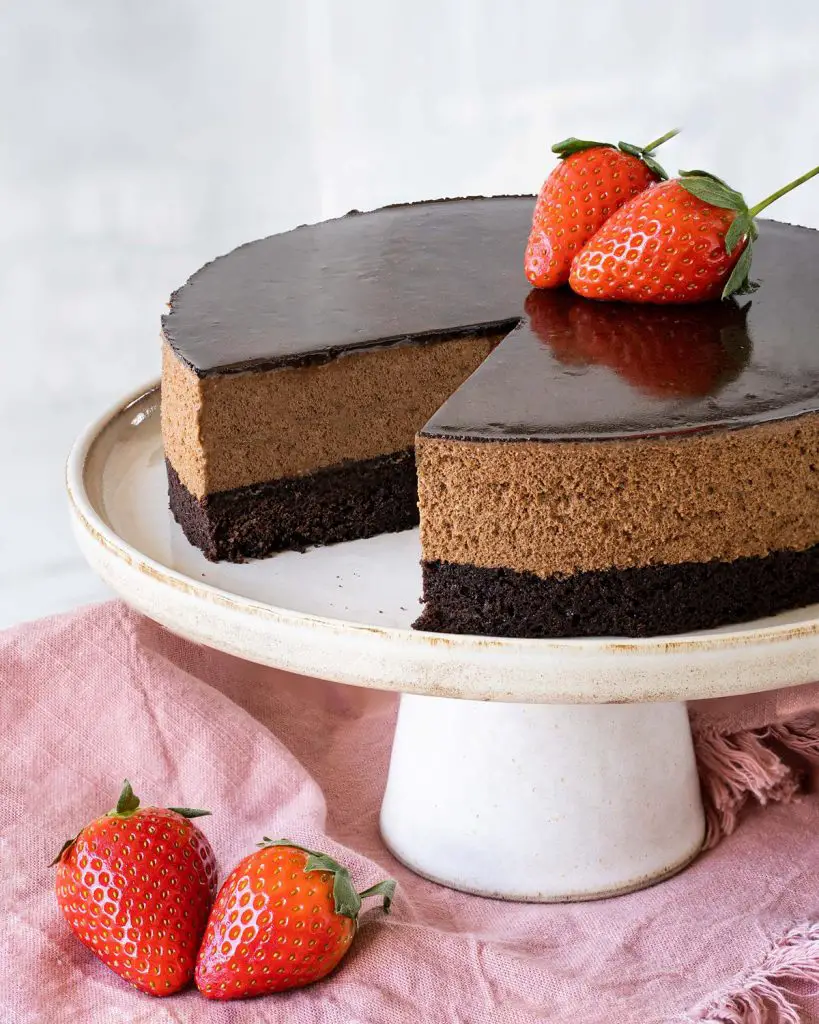
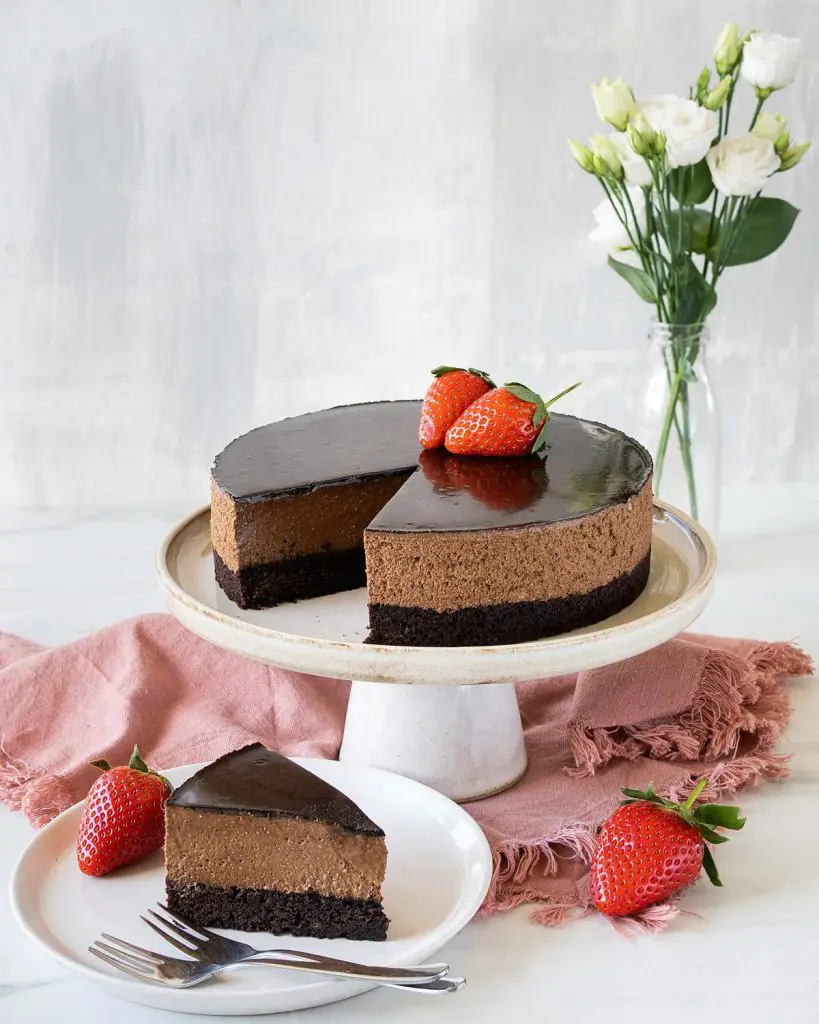
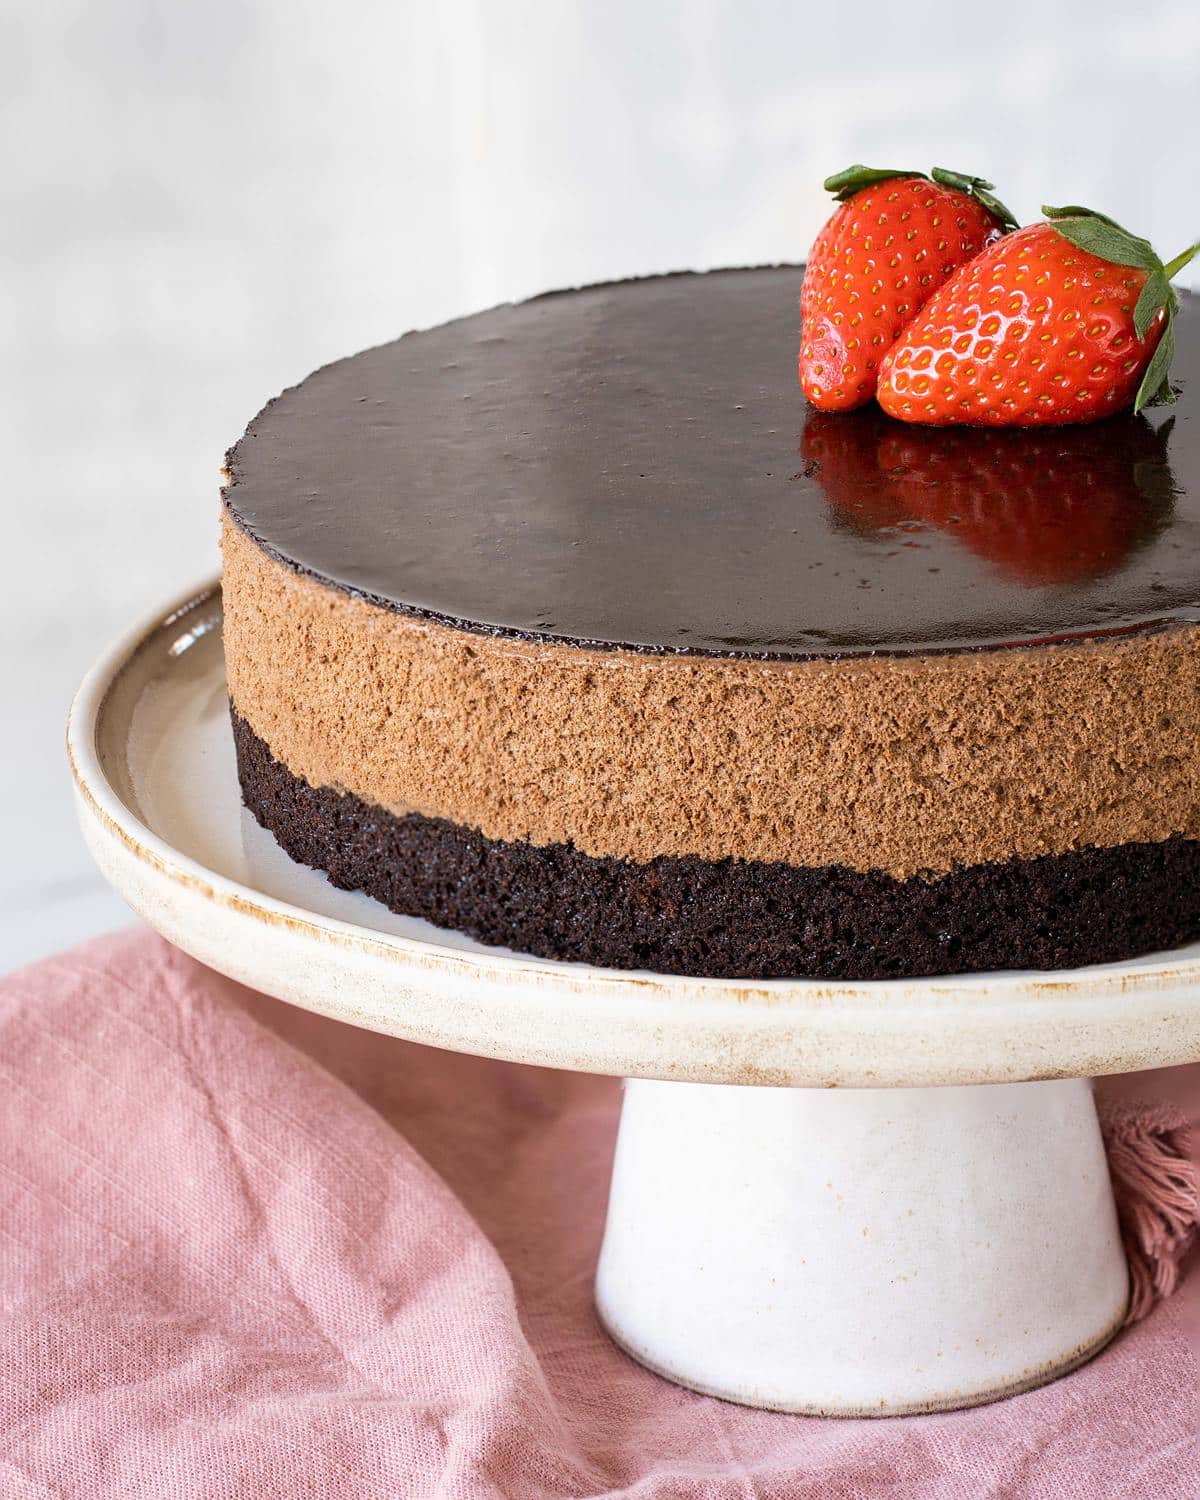
Squidgy chocolate brownie base. Light, melt in your mouth chocolate mousse. A beautiful shiny chocolate glaze. Put it all together, and you have the most amazing, decadent and exquisitely indulgent brownie mousse cake.
A special occasion
To me, chocolate is always special. Whether dark, milk or white, in cakes, cookies or any other form, chocolate is an everyday indulgence and one I love to eat and enjoy baking with. So when it comes to a special occasion, as much as I love other flavours, my thoughts always go to chocolate first.
Now, for a long time, I’ve wanted to share a mousse cake with you all. I love them, I think they’re a real indulgence and perfect for a special occasion. Sure, it takes a little more effort to make, but with Mother’s Day fast approaching, I thought an extra special creation was in order! And so, inspired by chocolate and plenty of indulgence, I present you with my Mother’s Day offering: my brownie mousse cake!
What ingredients do I need to make this brownie mousse cake?
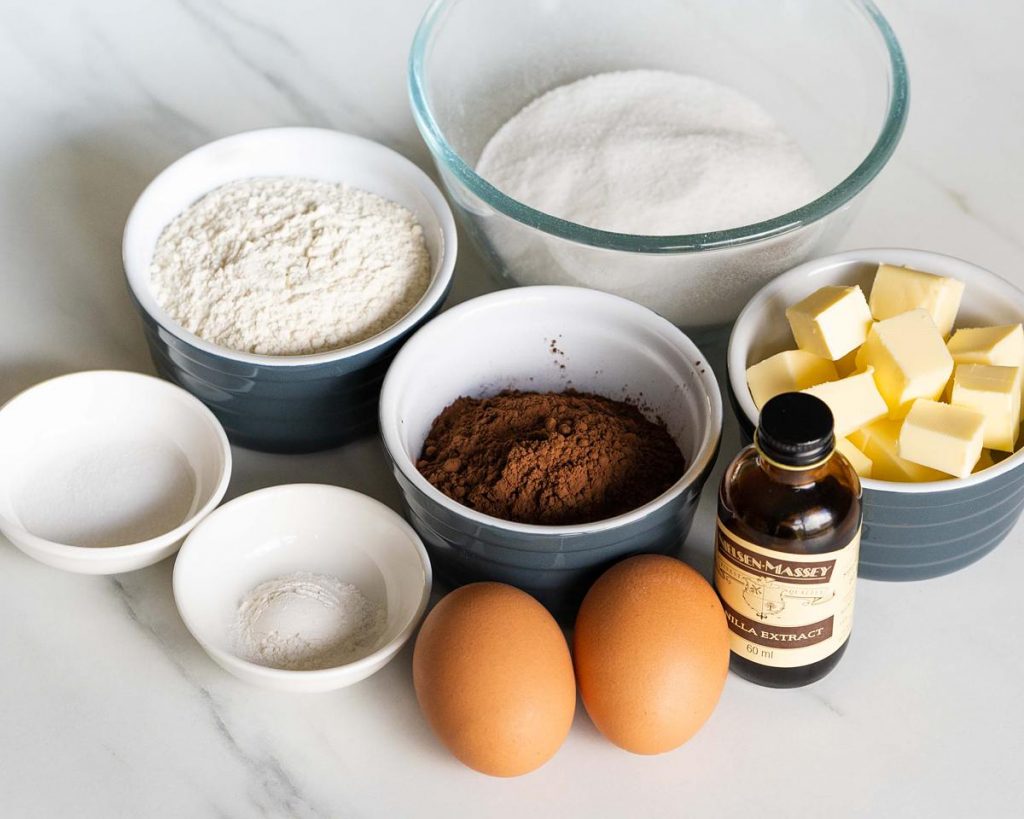
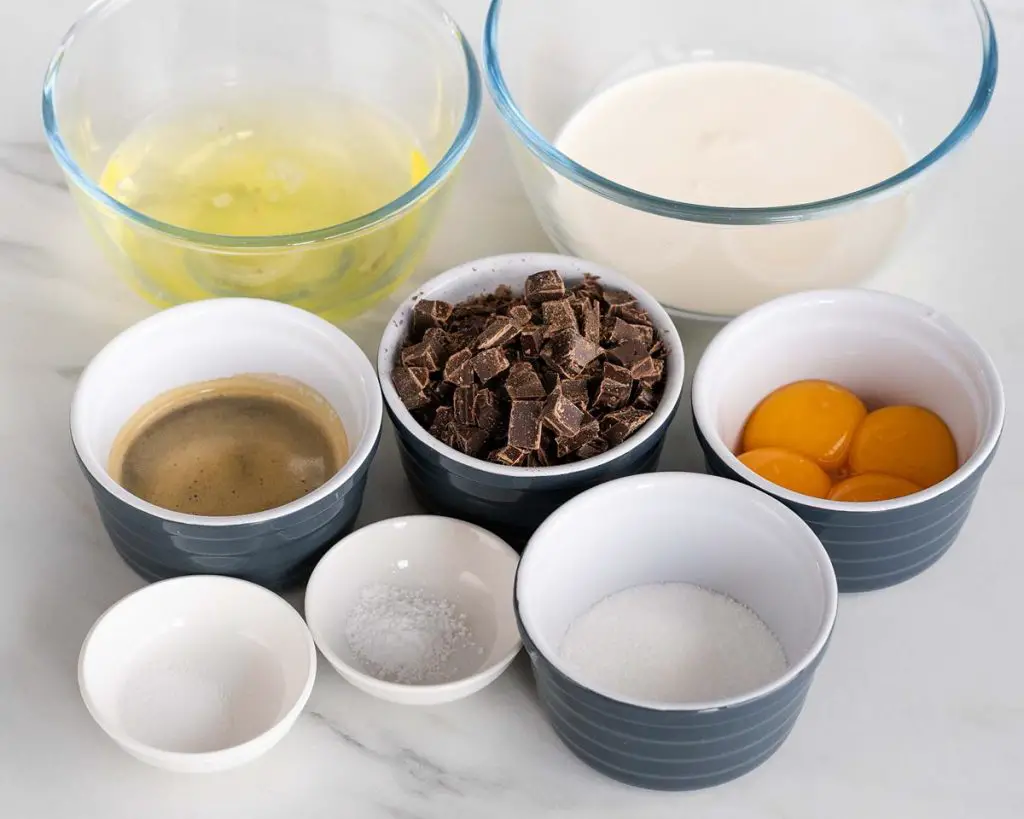
- Unsalted butter: I use unsalted butter so I can control how much salt goes into my bake. In this recipe, I use butter both in the brownie and in the mousse.
- Cocoa powder: for deep rich chocolatey deliciousness, used both in the chocolate glaze top and the brownie base.
- Caster sugar: for sweetness in your mousse cake. Used in all three elements of this bake.
- Eggs: helps with the structure of the brownies. Also used in the mousse for a really light, delicious creation!
- Vanilla: adds an extra level of flavour to your brownies.
- Flour: I use plain flour in the brownies, as I prefer this so I can control the rise in them.
- Baking powder: for rise in the brownies.
- Salt: to enhance the flavours in this bake. Don’t worry, you won’t taste it!
- Double cream: adds to the creaminess and structure of the mousse. Also used in the glaze.
- Espresso: adding coffee to chocolate bakes and creations enhances the flavour of chocolate. This one is optional, but highly recommended! If you don’t want the coffee, simply add the same amount of lukewarm water.
- Dark chocolate: melted into the mousse, I would recommend using one with minimum 60% cocoa solids.
- Cream of tartar: gives stability to your egg whites when whipped.
- Leaf gelatine: to help firm up your chocolate glaze. I used Dr Oetker leaf gelatine.
- Glucose syrup: adds sweetness and also helps prevent the sugar in the glaze from crystalizing.
What equipment do I need to make a brownie mousse cake?
- Thermapen thermometer*: for accurate measuring of your temperatures as you pasteurize your egg yolks and whites.
- Springform cake tin*: a springform makes it easier to release your brownie once baked, but is also really helpful for providing structure for your bake when adding the mousse as it supports the acetate collar well too.
- Parchment paper: to line your tin for your brownie.
- Sieve*: to remove any lumps from your dry ingredients.
- Small mixing bowl*/Mixing bowls*: to make your brownie in, and to whisk your egg components as part of the bain marie, as well as to soak your gelatine leaves before using.
- Whisk*: for mixing up your brownie mixture, and both the yolk and white elements of eggs when making the mousse.
- Large spatula*/small spatula*: for mixing and smoothing the brownie batter, plus folding through ingredients when making your chocolate mousse. I also use a small spatula when making the glaze for the top.
- Electric hand mixer*: used to whisk up your double cream. You can do this by hand, of course, but it will take longer and your bicep will get quite the workout for it! I prefer using an electric mixer for speed and convenience.
- Small saucepan*: to make up the base part of your bain marie.
- Acetate cake collar*: wrapped around the brownie base before topping with the mousse and glaze, helping to keep each element in neat layers.
- Stand mixer*: used to beat up your egg whites to stiff peaks. This makes for much lighter work, though you can of course use your electric hand mixer too.
How to make this brownie mousse cake
This bake will require a little longer to make, as the different elements need to cool or set before you can do the next step. First, we need to make the brownie base, then once cool top it with the light chocolate mousse. Once the mousse has set overnight, the glaze is added and left once again to set before releasing, decorating and enjoying the cake can happen!
For the brownie base:
Step 1: Lightly grease your 8″ springform tin and line the base with parchment paper, then set aside. Preheat your oven to 180C/350F.
Step 2: In a large mixing bowl, melt your butter, then sift in your cocoa powder, mixing until smooth. Add in your sugar and mix it in briefly, before adding the eggs and vanilla, mixing in between each addition. Sift in the flour, salt and baking powder and fold into your chocolate mixture until combined. Pour your brownie mix into your prepared springform tin, levelling the top, and bake for 25-30 minutes until done. Leave to cool completely.
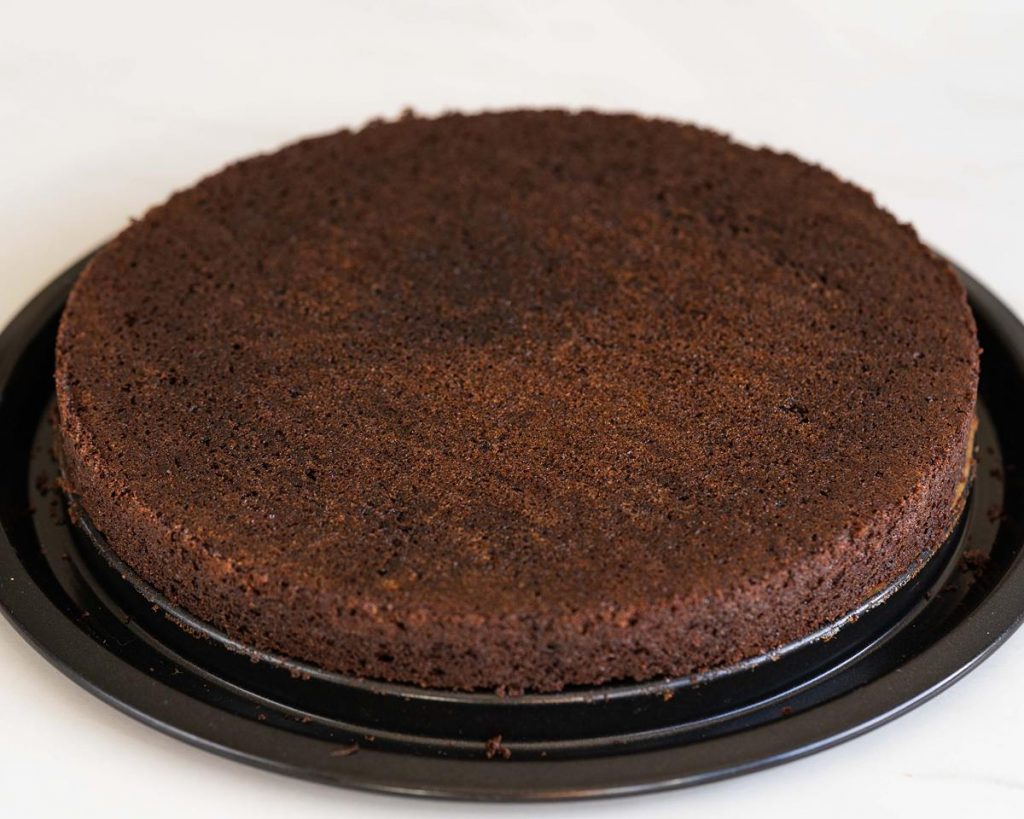
Step 3: Before you make your mousse, remove your brownie from the springform and level the top. Then flip it upside down, remove the paper on the bottom and return it to the springform base, cut side down. Wrap the brownie in a collar of acetate before putting the springform side back on the tin to hold everything in place. Set aside while you make the mousse.
For the chocolate mousse layer:
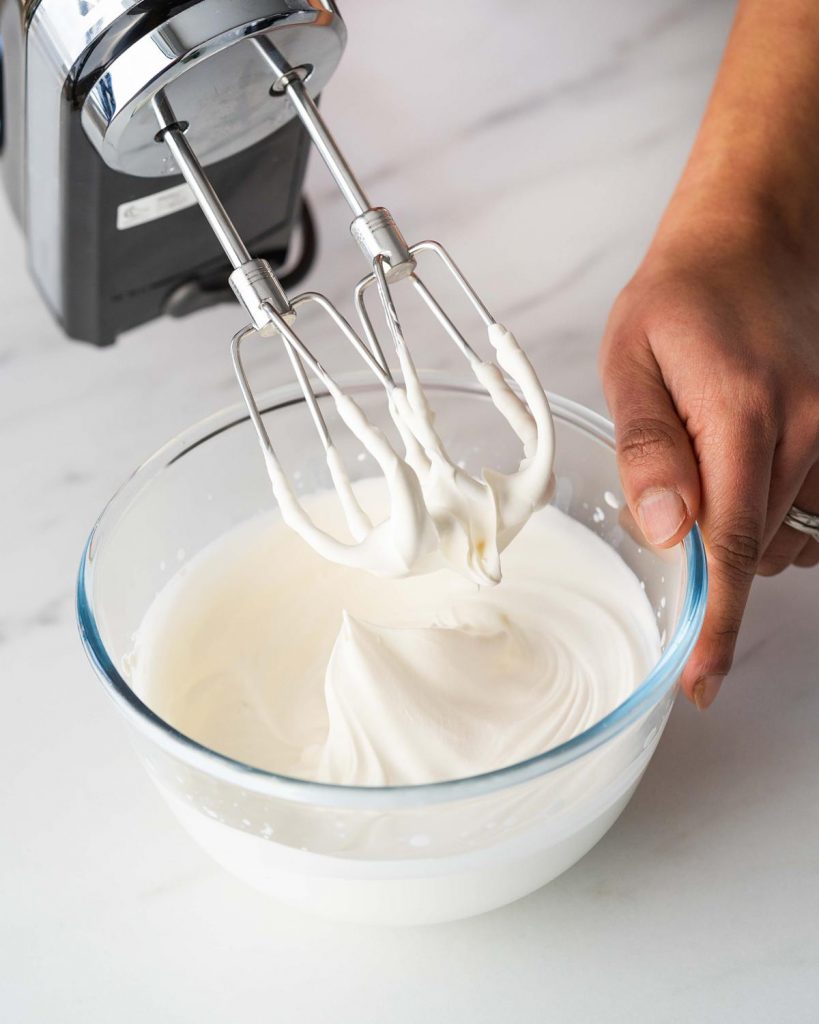
Step 1: Now to make the mousse! First, whip up your double cream to stiff peaks. Cover the bowl and chill whilst you make the rest of the mousse.
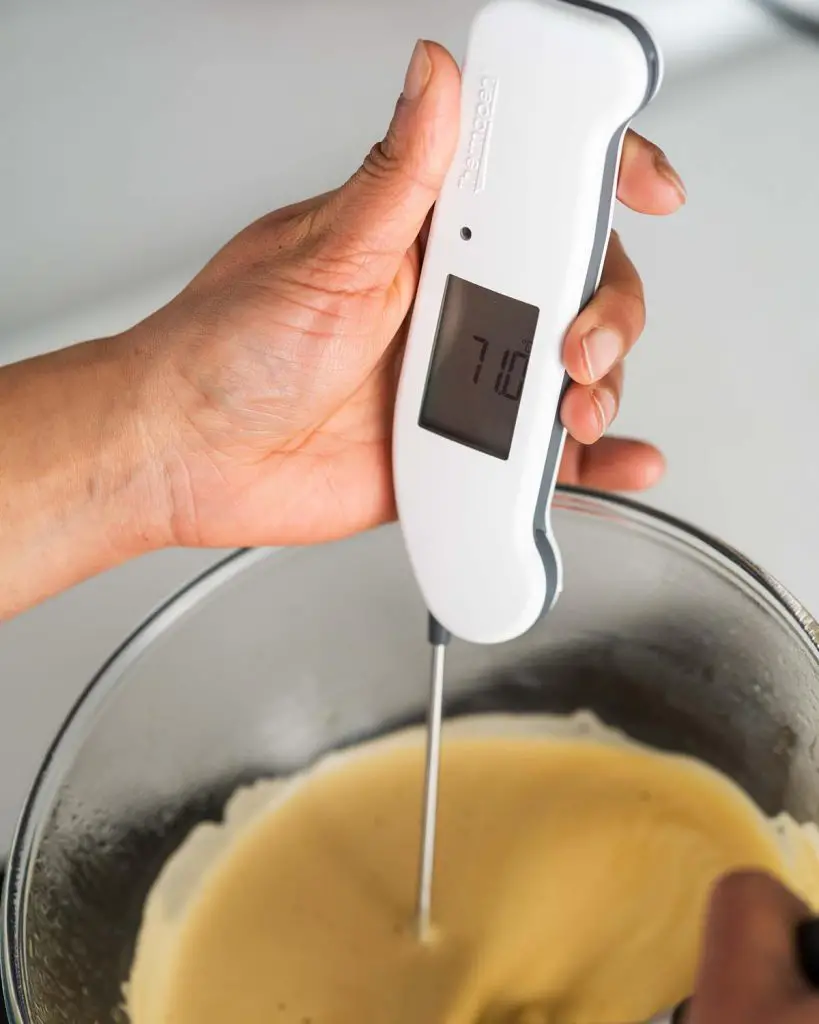
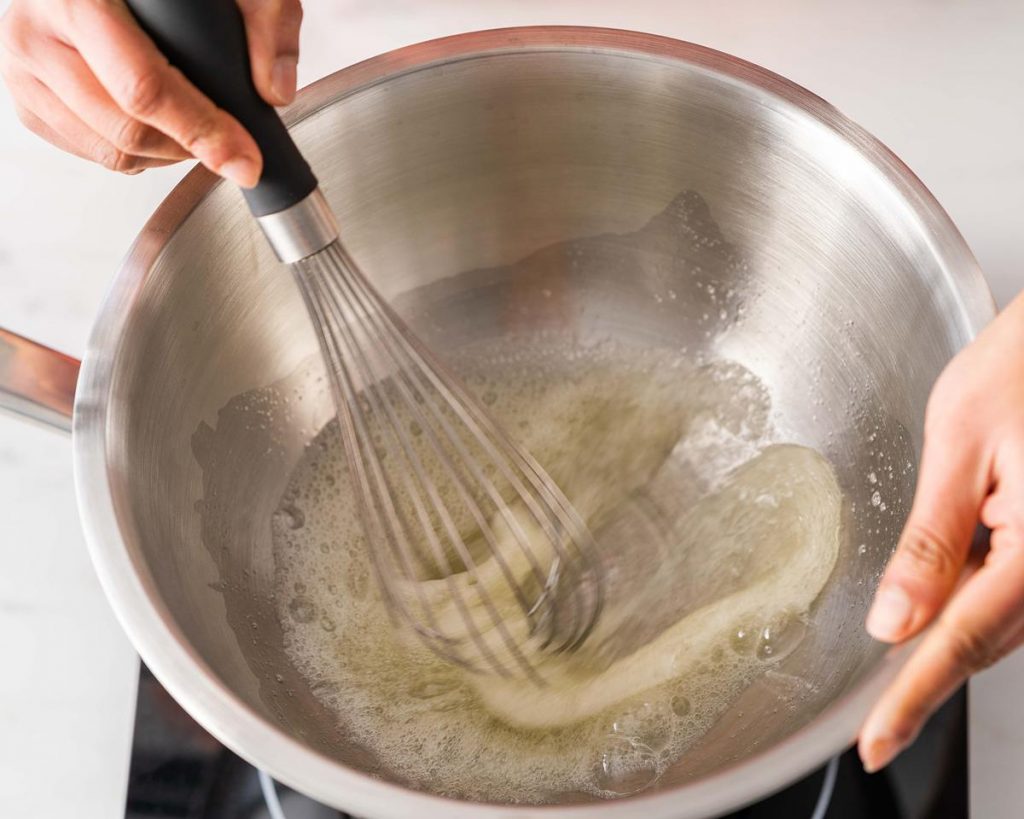
Step 2: In a large bowl, tip in your egg yolks, espresso (or water if you don’t want to use espresso), salt, butter and 1 tsp of sugar. Place your bowl over a small saucepan of gently simmering water and whisk. First, your butter has to melt, so your mixture may initially look like a curdled mess. Don’t worry, just keep heating gently and moving it all around so the yolks don’t cook on the bottom. Once your butter has melted, start whisking your mixture constantly until it has doubled in volume. Keep checking the temperature of your mixture regularly, whisking continuously, until it reaches 71C/160F, then remove from the heat. Add in your chopped chocolate and whisk until it has melted and your mixture is totally smooth. Set aside to cool to room temperature, whisking occasionally.
Step 3: In a separate clean bowl, place your egg whites, cream of tartar and the remaining sugar, whisking it all together. Place over a small saucepan of gently simmering water and heat gently, whisking constantly (really important for the egg whites!) until the temperature of your mixture reaches 71C/160F on your thermometer. Remove from the heat and immediately tip into the bowl of your stand mixer. Using a whisk attachment, beat your egg whites on high until they reach stiff peaks and have cooled right down to room temperature.
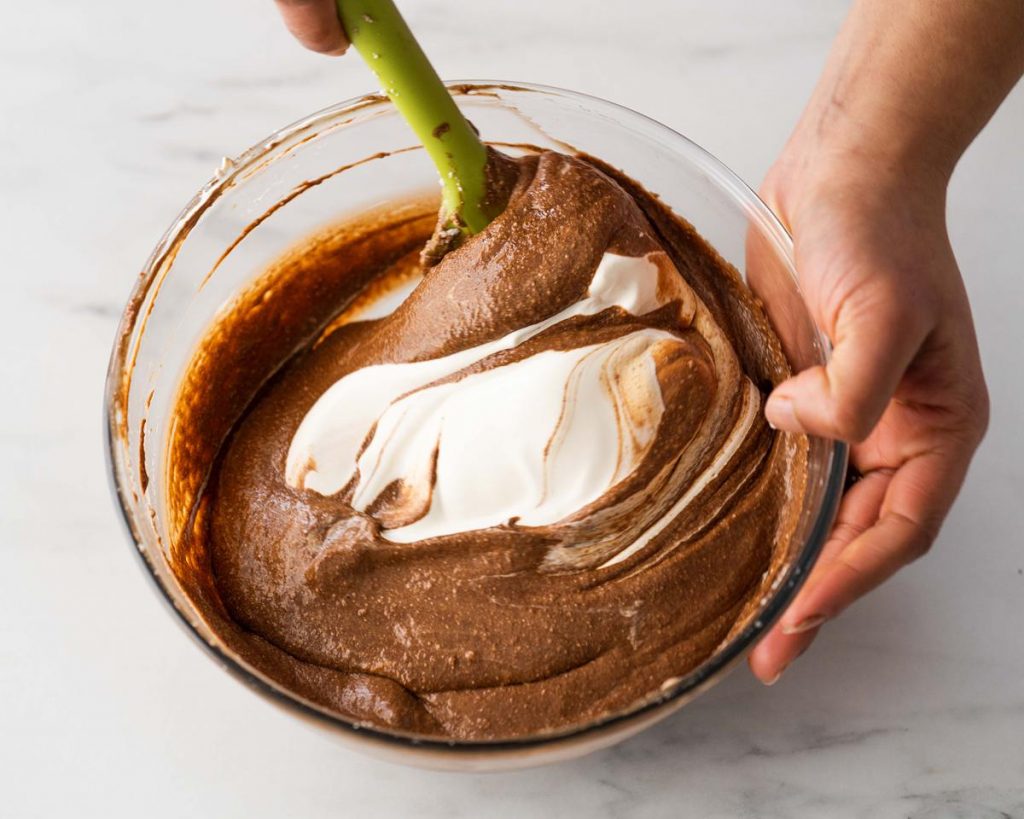
Step 4: Add a third of your egg whites mixture into your cooled chocolate mixture and use to loosen the chocolate mix. Then tip in the remaining egg whites and fold very gently and carefully to avoid knocking out all the air you’ve incorporated in. Once fully combined, repeat the process with the chilled whipped cream, ensuring everything is completely mixed together and homogenous.
Step 5: Very gently, pour your mousse mixture over your brownie base, carefully encouraging it evenly all the way around the brownie base. Give the tin a gentle shake to spread the mousse out and smooth the top, then place the springform in the fridge for the mousse to firm up and set completely. This will take at least 3-4 hours, but I prefer leaving it overnight.

For the cocoa glaze:
Step 1: In a small bowl, soak your gelatine leaf in cold water for 10 minutes.
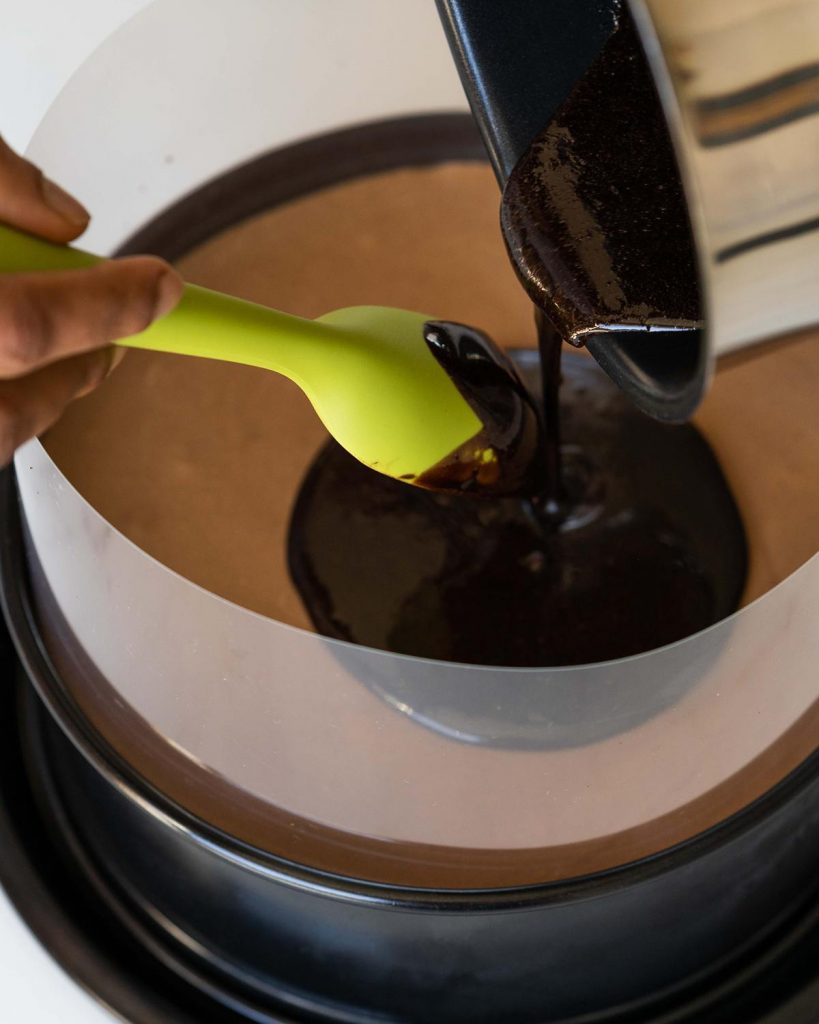
Step 2: In a small saucepan, combine all your glaze ingredients, except for the gelatine, and heat gently until melted and fully combined. Remove your gelatine leaf from the cold water and squeeze out any excess water, then add it to your small saucepan. Continue to heat gently until your gelatine has melted, then leave to cool for a few minutes. Remove the mousse cake from the fridge and carefully pour the cocoa glaze over the top. Return the mousse cake to the fridge for at least another 30 minutes to set.
Step 3: When you are ready to serve your mousse cake, remove the springform side and carefully peel away the acetate collar. Transfer your mousse cake to a serving plate, garnish with strawberries and serve.
Why should I pasteurize my eggs when making a chocolate mousse?
Many people don’t pasteurize their eggs when making things like mayonnaise, royal icing, hollandaise or a dessert mousse. However, this can carry a risk of foodborne illnesses (such as salmonella), especially to more vulnerable people such as young children, pregnant women and the elderly. Pasteurizing your eggs will remove this risk, making the eggs safe for everyone to enjoy.
How do I line the base of my springform tin?
I use the side of the springform, in its closed state, to trace around the inside of the circle onto parchment paper. Cut it out, then use it to line the base of your lightly greased tin. There is no need to line the sides of your springform.
How do I know when my brownie is done?
Your brownie is done when it is firm to the touch. The edges will be slightly shrinking away from the sides of the tin too. Leave it to cool in the tin, as it will firm up, before you remove it to level and proceed with the recipe.
How do I line my brownie and tin with acetate?
Cut a length of acetate a little longer than the circumference of your tin. With your brownie on the base, wrap the acetate snugly around the brownie. Use some tape to hold the acetate in place, then return the springform side back around the brownie base.
How long does this brownie mousse cake last and how do I store it?
This brownie mousse cake will keep for 2 days and must be stored in the fridge.
Can I freeze this brownie mousse cake?
You can make the brownie layer and freeze it just fine. Unfortunately, the mousse layer doesn’t freeze as well, so the whole cake cannot be frozen.
How do I freeze and defrost the brownie layer?
To freeze the brownie layer, wrap it tightly in two layers of cling film then freeze, making sure it is totally flat in the freezer. To defrost it, simply remove it from the freezer and unwrap it completely. Then place on a cooling rack for a couple of hours until defrosted completely. Once defrosted, you can pick up your recipe where you left off.
Can I make this brownie mousse cake gluten and dairy free?
Yes! Simply replace the plain (all purpose) flour with a gluten free alternative in the brownie. Do make sure your baking powder is gluten free too. For dairy free options, replace the butter (in the brownies and mousse) with a dairy free block butter, ensuring it’s not a soft spreadable type you replace it with. Replace the double cream with a suitable dairy free alternative that can be whipped up too.
Additional tips for making this brownie mousse cake
- Before you do anything, read the recipe through at least twice. There are several steps that could go wrong in this recipe, so important you are as prepared as you can be!
- Make sure you’ve prepared your tools and ingredients before you start each step: line the base your springform tin with baking paper, preheat your oven and get your ingredients out ready to use.
- On making your mousse, make sure you’ve prepared your brownie base first, including the acetate collar. Have all your ingredients and tools to hand ready to use, especially important if you don’t want to cook your eggs when pasteurizing them!
- When dealing with egg whites and whipping them up, it is really REALLY important you ensure all your bowls and tools are completely grease free. Any fat will hinder the egg whites whipping up, so make sure your bowls and tools are completely clean. I use a little vinegar on a piece of kitchen paper to wipe my bowls and tools down before using them to remove anything I might have missed. And don’t worry, you won’t taste the vinegar doing this!
- For both the egg mixtures, keep your pan of water really low and simmering. Turning the temperature up risks cooking your eggs and you will get lumps of cooked egg in your mousse. Not what we want!
- Keep checking the temperature of your egg mixtures regularly with your Thermapen*, especially as it nears the 71C/160F mark. This is important as it can go up pretty quickly during those last few minutes!
- The final step of mixing the three mousse elements together can be quite daunting! Just take your time, fold slowly and gently and all will be well.
- Ensure your mousse is fully set before topping with the cocoa glaze. It shouldn’t wobble at all when you gently shake the tin.
- Just as important is to ensure your cocoa glaze is not too hot when poured over your mousse or you risk melting it. I heat my glaze very gently, only enough to melt the sugar and dissolve the gelatine, then leave to cool a little before pouring on the mousse. Keep the mousse in the fridge as much as possible, before and after adding the glaze, to help it not be affected.
Troubleshooting
If you have any other questions about the making of this recipe, please use the comments below to ask away and I’ll do my best to help! And if you made and enjoyed this, I’d love to hear from you too!
And don’t forget: if you make this recipe for chocolate brownie mousse cake, especially if its for a special occasion, please do consider leaving a rating and review below. I love to hear from you and know how you enjoy making it and it really helps others looking for that special recipe too! You could even post a picture on Instagram and tag me when you share it with the world, I’d love to see your creation!
More cake recipes for you to enjoy
Don’t forget too to check out these other delicious cake recipes on my blog:
Chocolate fudge cake: The ULTIMATE chocolate fudge cake! Light but deeply chocolatey cake with a silky chocolate fudge icing. Serve either at room temperature, soft and melt-in-your-mouth, or warm and gooey with ice cream. Yum!
Jamaican ginger cake: Warming and spicy, my Jamaican ginger cake recipe is just divine! Beautiful fiery ginger cake topped with a cool lightly spiced cream cheese icing, this is not a cake you’ll want to miss!
Carrot cake tray bake: My crowd pleasing carrot cake tray bake is packed with walnuts and my delicious spice mix. Topped with a tangy cream cheese icing and a scattering of walnuts, this is sure to become a favourite!
Thanks for joining me today, my friends. Wishing you all a very special Mother’s Day and lots of fun making this beautiful brownie mousse cake!
Happy baking my friends! x
Recommended equipment and ingredients I used *
| Thermapen thermometer | Springform tin |
| Sieve | Small mixing bowl |
| Mixing bowls | Whisk |
| Large spatula | Small spatula |
| Electric hand mixer | Small saucepan |
| Acetate cake collar | Stand mixer |
Chocolate Brownie Mousse Cake
12
servings25
minutes5
hours371
kcal5
hours25
minutesDelightful brownie. Silky chocolate mousse. Shiny cocoa glaze. The perfect chocolate celebration cake!
Keep the screen of your device on
Ingredients
- For the brownie base
115 g (½ cup) unsalted butter
50 g (¼ cup + 3 tbsp) cocoa powder
190 g (¾ cup + 3 tbsp) caster sugar
2 large eggs
2 tsp vanilla
100 g (½ cup + 2 tbsp) plain (all purpose) flour
0.5 tsp baking powder
0.5 tsp salt
- For the chocolate mousse layer
180 ml (¾ cup) double cream
4 large egg yolks
60 ml (¼ cup) espresso, at room temperature
0.25 tsp salt
3 tbsp caster sugar, divided into 1 tsp and 8 tsp
45 g (3 tbsp + 1 tsp) unsalted butter
170 g (¾ cup + 3 tbsp) dark chocolate (minimum 60% cocoa solids)
4 large egg whites
0.25 tsp cream of tartar
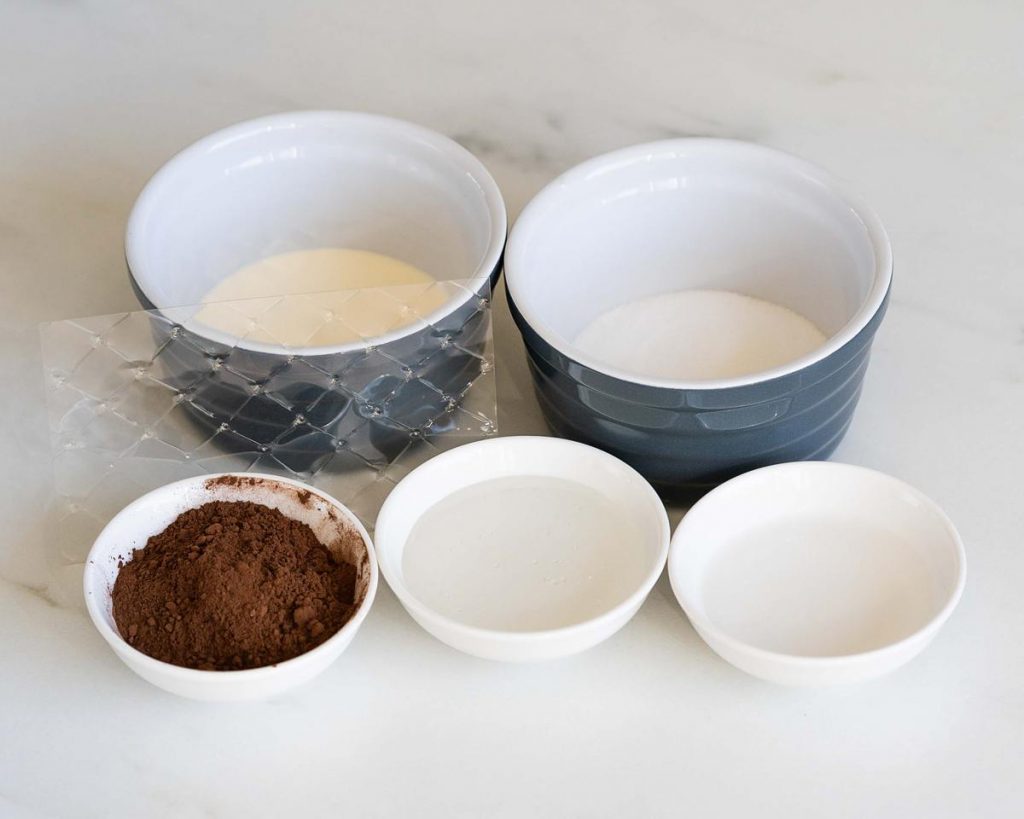
- For the cocoa glaze
1 leaf gelatine (I used Dr Oetker gelatine leaves)
25 ml (1 tbsp + 2 tsp) double cream
2 tsp water
35 g (2 tbsp + 2 tsp) caster sugar
35 g (1 ⅔ tbsp) glucose syrup
12 g (1 tbsp + 2 tsp) cocoa powder
Directions
- For the brownie base
- Lightly grease your 8″ springform tin and line the base with parchment paper, then set aside. Preheat your oven to 180C/350F.
- In a large mixing bowl, melt your butter, then sift in your cocoa powder, mixing until smooth. Add in your sugar and mix it in briefly, before adding the eggs and vanilla, mixing in between each addition. Sift in the flour, salt and baking powder and fold into your chocolate mixture until combined. Pour your brownie mix into your prepared springform tin, levelling the top, and bake for 25-30 minutes until done. Leave to cool completely.
- Before you make your mousse, remove your brownie from the springform and level the top. Then flip it upside down, remove the paper on the bottom and return it to the springform base, cut side down. Wrap the brownie in a collar of acetate before putting the springform side back on the tin to hold everything in place. Set aside while you make the mousse.
- For the chocolate mousse layer
- Now to make the mousse! First, whip up your double cream to stiff peaks. Cover the bowl and chill whilst you make the rest of the mousse.
- In a large bowl, tip in your egg yolks, espresso (or water if you don’t want to use espresso), salt, butter and 1 tsp of sugar. Place your bowl over a small saucepan of gently simmering water and whisk. First, your butter has to melt, so your mixture may initially look like a curdled mess. Don’t worry, just keep heating gently and moving it all around so the yolks don’t cook on the bottom. Once your butter has melted, start whisking your mixture constantly until it has doubled in volume. Keep checking the temperature of your mixture regularly, whisking continuously, until it reaches 71C/160F, then remove from the heat. Add in your chopped chocolate and whisk until it has melted and your mixture is totally smooth. Set aside to cool to room temperature, whisking occasionally.
- In a separate clean bowl, place your egg whites, cream of tartar and the remaining sugar, whisking it all together. Place over a small saucepan of gently simmering water and heat gently, whisking constantly (really important for the egg whites!) until the temperature of your mixture reaches 71C/160F. Remove from the heat and immediately tip into the bowl of your stand mixer. Using a whisk attachment, beat your egg whites on high until they reach stiff peaks and have cooled right down to room temperature.
- Add a third of your egg whites mixture into your cooled chocolate mixture and use to loosen the chocolate mix. Then tip in the remaining egg whites and fold very gently and carefully to avoid knocking out all the air you’ve incorporated in. Once fully combined, repeat the process with the chilled whipped cream, ensuring everything is completely mixed together and homogenous.
- Very gently, pour your mousse mixture over your brownie base, carefully encouraging it evenly all the way around the brownie base. Give the tin a gentle shake to spread the mousse out and smooth the top, then place the springform in the fridge for the mousse to firm up and set completely. This will take at least 3-4 hours, but I prefer leaving it overnight.
- For the cocoa glaze
- In a small bowl, soak your gelatine leaf in cold water for 10 minutes.
- In a small saucepan, combine all your glaze ingredients, except for the gelatine, and heat gently until melted and fully combined. Remove your gelatine leaf from the cold water and squeeze out any excess water, then add it to your small saucepan. Continue to heat gently until your gelatine has melted, then leave to cool for a few minutes. Remove the mousse cake from the fridge and carefully pour the cocoa glaze over the top. Return the mousse cake to the fridge for at least another 30 minutes to set.
- When you are ready to serve your mousse cake, remove the springform side and carefully peel away the acetate collar. Transfer your mousse cake to a serving plate, garnish with strawberries and serve.
Made this yesterday for Father’s Day. The recipe doesn’t specify what size of springform pan, so I used a 9″. The mouse layer was not as thick as the picture, and the glaze just covered the top. Next time, I’ll try the 7″ and see how it goes. Brownie layer came out well. Mousse did not “pour” so I had to even it out the best I could to make a smooth top for the glaze. I didn’t have glucose syrup, but looked up substitutions and used honey. Seemed to work out well, just as said, it just barely covered the cake.
One other point, maybe list the eggs for the mousse as “4 eggs, separated.” I almost threw out the whites because at the time, they were off my computer screen while I was prepping ingredients.
It was very tasty and the family enjoyed it!