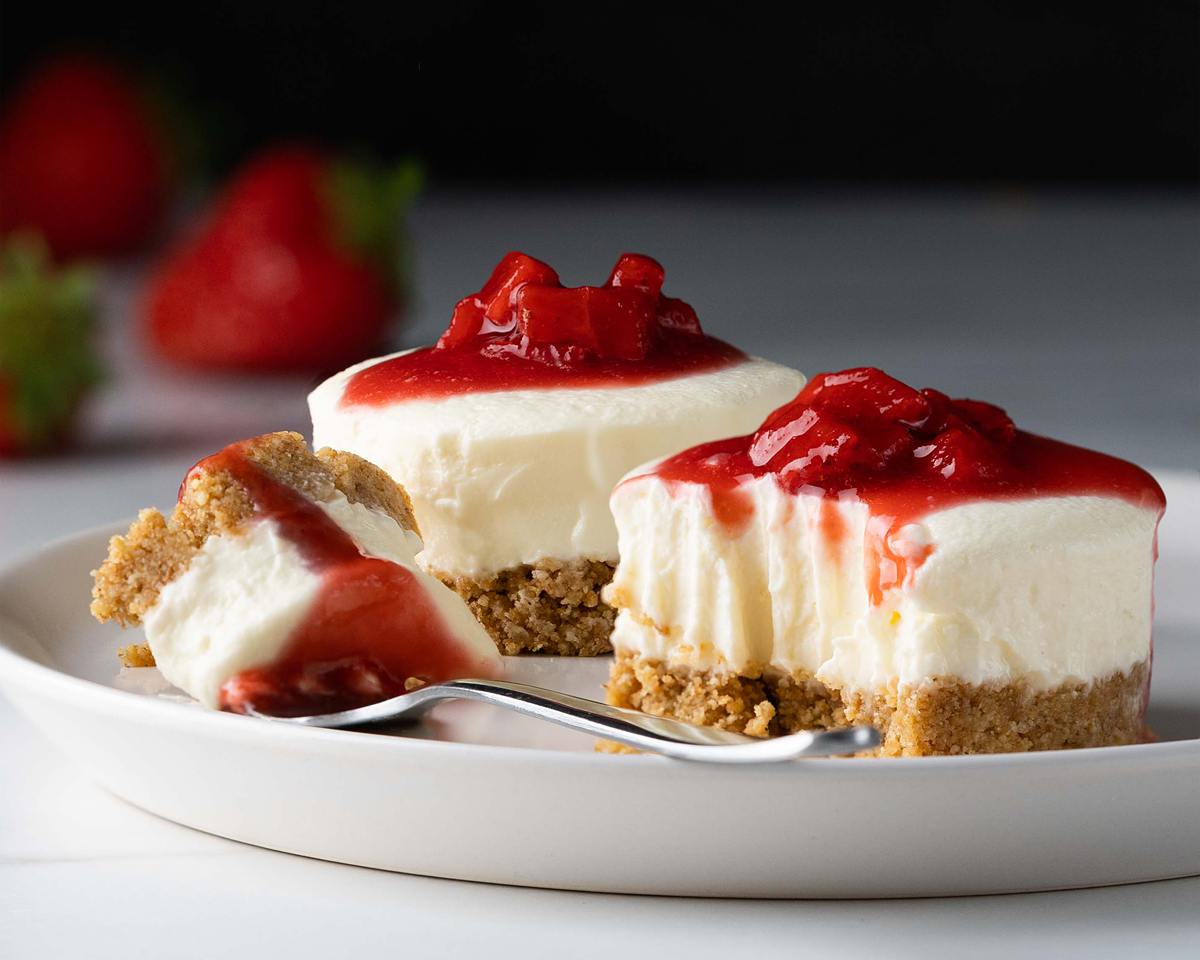
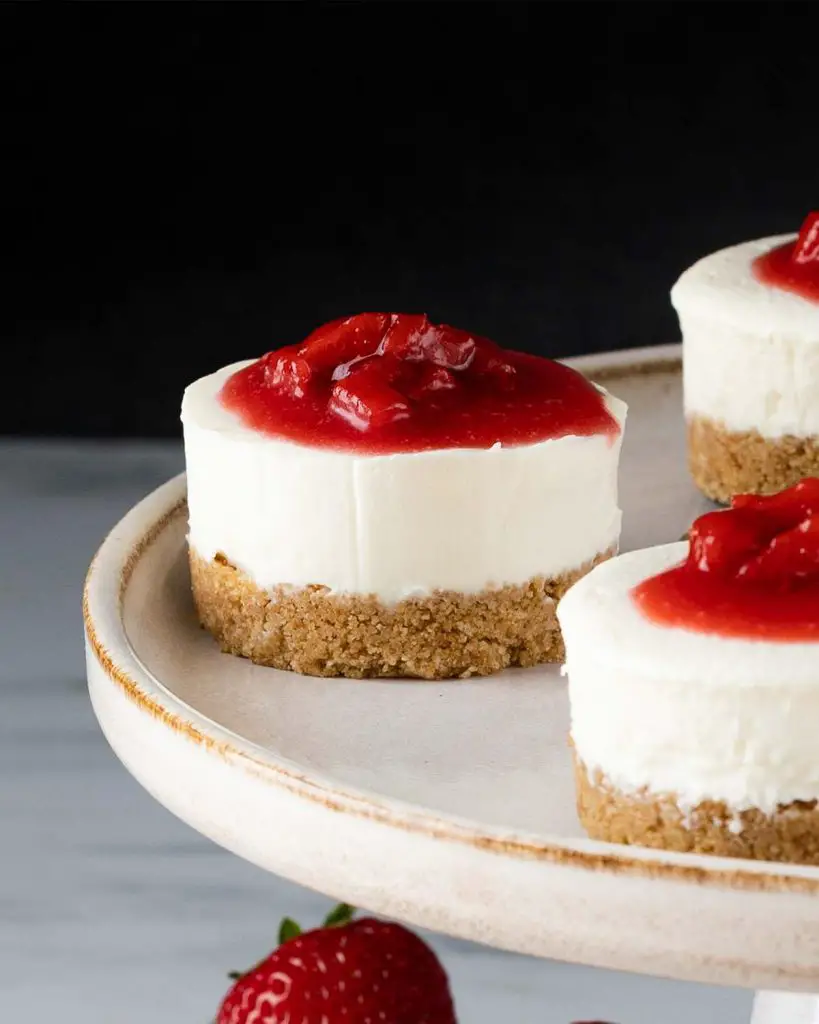
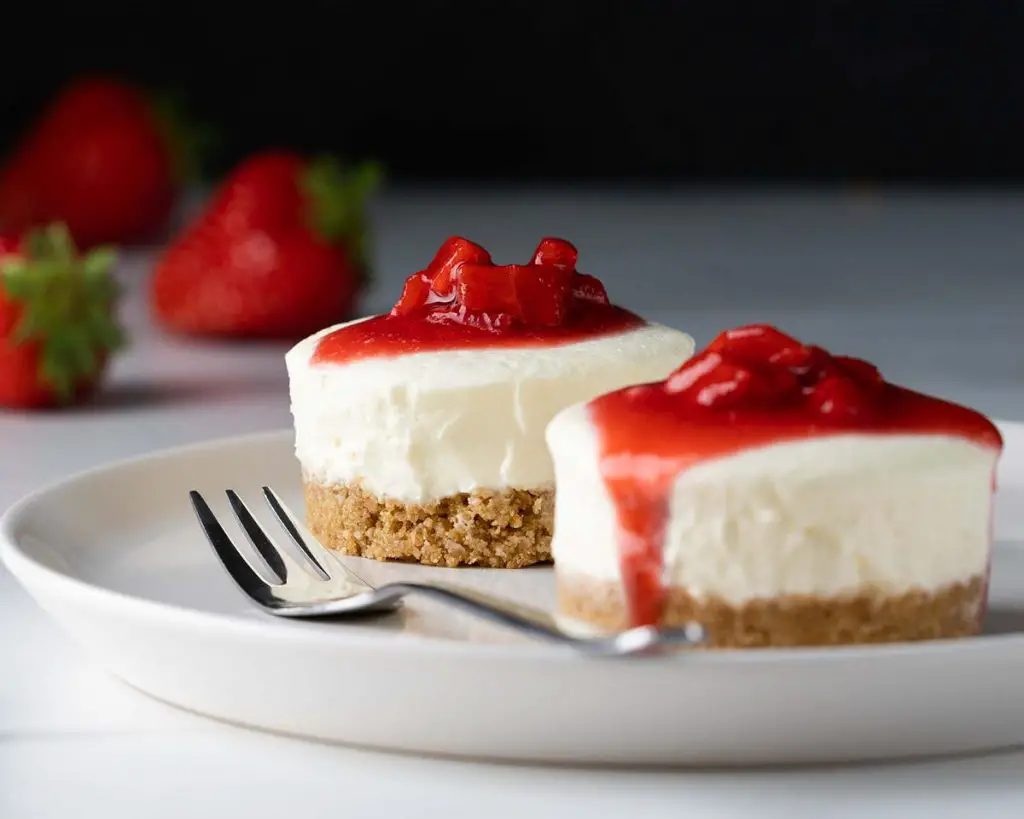
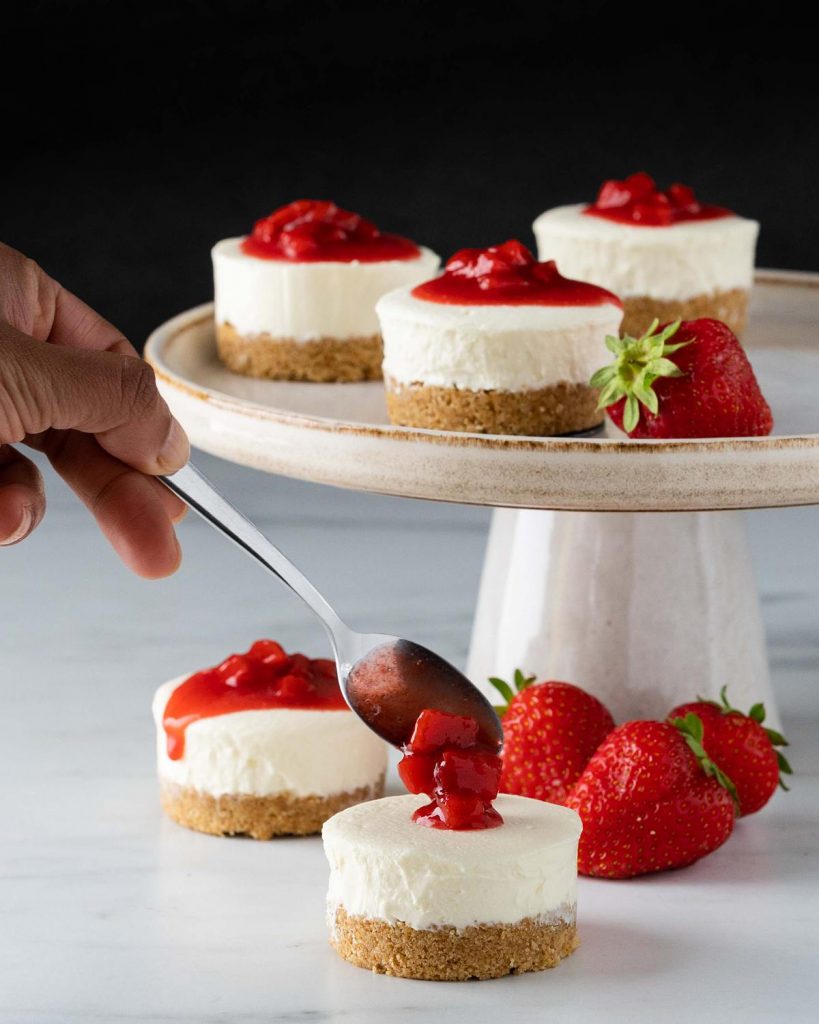
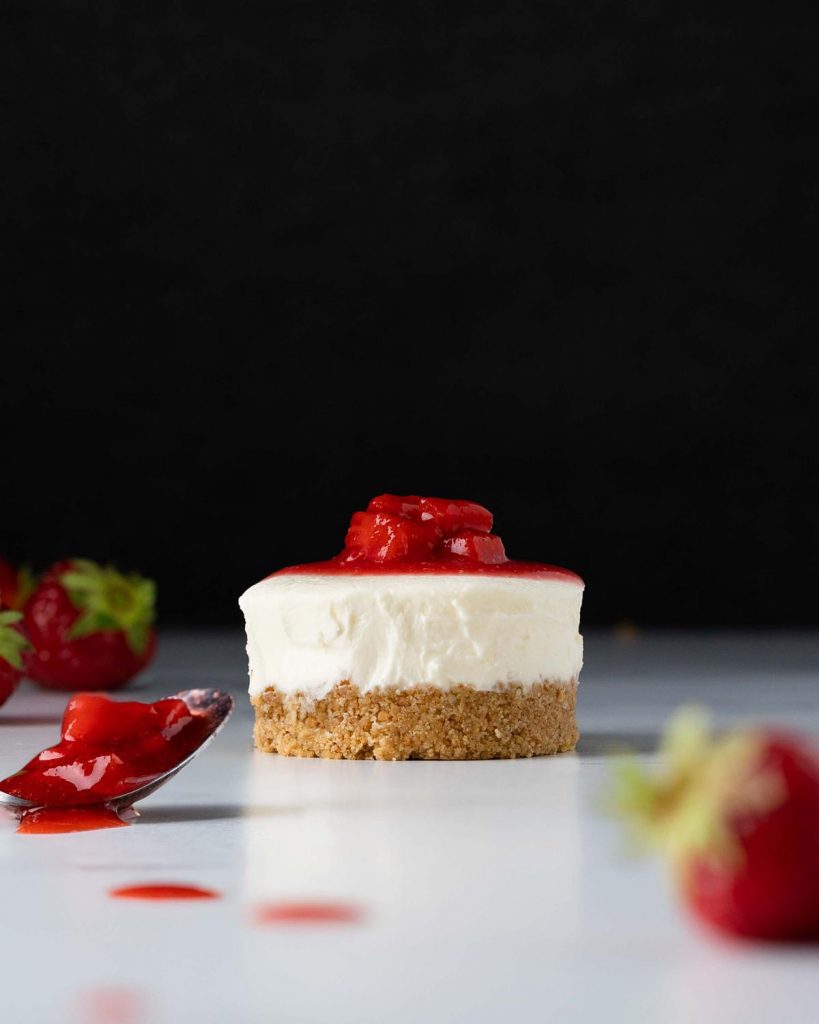
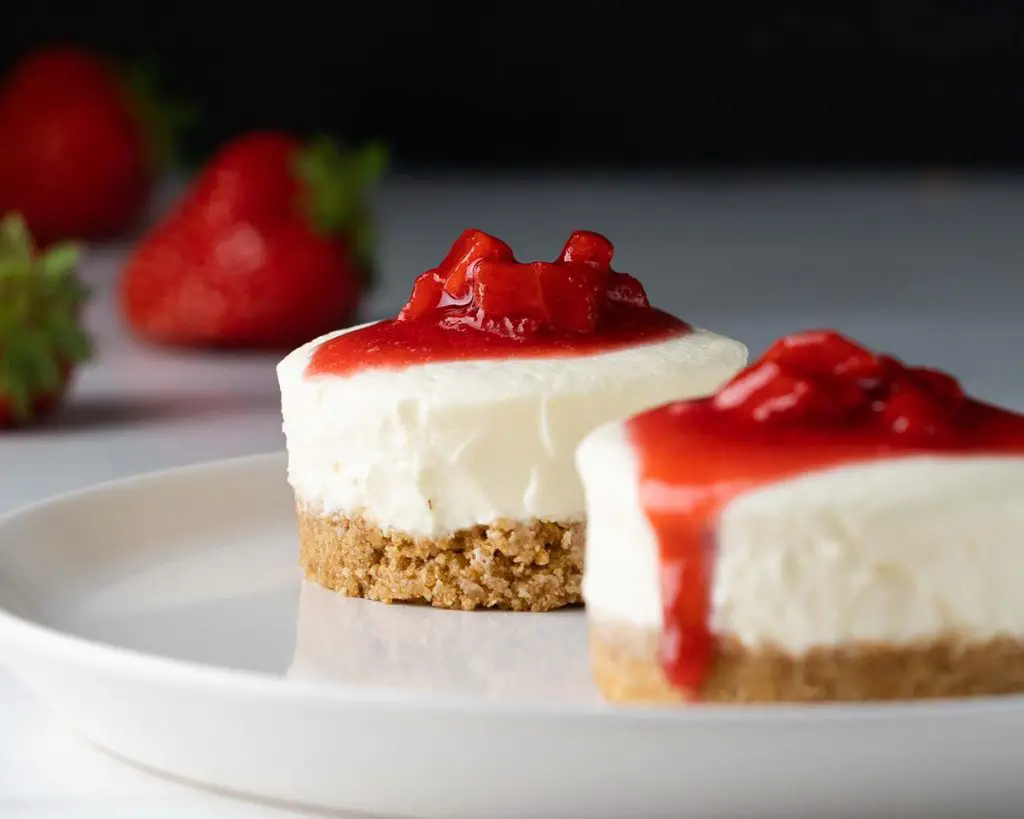
My mini no bake strawberry cheesecakes have a crunchy biscuit base and a smooth creamy vanilla cheesecake filling, all finished with a homemade strawberry topping. These showstopping desserts are the perfect end to a meal with friends, and are sure to delight!
Mini desserts
If you have been following me for a while, you will know I love making mini desserts. You just cannot beat the convenience of how mini desserts plate up into the perfect single portions. Add because this one is a mini cheesecakes no bake recipe, it is even easier to create something delicious in next to no time!
For these cheesecakes, I have topped them with a simple homemade strawberry sauce, making them strawberry mini cheesecakes. However, you could just as easily make it a homemade raspberry sauce, homemade blueberry sauce or any other homemade berry sauce instead.
What ingredients do I need to make no bake mini cheesecakes
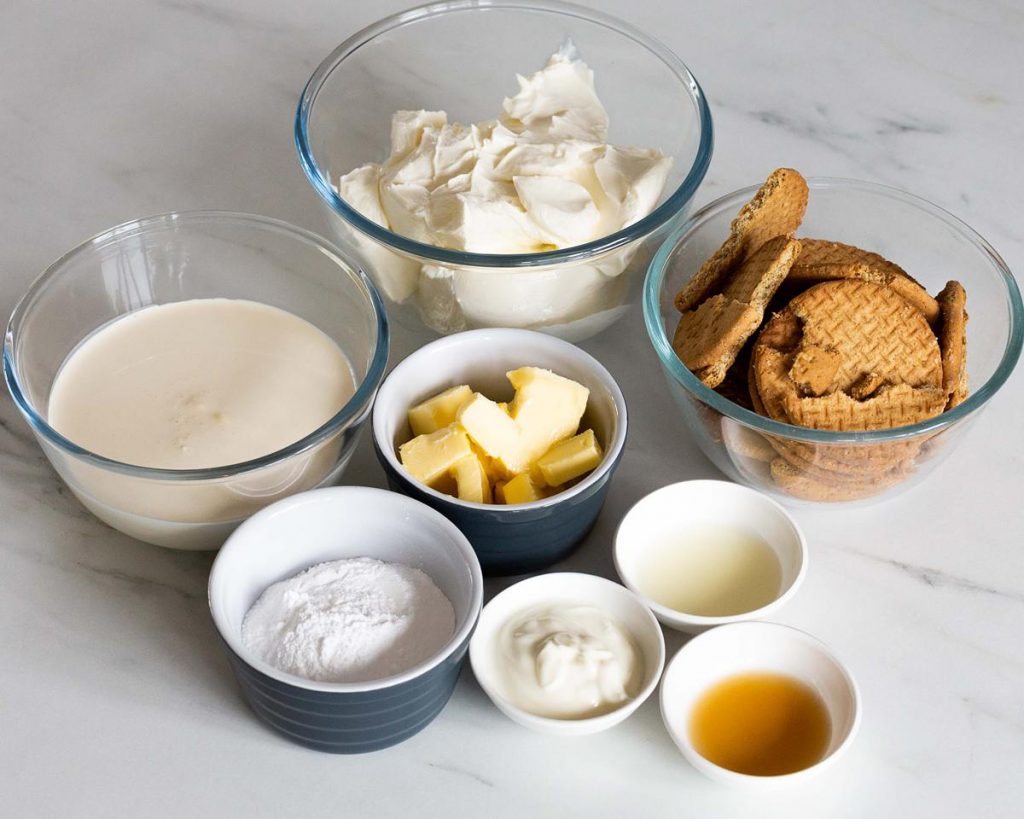
- Digestive biscuits: used in the biscuit base of the mini cheesecakes.
- Unsalted butter: melted, this helps bind the biscuit base, giving a rich, beautiful base for the no bake cheesecake.
- Cream cheese: make sure to use a full fat cream cheese when making the filling for any no bake cheesecake recipe, as this is part of what helps the filling set firmly.
- Double/heavy cream: whipped up, this gives body, richness and stability to the cheesecake filling.
- Yogurt: gives a little extra tangy flavour to the cheesecake filling.
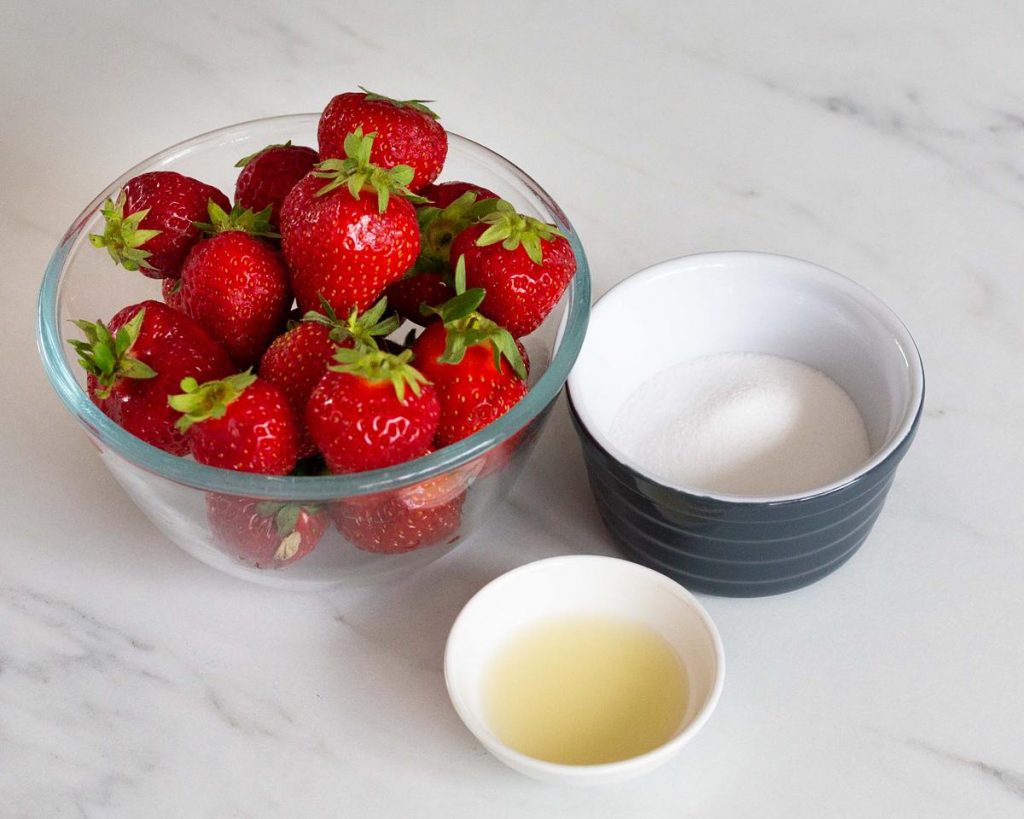
- Lemon juice: this addition brightens the flavour of the cheesecake, giving it a lovely tang to offset the sweetness, and for the strawberry glaze too.
- Vanilla: for gorgeous flavour!
- Icing sugar: for sweetness in the filling.
- Strawberries: used in the strawberry topping for cheesecake.
- Caster sugar: to add sweetness to the cheesecake topping.
What equipment do I need to make mini no bake strawberry cheesecakes?
- Digital kitchen scales*: my recommended method of measuring ingredients is to weigh them out using grams rather than cups. I do, however, provide cup measures too, if you prefer working with this method.
- Measuring spoons*: for measuring smaller quantities such as tablespoons (tbsp) and teaspoons (tsp). A set of dedicated measuring spoons are far more accurate than using everyday eating spoons, so is a small investment well worth making.
- Food processor*: a quick way to make the biscuit base. If you do not have a food processor, you can place the biscuits into a sealable freezer bag and bash with a rolling pin instead.
- Loose-bottomed mini cakes tin*: I love this tin! It means I can make mini cheesecakes, cakes and pies without needing to use cupcake tins and liners. So easy to release and gives lovely straight sides for these mini cheesecakes.
- Mixing bowl*: to mix together the ingredients for the cheesecake filling.
- Electric hand mixer*: whilst you can beat your filling by hand, this handy tool makes it all a whole lot easier.
- Spatula*: for scraping your bowl down as you make the no bake cheesecake filling and the strawberry topping for cheesecake.
- Small saucepan*: to make the strawberry sauce topping.
How to make this no bake mini cheesecake recipe
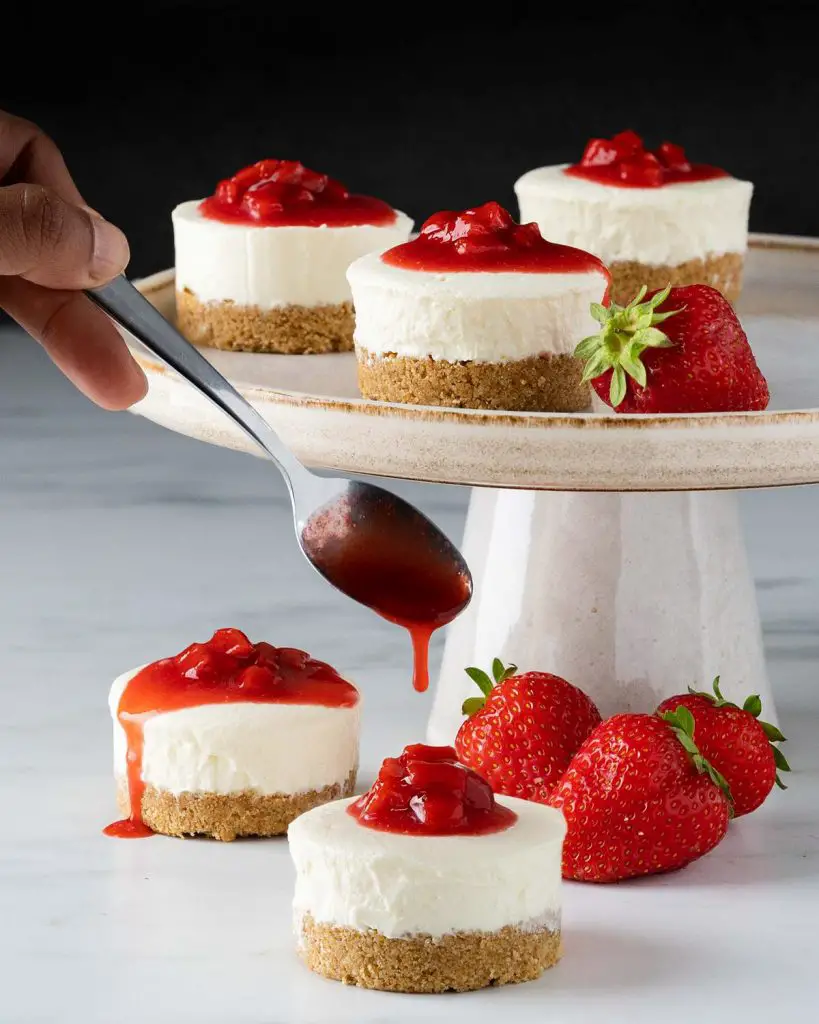
First, you make the mini cheesecake biscuit bases and filling. Once they are setting in the fridge, make the strawberry topping before leaving everything to cool and chill for a few hours. To serve, simply drizzle some of the strawberry sauce over each mini no bake cheesecake as you serve. Easy peasy!
For the mini cheesecakes:
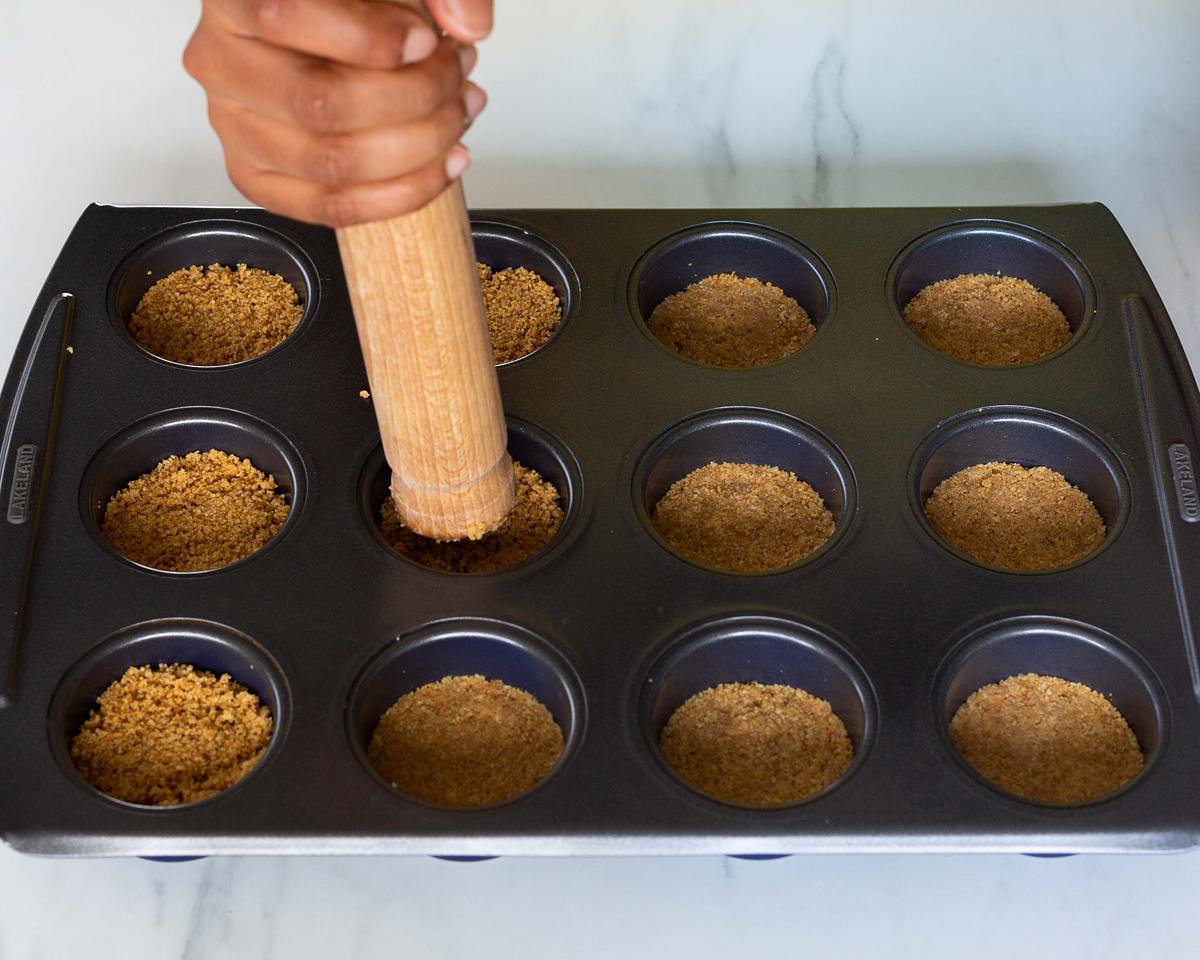
Step 1: First, make the biscuit base for the cheesecake. Using the food processor, blitz the biscuits until they are crumbs. Add in the melted butter and blitz again to completely combine. Divide the mixture evenly between the individual cake tins and press down firmly to flatten for the bases of each cheesecake. Pop the tin in the fridge whilst making the no bake cheesecake filling.

Step 2: Once the base is chilling, time to make the no bake cheesecake filling. In a large mixing bowl, tip in the double (heavy) cream and beat to stiff peaks. This should take just a few minutes with a handheld electric whisk, or a little longer if done by hand.

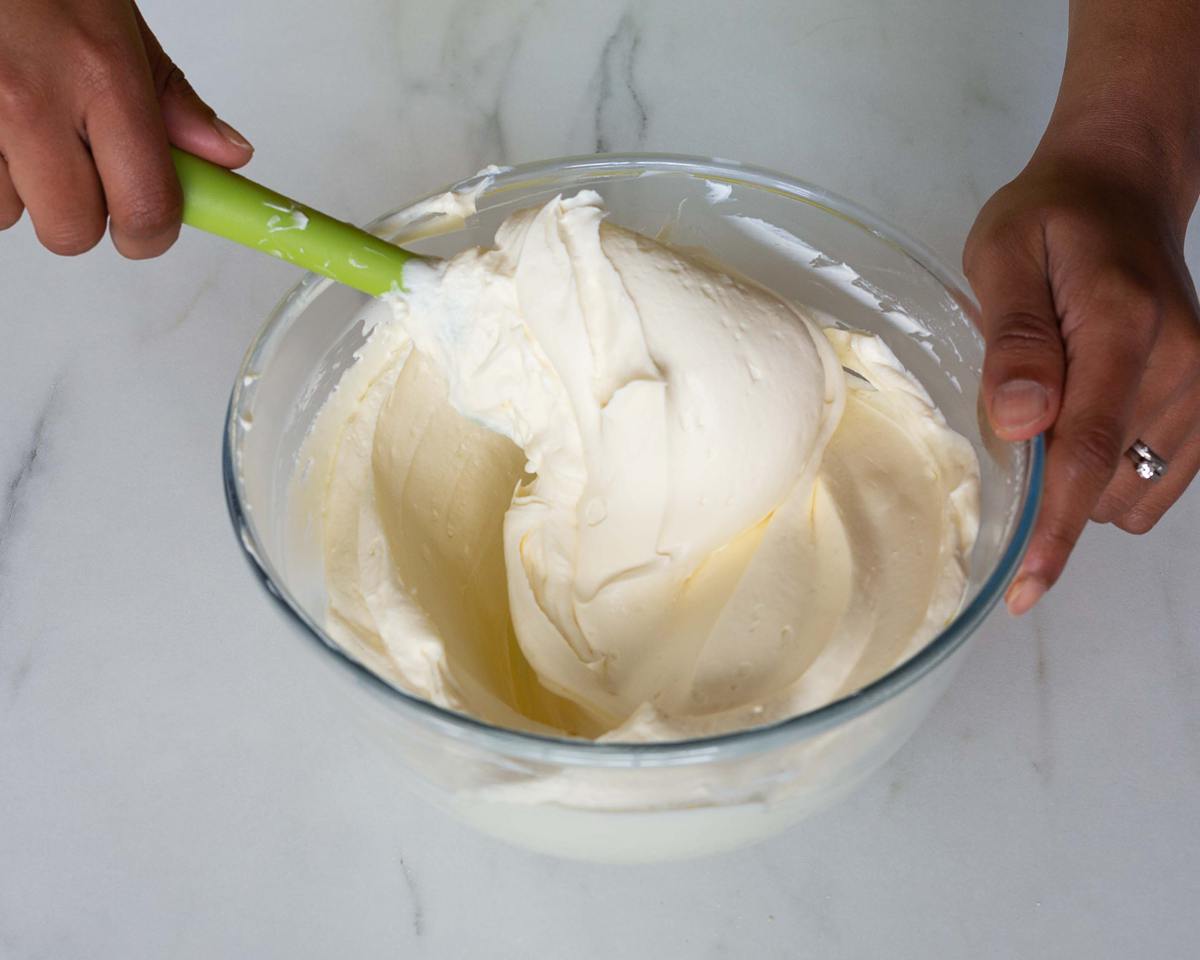
Step 3: In a separate bowl, beat together the cream cheese, yogurt, lemon juice, vanilla and icing sugar until well combined and smooth.
Step 4: Add the whipped cream to the cream cheese mixture and fold it all together to thoroughly combine. Do this using a spatula, ensuring everything is evenly mixed together.
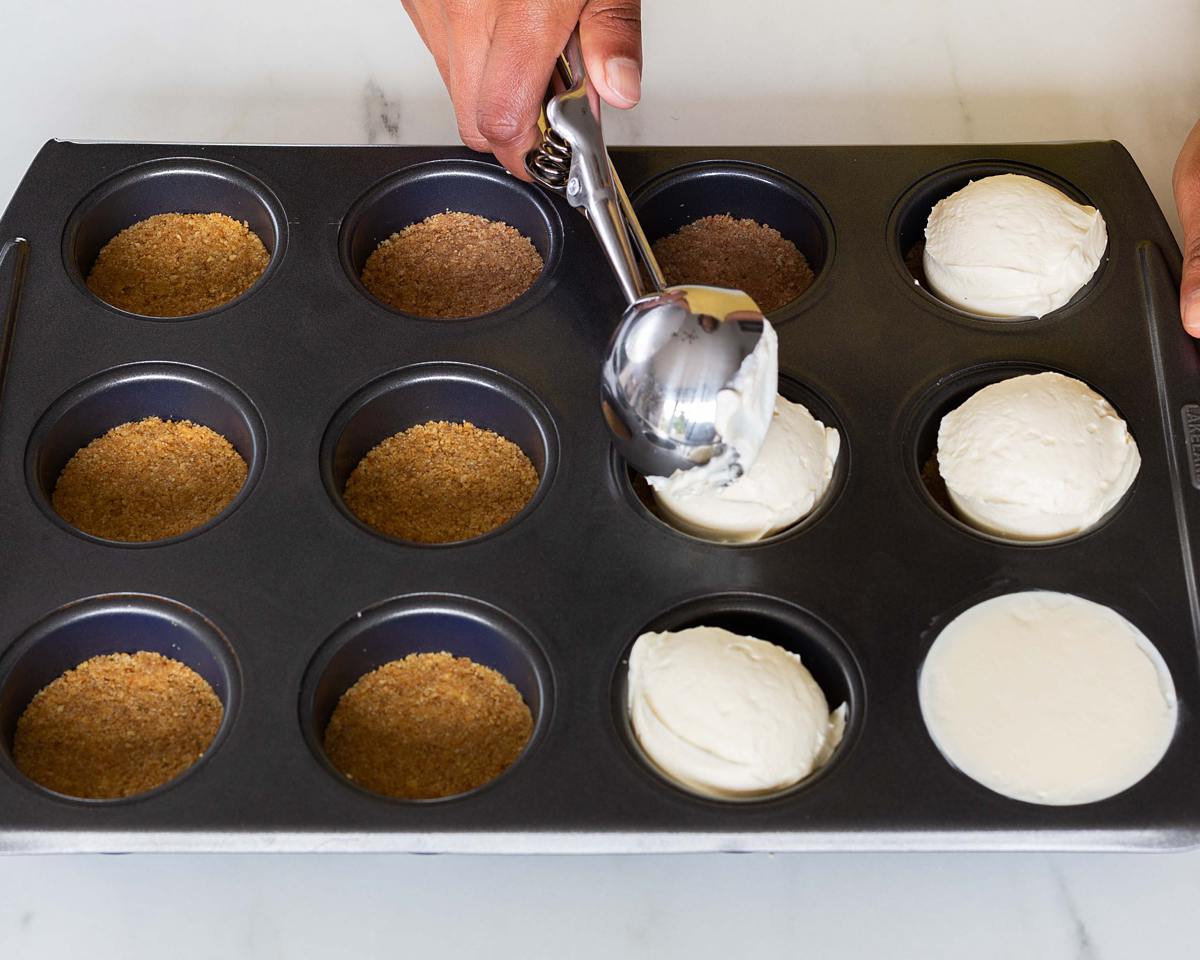
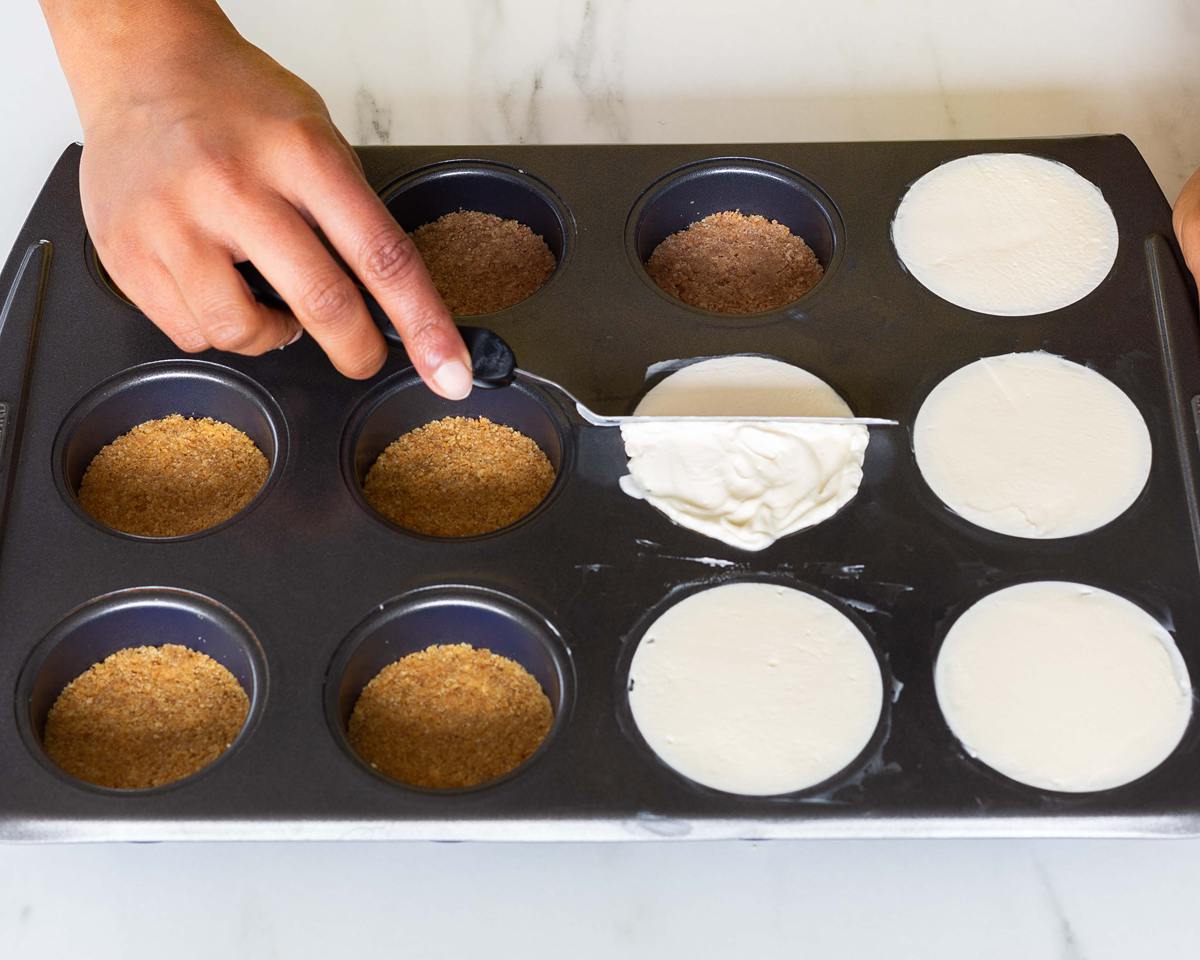
Step 5: Scoop or pipe the filling evenly over each biscuit base before levelling the top of each cheesecake. Pop the tray in the fridge to chill and set for at least four hours, but ideally overnight.
For the strawberry topping:
Step 1: Remove the green leaves and stem from the strawberries and chop them into small pieces. Set aside about 3-4 tablespoons of chopped strawberries, and place the rest in a saucepan with the lemon juice and sugar.
Step 2: Heat the strawberry mixture to melt the sugar, stirring to make sure the fruit is evenly coated with the lemon and sugar. Once the sugar has melted, cook the mixture until the strawberries break down, and the liquid has thickened to a beautiful rich red sauce. This cooking takes about 20-25 minutes.
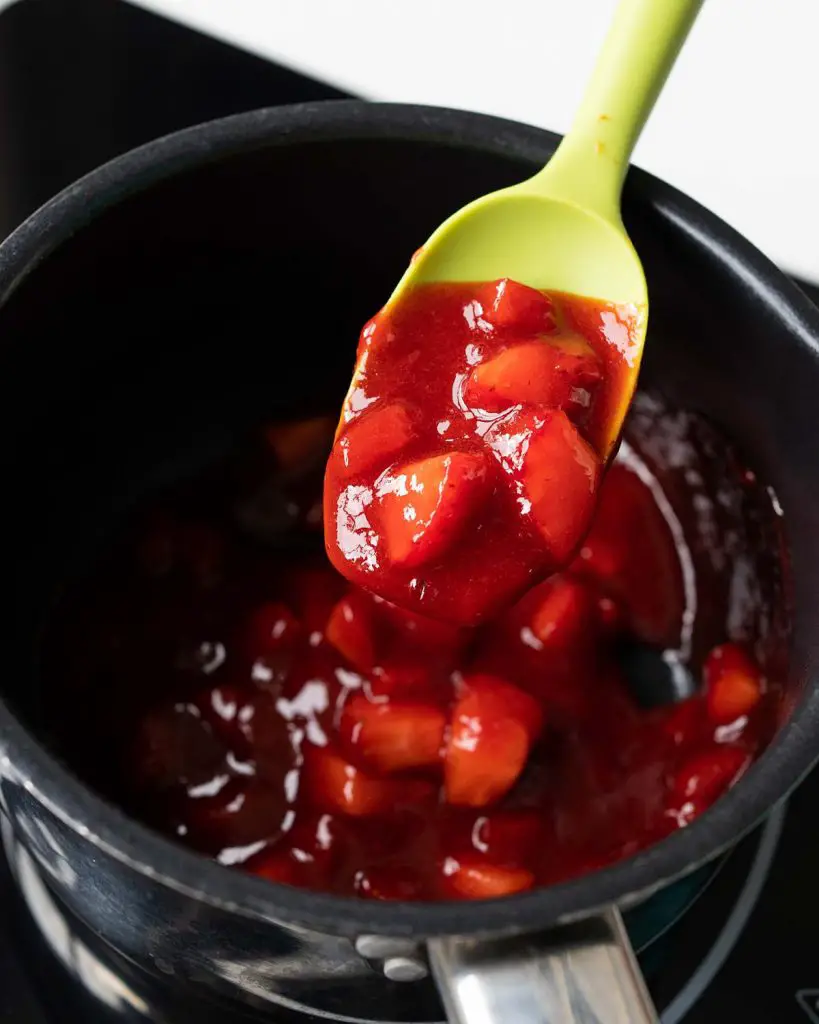
Step 3: Remove from the heat and add in the strawberries set aside earlier, stirring to coat them in the cooked sauce. Leave the strawberry topping to cool, then chill in the fridge until time to serve the cheesecakes.
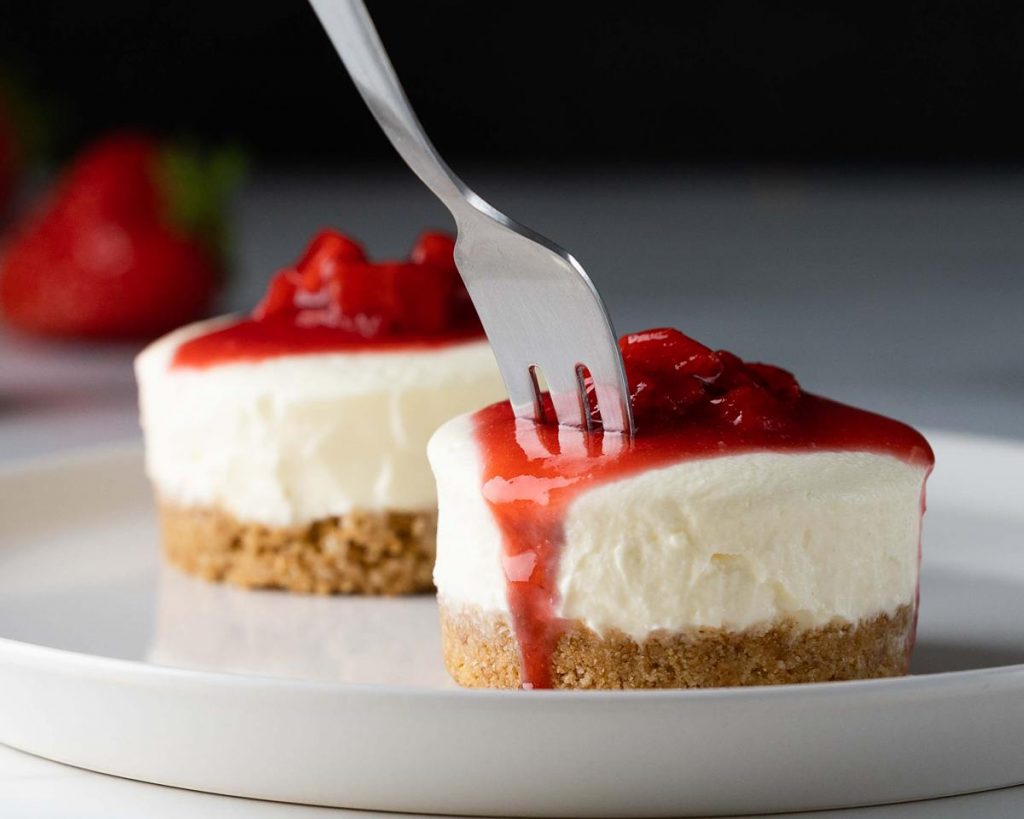
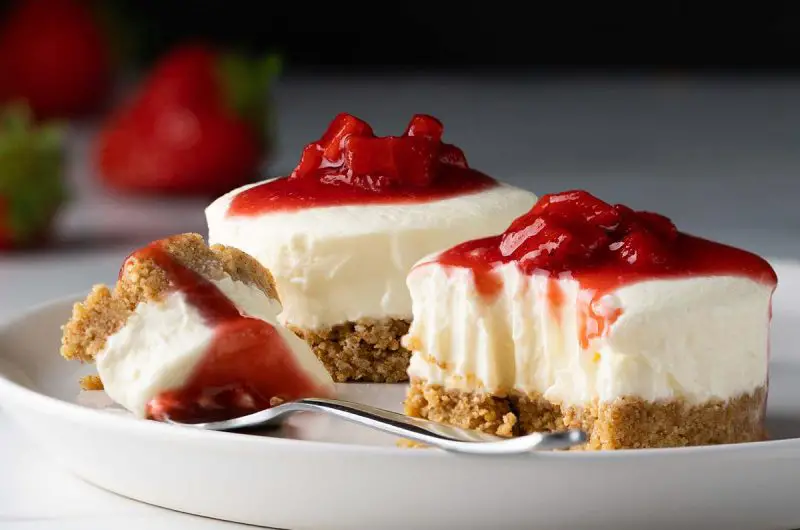
Step 4: When ready to serve, remove the cheesecakes from the tin by pushing up from the bottom to unmould them. Place on serving plates, then top with some of the strawberry topping. Serve and enjoy!
Can I make these without a special tin?
Yes of course! If you have not got a loose bottomed mini cakes tin as I have, you can use a cupcake or muffin tin to make mini no bake strawberry cheesecakes too. You will need to use cupcake or muffin cases, in order to make it easier to remove the finished mini cheesecakes from the tin. Once removed, you can peel off the paper cases before topping with strawberry cheesecake topping and serving.
Why is my mini no bake strawberry cheesecake runny?
There are a couple of things that could have gone wrong here. First, the cream cheese may have been overmixed. If this was the case, the cream cheese mixture would have looked like it split before you mixed it with the whipped cream. The other alternative is that the double (heavy) cream was not sufficiently whipped to stiff peaks. This means when it was combined with the cream cheese mixture, it was not firm enough to allow it to set.
How long does this strawberry no bake cheesecake take to set?
Thanks to their smaller size, these mini no bake strawberry cheesecakes should set quicker than their full sized cousins. However, I would still recommend leaving them to set for at least 4-5 hours before you dig in. The ideal would be overnight, but I do understand that waiting is tough!
Does no bake cheesecake have eggs?
There are no eggs in this no bake strawberry cheesecake recipe. If there were eggs in the cheesecake, you would need to bake it to allow the filling to set.
How long does no bake cheesecake last?
These mini no bake strawberry cheesecakes can be made a day or two before serving and will keep well in the fridge for up to two days before being enjoyed.
Should this mini no bake strawberry cheesecake be refrigerated?
Yes, it should be kept in the fridge due to the cream cheese and double cream used in the cheesecake.
Can no bake cheesecake be frozen?
Yes, it can! To freeze these mini cheesecakes, make and chill as directed to the end of the cheesecake instructions. Once they have set overnight, carefully remove them from the tin and place the mini cheesecakes in one layer in a freezer safe container. Seal the container securely and place in the freezer for up to three months. When you want to enjoy these cheesecakes again, simply thaw them in the fridge for at least 24 hours before serving.
Remember if you are freezing this recipe, not to freeze the strawberry topping on the cheesecake. Instead, make this for when you wish to serve the thawed mini cheesecakes and spoon over the top just before serving.
Additional tips for this mini no bake strawberry cheesecake recipe
- Press the biscuit base really firmly into the bottom of the pan to give a solid base for the filling. I use the end of my rolling pin to give me a flat surface to work with, but a small glass or even clean fingers work just as well.
- The base can be baked if desired. Baking the crusts makes them firmer and less crumbly, so it totally depends on the texture you prefer. If baking, once pressed into the tin, bake them for 5-7 minutes at 180C/350F. Please make sure the bases and tin are fully cool before topping with the cheesecake filling, or you will end up with a melted cheesecake puddle!
- The cream cheese and yogurt should be at room temperature before mixing. Using these ingredients at room temperature will ensure the cheesecake filling is smooth and creamy.
- Keep the double (heavy) cream cold until ready to use it. Cold cream whips up much better into the stiff peaks required in this recipe. I even like to chill my beaters and my bowl to help the process along, but this is entirely optional.
- When making the strawberry compote for the topping, be patient as the mixture cooks down. It takes a little while, but results in a rich stunning strawberry cheesecake topping and is totally worth it! I like a few firm pieces of fruit too, but if you prefer all the topping to be softer, you can just as easily cook all the fruit down together.
- Ensure both cheesecake and topping are well chilled before bringing them together to serve. A warm strawberry topping may melt the cheesecake and leave a puddle on your plate!
Troubleshooting
If you have any other questions about this recipe, please leave me a comment below, I will do my best to help you. And if you do make this recipe for mini no bake strawberry cheesecakes, please do consider leaving me a rating and review below. I would so appreciate your feedback to help me grow my website and it is incredibly helpful for others looking for a recipe too. Additionally, you could also post a picture on Instagram and tag me when you share it with the world. Go on, you know you want to!
More recipes from my blog for you to enjoy
Do check out these other yummy recipes on my blog too:
Strawberries and cream fudge: my strawberries and cream fudge is a take on a quintessentially British favourite. Creamy and delicious, with extra pops of flavour from the freeze dried strawberries, this will be everyone’s favourite fudge!
Mini key lime pies (eggless): irresistible individual buttery biscuit bases topped with a luscious creamy tangy and sweet key lime filling. Pipe with some softly whipped cream and a little lime zest and you have a perfect single serve summertime dessert!
Chocolate fudge doughnuts: moist, rich, soft and lighter than air! These chocolate cake doughnuts topped with the silkiest, smoothest and most incredible chocolate fudge glaze in the world are so hard to resist! Pure chocolate heaven!
And that’s it from me for today! Happy baking, my friends! x
Recommended equipment I used *
| Digital kitchen scales | Measuring spoons |
| Food processor | Loose-bottomed mini cakes tin |
| Mixing bowl | Electric hand mixer |
| Spatula | Small saucepan |
Mini No Bake Strawberry Cheesecakes
12
servings30
minutes30
minutes417
kcal4-10
hours1
hourMini sized adorable no bake cheesecakes topped with a luscious fresh strawberry topping!
Keep the screen of your device on
Ingredients
- For the mini cheesecakes
200 g (1 ¾ cups + 1 tbsp) digestive biscuits
80 g (¼ cup + 2 tbsp) unsalted butter, melted
550 g (2 ¼ cups + 3 tbsp) full fat cream cheese
275 ml (1 cups + 2 tbsp) double (heavy) cream
2 tbsp yogurt (I use Greek yogurt)
1 tsp lemon juice
1 tsp vanilla
65 g (½ cup) icing (powdered) sugar
- For the strawberry topping
450 g (2¾ cups) strawberries, stems removed and chopped
60 g (¼ cup + 1 tbsp) caster sugar
1.5 tsp lemon juice
Directions
- For the mini cheesecakes
- First, make the biscuit base for the cheesecake. Using the food processor, blitz the biscuits until they are crumbs. Add in the melted butter and blitz again to completely combine. Divide the mixture evenly between the individual cake tins and press down firmly to flatten for the bases of each cheesecake. Pop the tin in the fridge whilst making the no bake cheesecake filling.
- Once the base is chilling, time to make the no bake cheesecake filling. In a large mixing bowl, tip in the double (heavy) cream and beat to stiff peaks. This should take just a few minutes with a handheld electric whisk, or a little longer if done by hand.
- In a separate bowl, beat together the cream cheese, yogurt, lemon juice, vanilla and icing sugar until well combined and smooth.
- Add the whipped cream to the cream cheese mixture and fold it all together to thoroughly combine. Do this using a spatula, ensuring everything is evenly mixed together.
- Scoop or pipe the filling evenly over each biscuit base before levelling the top of each cheesecake. Pop the tray in the fridge to chill and set for at least four hours, but ideally overnight.
- For the strawberry topping
- Remove the green leaves and stem from the strawberries and chop them into small pieces. Set aside about 3-4 tablespoons of chopped strawberries, and place the rest in a saucepan with the lemon juice and sugar.
- Heat the strawberry mixture to melt the sugar, stirring to make sure the fruit is evenly coated with the lemon and sugar. Once the sugar has melted, cook the mixture until the strawberries break down, and the liquid has thickened to a beautiful rich red sauce. This cooking takes about 20-25 minutes.
- Remove from the heat and add in the strawberries set aside earlier, stirring to coat them in the cooked sauce. Leave the strawberry topping to cool, then chill in the fridge until time to serve the cheesecakes.
- When ready to serve, remove the cheesecakes from the tin by pushing up from the bottom to unmould them. Place on serving plates, then top with some of the strawberry topping. Serve and enjoy!
Notes
- Press the biscuit base really firmly into the bottom of the pan to give a solid base for the filling. I use the end of my rolling pin to give me a flat surface to work with, but a small glass or even clean fingers work just as well.
- The base can be baked if desired. Baking the crusts makes them firmer and less crumbly, so it totally depends on the texture you prefer. If baking, once pressed into the tin, bake them for 5-7 minutes at 180C/350F. Please make sure the bases and tin are fully cool before topping with the cheesecake filling, or you will end up with a melted cheescake puddle!
- The cream cheese and yogurt should be at room temperature before mixing. Using these ingredients at room temperature will ensure the cheesecake filling is smooth and creamy.
- Keep the double (heavy) cream cold until ready to use it. Cold cream whips up much better into the stiff peaks required in this recipe. I even like to chill my beaters and my bowl to help the process along, but this is entirely optional.
- When making the strawberry compote for the topping, be patient as the mixture cooks down. It takes a little while, but results in a rich stunning strawberry cheesecake topping and is totally worth it! I like a few firm pieces of fruit too, but if you prefer all the topping to be softer, you can just as easily cook all the fruit down together.
- Ensure both cheesecake and topping are well chilled before bringing them together to serve. A warm strawberry topping may melt the cheesecake and leave a puddle on your plate!