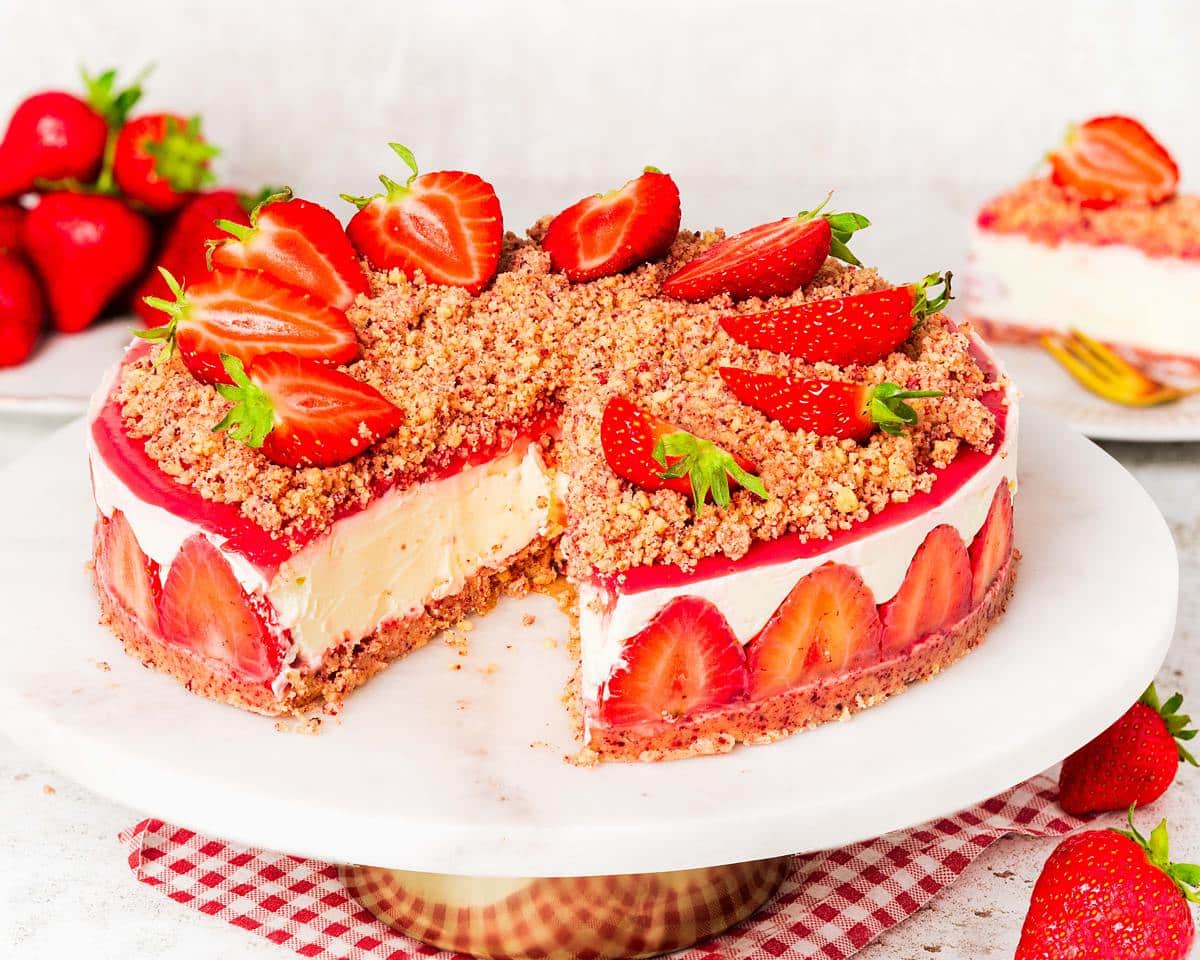
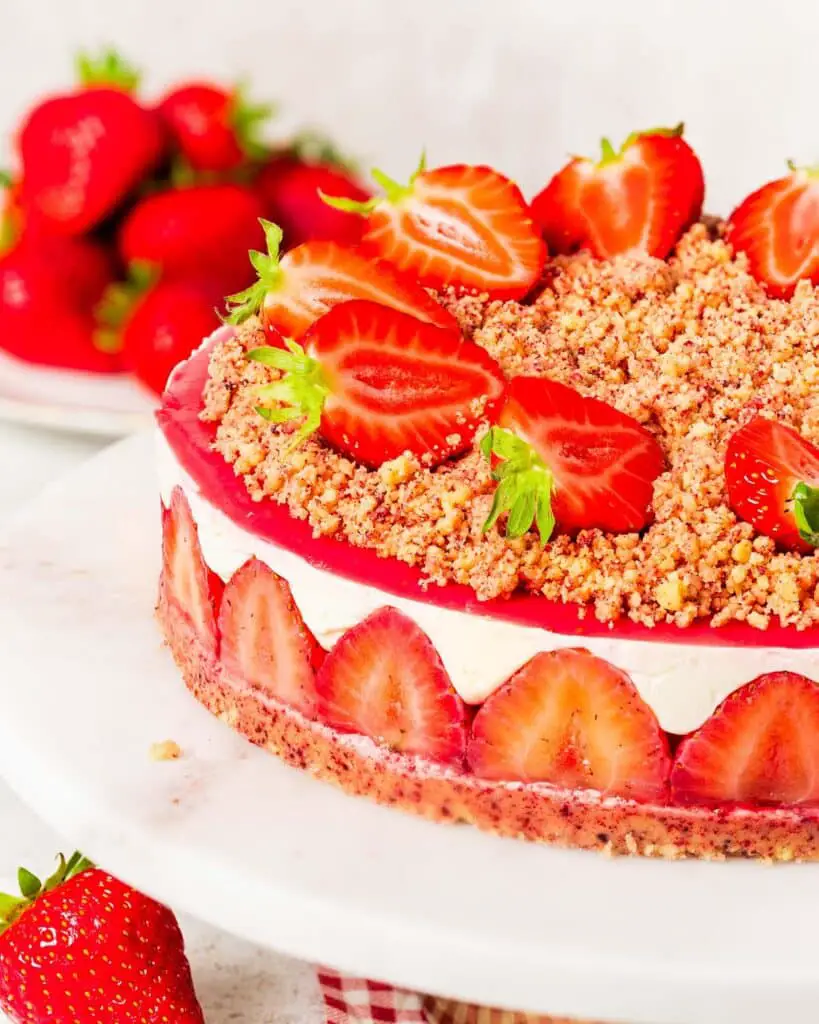
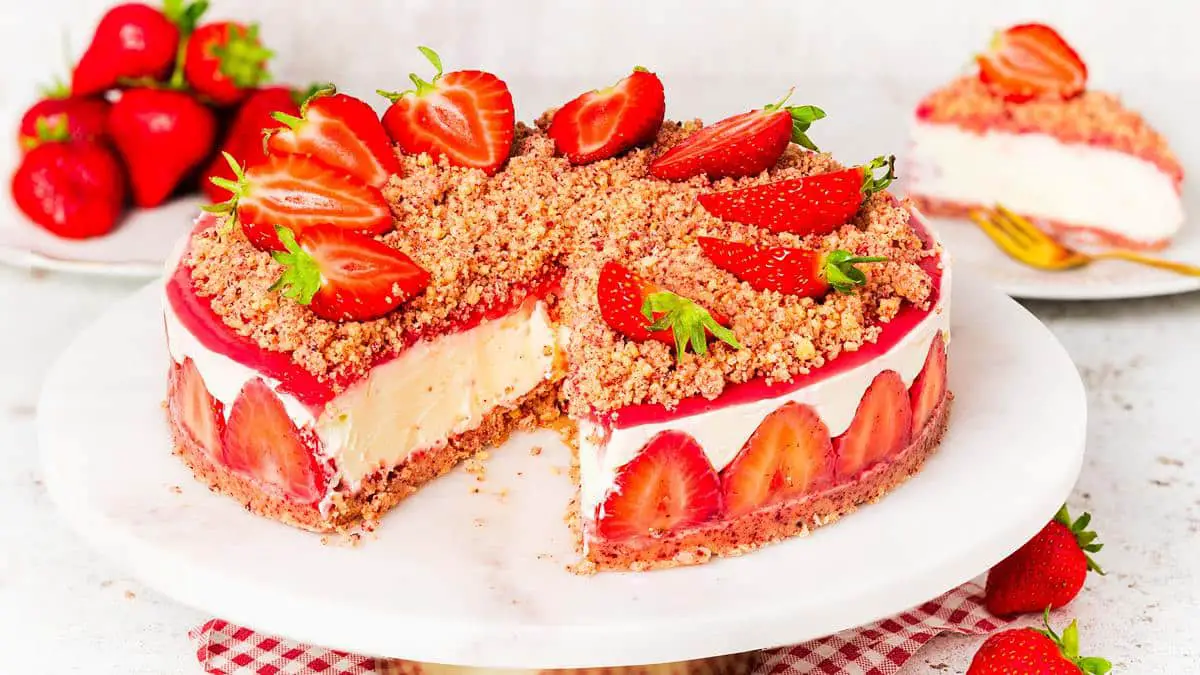
My strawberry cheesecake crunch is a wonderful summertime dessert with real wow factor! It has plenty of strawberry flavour from the fresh strawberry sauce and whole fruit as well as the freeze dried strawberries used in the biscuit base and topping. Paired with the creamy cheesecake filling and a pretty decorative strawberry half on top, and you have a really showstopper dessert!
Why you’ll love this strawberry cheesecake crunch recipe
- Simple ingredients. This no bake strawberry cheesecake uses readily available ingredients in most stores, so can easily be whipped up whenever the craving hits!
- Easy to put together. Since there is no cooking or baking, this no bake cheesecake recipes comes together really quite easily. As a bonus, because it is simple to make, it makes a lovely make ahead dessert to get little ones helping in the kitchen too!
- Makes a change! For me, as much as I love cheesecakes, it can get a little samey with the biscuit base and cheesecake on top. My version has halved strawberries decorating the sides along with a strawberry sauce, giving this dessert extra flavour, texture and wow factor!
- Convenient. No bake cheesecakes are convenient to make as they require zero cooking or oven time. Plus, if you are entertaining, no bake cheesecakes are an amazing dessert choice as they are made ahead of serving time!
Strawberry crunch cheesecake components
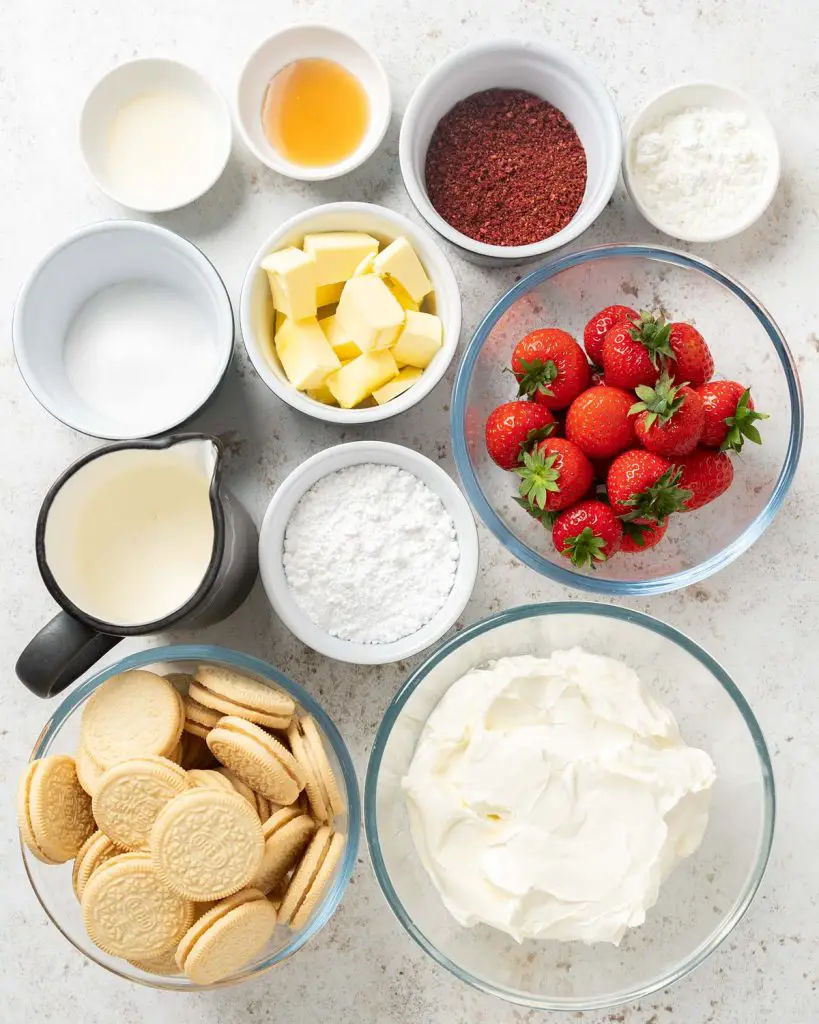
- Oreos: I used golden oreos here for a lighter crust and a delicate vanilla flavour. Used for the biscuit base as well as the crunch topping.
- Freeze dried strawberries: gives delicious flavour to the cheesecake base and adds specs of wonderful colour to the topping too.
- Butter: I use melted unsalted butter in the base of the no-bake strawberry cheesecake. It gives a wonderful rich flavour and helps bind the biscuits together when making the base.
- Cream cheese: make sure to use a full fat cream cheese when making the filling for any no bake cheesecake recipe, as this is part of what helps the filling set firmly. Plus it gives the oreo and strawberry cheesecake a wonderfully rich and decadent texture!
- Icing sugar: just a little, for sweetness in the cheesecake filling.
- Vanilla: for delicious flavour in the cheesecake filling, perfectly compliments the base and the strawberry flavours.
- Double/heavy cream: whipped up, this gives body, richness and stability to the strawberry crunch cheesecake recipe.
- Strawberries: fresh strawberries are used to create the strawberry sauce that tops the no bake vanilla cheesecake, and are used cut in half for decorating around the outside of the dessert. So pretty!
- Caster sugar: to sweeten the strawberry sauce, just a little bit to enhance the natural sweetness of the fruit.
- Lemon juice: acts as a natural preservative and helps the sauce keep its beautiful colour.
- Cornflour/cornstarch: used when making the strawberry sauce to thicken the mixture ready for spreading over the strawberry crunch cheesecake no bake.
Equipment needed to make a no bake cheesecake
- Digital kitchen scales*: I provide all my measurements in cups too, however I would encourage all bakers to weigh out ingredients when baking. A set of digital kitchen scales is so useful and totally an essential baking tool for me.
- Measuring spoons*: a set of measuring spoons is essential for any baker. This is because these are more accurate than using everyday teaspoons and tablespoons, which can vary greatly in size.
- Food processor*: a super quick way to make the biscuit base for this cheesecake. If you do not have a food processor, place the biscuits into a sealable freezer bag and bash with a rolling pin instead.
- Springform tin*: to make this strawberry crunch cheesecake recipe in. There is absolutely no need to line the base or grease before making the cheesecake, it should come off easily enough. However, I like to add a smaller circle of parchment as it does make it so much easier to lift off.
- Mixing bowl*: to mix all the ingredients together to make the strawberry cheesecake no bake.
- Handheld electric mixer*: a useful tool to make life easier in the kitchen! You can, of course, make this recipe entirely by hand. But it will be a bit of a workout for your arm!
- Spatula*: used to scrape down the bowl. This helps to ensure everything mixes together thoroughly when making this easy cheesecake.
- Offset spatula*: This tool makes the job of levelling the top of the vanilla no bake cheesecake so much easier than a regular spatula or knife.
- Small saucepan*: to make and cook down the strawberry sauce when making this strawberry crunch cheesecake.
- Sieve*: to push the cooked strawberry goo through, giving a beautiful smooth sauce to go over the top.
How to make strawberry crunch cheesecake
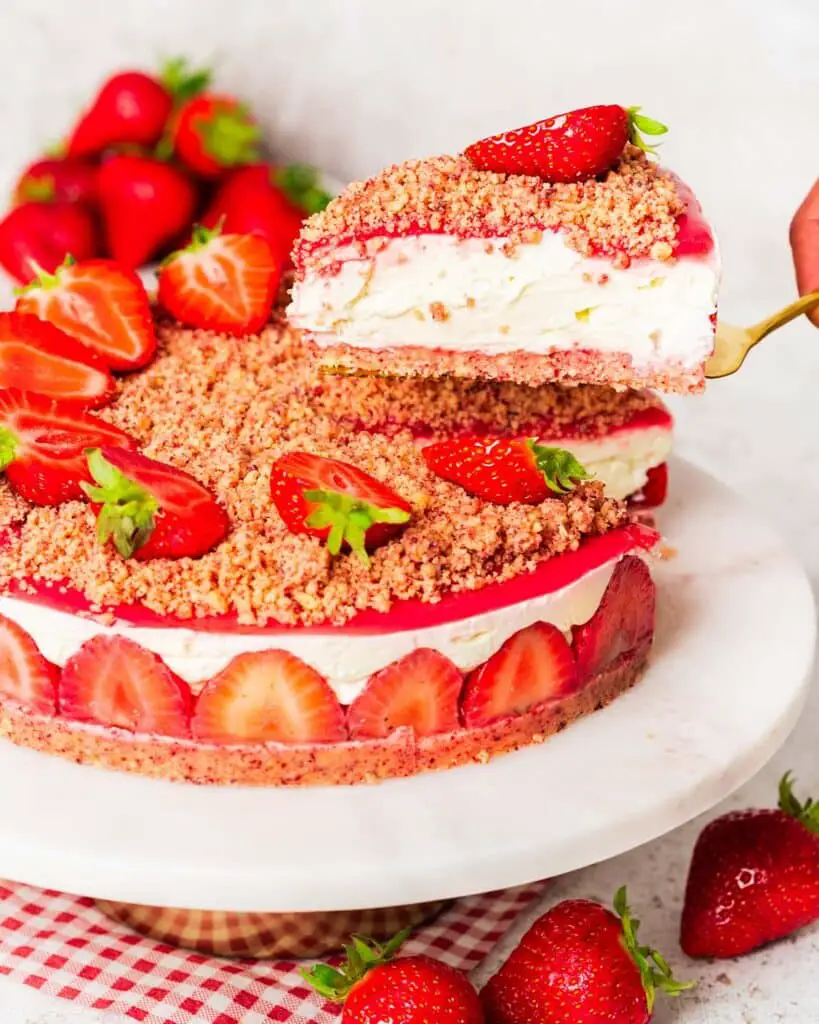
This strawberry cheesecake crunch recipe is so simple to put together but looks so impressive! Simply mix together the base ingredients and press about ⅔ of the mixture into the tin. Place a row of hulled and halved strawberries all around the edge, then beat the cheesecake filling and spread over the top, pushing it in between the strawberry edge. Once chilled, top with the strawberry goo, sprinkle on the reserved biscuit base and decorate with strawberry halves. Yum!
For the biscuit base
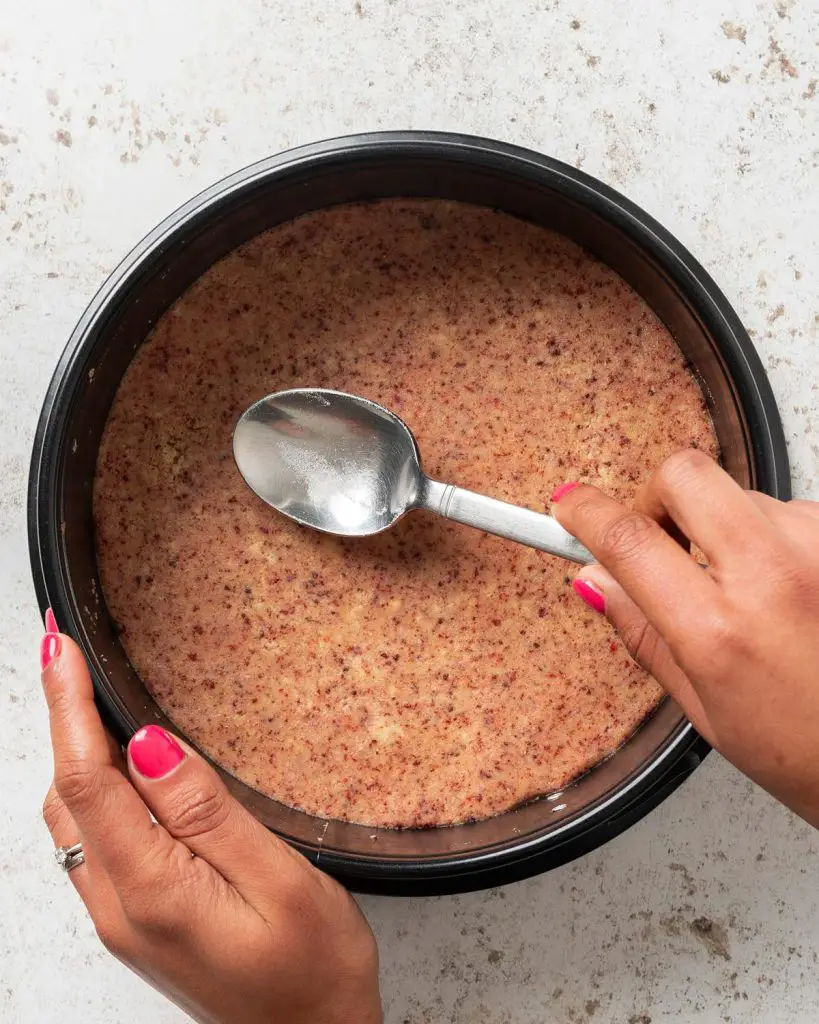
Step 1: Place the biscuits and freeze dried strawberries into a food processor and blitz until the biscuits are completely crumbled. If you do not have a food processor, pop the biscuits into a sealable bag and bash them with a rolling pin until well crushed. Both work fine, one is definitely more therapeutic (!), but I prefer using a food processor purely for speed.
Step 2: Add in the melted butter and mix through, scraping down the bowl to make sure everything is really well combined. Tip about ⅔ of the biscuit mixture into an 8″ springform tin and press it down evenly to make a flat base. Pop the tin in the fridge to allow the base to chill until needed.
How to make the cheesecake filling
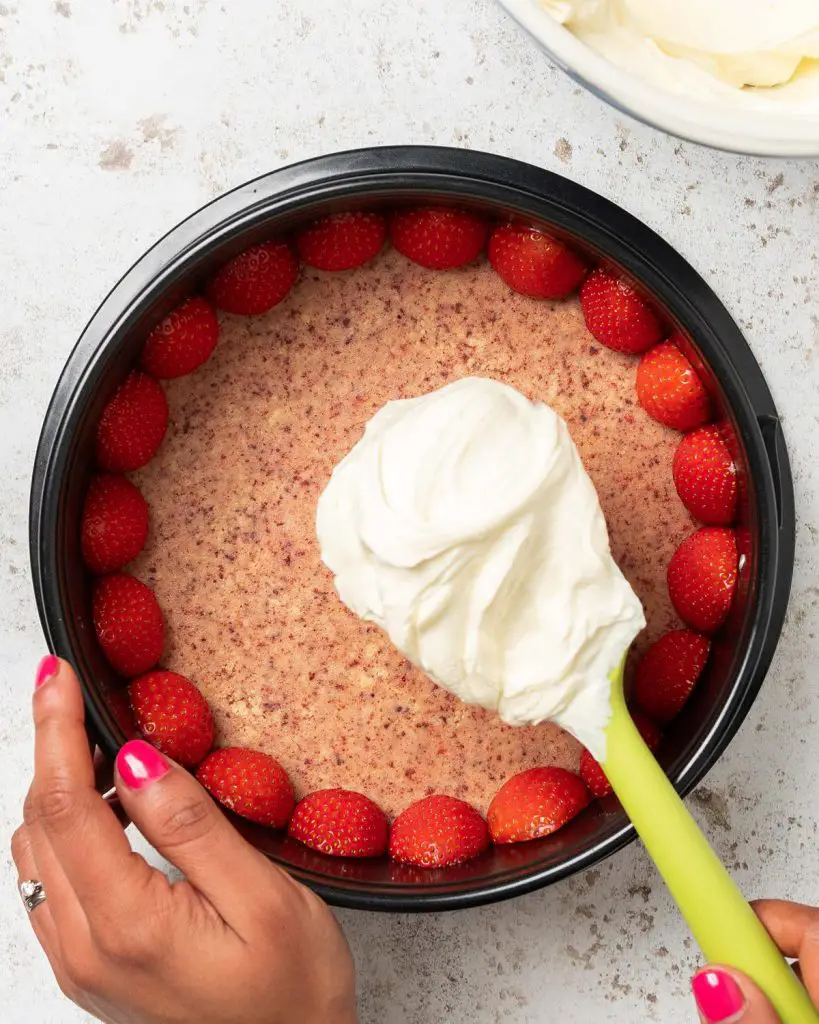
Step 1: In a large mixing bowl, beat together the cream cheese, vanilla and icing sugar until smooth and creamy.
Step 2: Pour in the double cream and beat it all together until the double cream is well combined with the cheese and the mixture thickens. Set aside until required. The cheesecake filling is done!
Assembling the cheesecake
Step 1: Choose strawberries that are roughly the same height and width. Half each strawberry, then cut a flat edge to remove the leaves and stem. Place on some kitchen towel to absorb some of the juices.
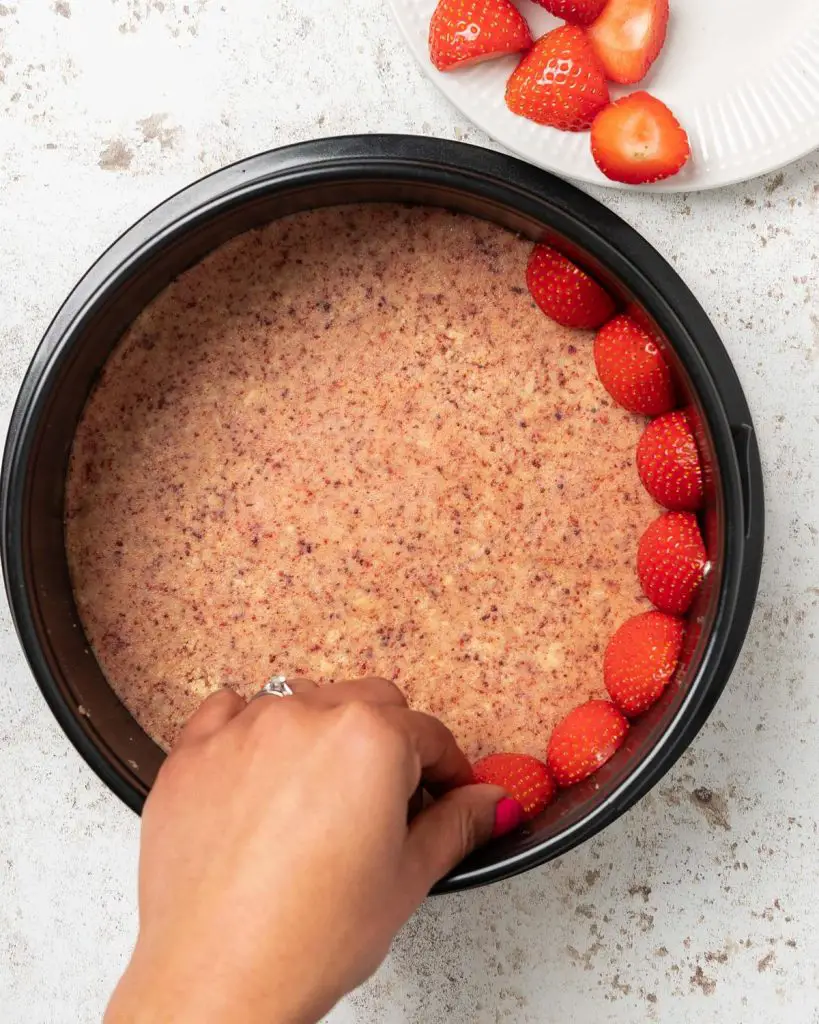
Step 2: Pull the tin with the base out of the fridge, and place a strawberry half against the side of the tin. Make sure the flat tops are at on the base, point facing up, and the cut edges are against the side of the tin. Use as many strawberry halves as required to create a strawberry border around the tin.
Step 3: Spoon the cheesecake filling onto the base, spreading it out and making sure to fill the space in between the strawberries around the edge. Once all the cheesecake filling has been added to the tin, smooth and level the top using an offset spatula. Chill for at least 3-4 hours, preferably overnight.
Making homemade strawberry sauce
Step 1: Remove the green leaves and stem from the strawberries and chop them into small pieces. Place them in a saucepan with the lemon juice and sugar.
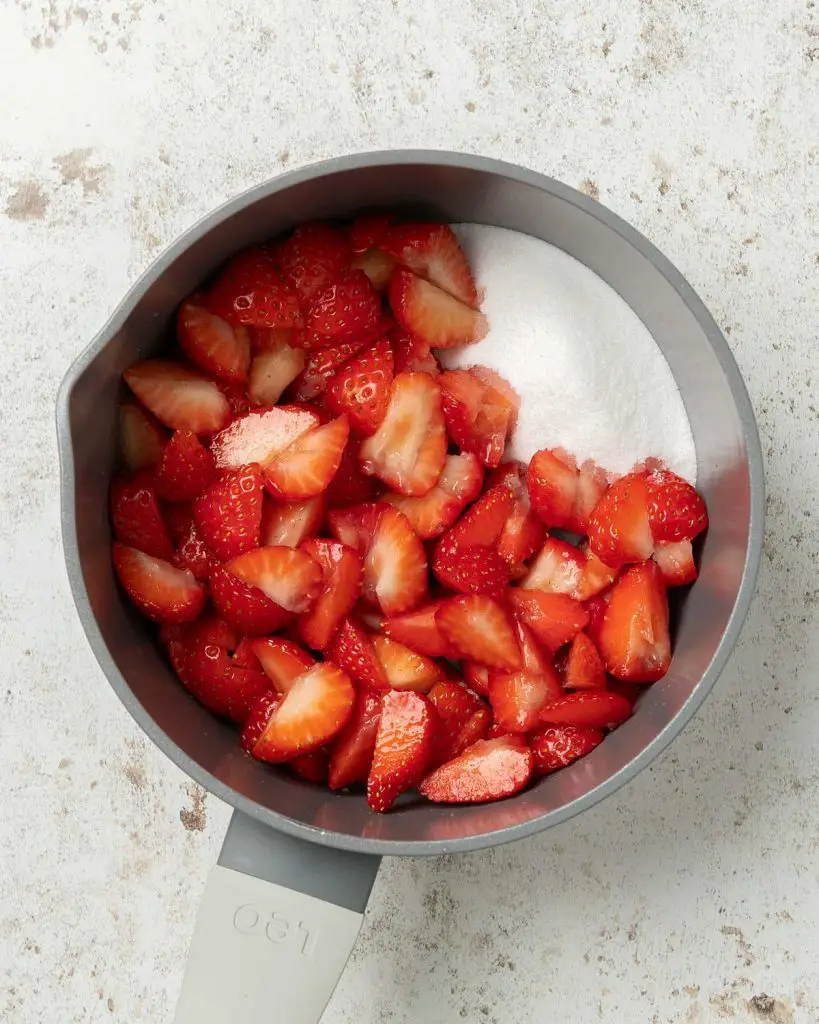
Step 2: Heat the strawberry mixture to melt the sugar, stirring to make sure the fruit is evenly coated with the lemon and sugar. Once the sugar has melted, cook the mixture until the strawberries break down. Add in the cornflour and cook until the mixture starts to thicken.
Step 3: Remove the strawberry mixture from the heat and blitz or mash until smooth. Push the strawberry goo through a sieve to remove any seeds and leave to cool before using on the cheesecake.
Finishing the cheesecake
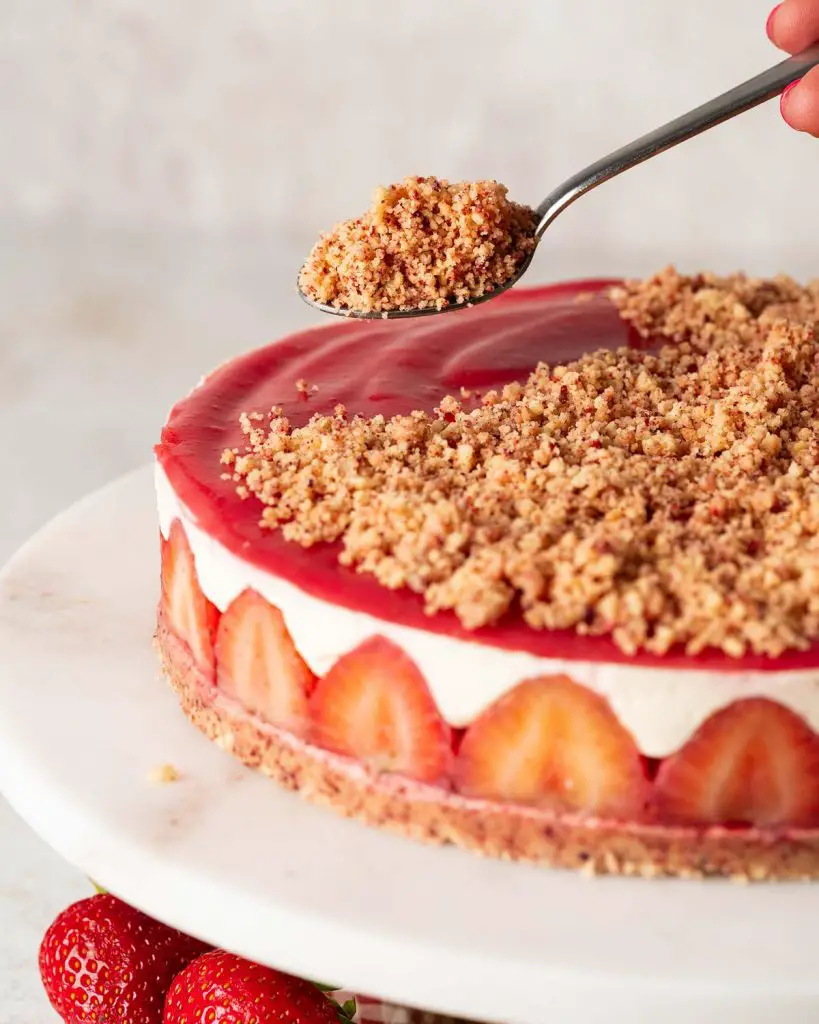
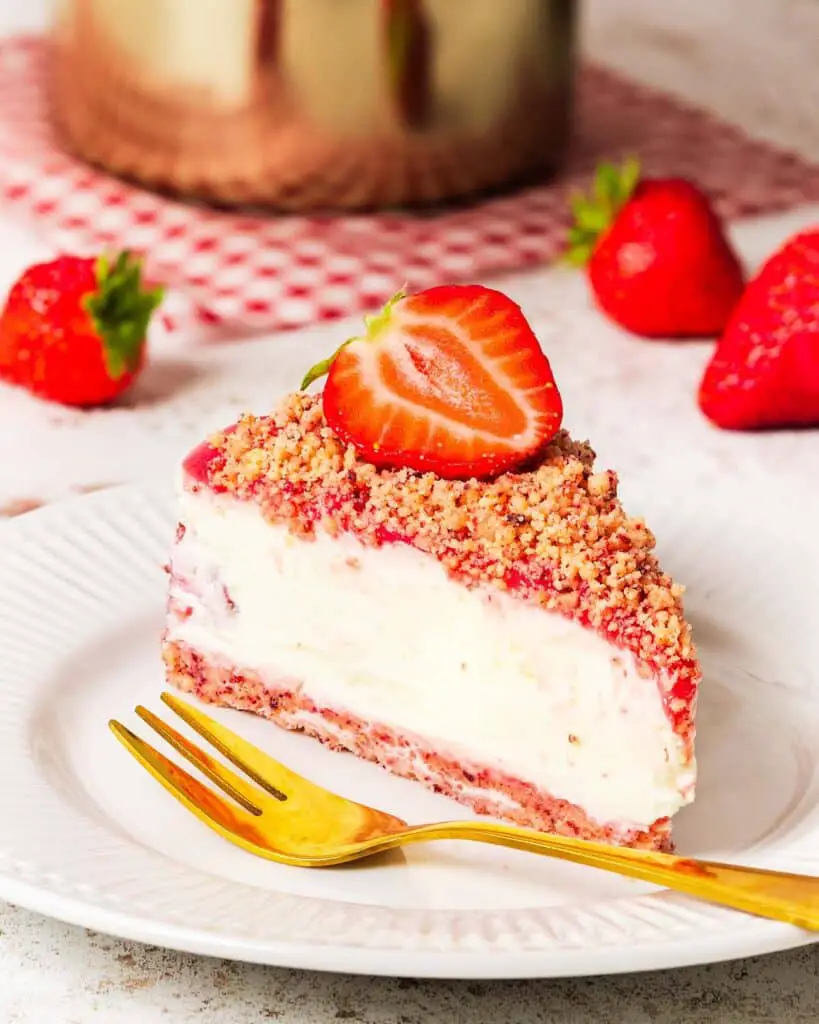
Step 1: Once the cheesecake has chilled and the strawberry sauce has cooled, its time to finish assembling the cheesecake! Remove the cheesecake from the tin and place on a serving dish.
Step 2: Spread the strawberry sauce over the top of the cheesecake in an even layer, leaving a little gap around the outer edge.
Step 3: Do this part just before serving to keep the crunch of the topping. Sprinkle the reserved biscuit base over the strawberry sauce in an even layer, leaving little gaps to allow the sauce to peak through for some pretty colour.
Step 4: Top the cheesecake with some halved strawberries for decoration. Enjoy!

Do no bake cheesecakes use eggs?
There are no eggs in this easy strawberry crumble cheesecake. A cheesecake recipe with eggs in the ingredients will need to be baked. This is to allow the eggs to cook and set the cheesecake.
Making this strawberry cheesecake crunch without a springform pan
A springform tin is a really useful tool as it makes it so much easier to release the strawberry crunch cheesecake with golden oreos from the tin. If you do not have a springform tin, you could use a loose bottomed cake tin too. Anything that will allow you to lift the cheesecake out of the tin will work when making this.
Do you need to line a springform cake tin for a cheesecake?
No, there is no need to line the springform when making a cheesecake, it should release easily enough without. Simply run an off set spatula or a thin knife under the base to release it from the tin before transferring it to a serving plate.
Having said this, I do sometimes like to line the base with a small circle of parchment as this does help make it a teensy bit easier to get the cheesecake off the base!
How do I get a lump free cheesecake?
Always make sure the cream cheese is at room temperature before mixing. This will help you make sure the filling is smooth and creamy.
How to store a strawberry crunch cheesecake
This no bake cheesecake should be stored in the fridge. I keep my serving dish in the fridge, once the cheesecake has been unmoulded. Cover with a microwave lid to avoid too much moisture remaining and settling on the cheesecake. This cheesecake should be eaten within two days of making, due to the fresh strawberries.
Making this no bake strawberry cheesecake in advance
Make this cheesecake up to a day ahead of serving. I would recommend doing the crumble decoration on top just before serving. This is to ensure the crunch of the topping remains crunchy and does not become soft for absorbing the moisture of the topping and cheesecake. Eat within two days.
Tips for the best strawberry crunch cheesecake
- Press the biscuit base really firmly into the bottom of the pan to give a firm base for the filling. I use the end of my rolling pin to give me a flat surface to work with. A small glass, the back of a spoon or even clean fingers work just as well.
- You can bake the cheesecake base if you wish. Baking the crust makes it firmer and less crumbly, so it completely depends on the texture you prefer. Once pressed into the tin, bake the crust for about 8 minutes at 180C/350F. Please make sure the base and tin are fully cool before topping with the fresh strawberries and vanilla cheesecake filling, or you will end up with a melted cheesecake puddle!
- The cream cheese should be at room temperature before mixing. Using it at room temperature will ensure the cheesecake filling is smooth and creamy.
- Make sure the strawberries used around the edge for decoration are at room temperature before you cut them. This will ensure there is minimal condensation and moisture when the cheesecake is assembled, which could affect the finished cheesecake filling.
- For the decoration around the edges, try to use strawberries that are evenly matched in size, both height and width. Cut flat across the top to remove the leaves and stem, then in half as in the photos. Dab the cut sides with some kitchen towel to remove as much moisture as possible before using to decorate.
- When spreading the cheesecake filling in the tin, make sure to gently push it in between the strawberry pieces too, for a pretty effect once it is out of the tin.
- Once the cheesecake has been removed from the tin and is on the serving plate, gently spread the strawberry sauce over the top, easing it near but not completely to the edges.
- Add the crunchy top to the cheesecake and the strawberry decoration soon before serving. This will ensure the crunch keeps its texture and does not go soft or soggy.
Troubleshooting
If you have any questions about this strawberry cheesecake recipe, please comment below and I will do my best to help. And do remember: if you enjoy this recipe for strawberry cheesecake crunch, please leave a rating and review below. You could even post a picture on Instagram and tag me when you share it with the world. You already know I would love to see!
What are some easy no bake cheesecake recipes?
Rhubarb cheesecake: Make the most of seasonal rhubarb with this delicious cheesecake. A buttery digestive biscuit crust topped with smooth creamy vanilla cheesecake, layered and swirled with a rich rhubarb compote. A simple but wonderful dessert for any occasion!
Mini blackberry cheesecakes: Serve these individual servings of blackberry cheesecake to friends and family for a delightful summery dessert. Creamy and dreamy, with a delicate almond flavoured crust and a pretty drizzle to decorate. These beauties are sure to delight everyone who has one!
Biscoff cheesecake: Calling all fans of Biscoff! This delicious no bake cheesecake is packed with delicious flavour and texture of both the spread and the biscuits! With a hidden texture in the middle of the cheesecake using extra crushed biscuits and drizzled spread, this six ingredient Biscoff cheesecake really is totally irresistible!
Thanks so much for joining me today, friends. And as always, happy dessert making! x
Recommended equipment I used *
| Digital kitchen scales | Measuring spoons |
| Food processor | Springform tin |
| Mixing bowl | Handheld electric mixer |
| Spatula | Offset spatula |
| Small saucepan | Sieve |
Strawberry Cheesecake Crunch (No Bake)
Ingredients
For the biscuit base
- 350 g (3 cups + 3 tbsp) golden oreos
- 15 g (½ cup) freeze dried strawberries
- 85 g (¼ cup + 2 tbsp) unsalted butter, melted
For the cheesecake
- 10-12 fresh strawberries
- 600 g (2 ½ cups + 3 tbsp) full fat cream cheese
- 80 g (½ cup + 1 tbsp) icing (powdered) sugar
- 1 tsp vanilla
- 250 ml (1 cup + 1 tbsp) double (heavy) cream
For the strawberry sauce
- 250 g (1 ¼ cups) strawberries
- 2 tbsp caster sugar
- 1 tsp lemon juice
- 1 tbsp cornflour
Instructions
For the biscuit base
- Place the biscuits and freeze dried strawberries into a food processor and blitz until the biscuits are completely crumbled. If you do not have a food processor, pop the biscuits into a sealable bag and bash them with a rolling pin until well crushed. Both work fine, one is definitely more therapeutic (!), but I prefer using a food processor purely for speed.
- Add in the melted butter and mix through, scraping down the bowl to make sure everything is really well combined. Tip about ⅔ of the biscuit mixture into an 8" springform tin and press it down evenly to make a flat base. Pop the tin in the fridge to allow the base to chill until needed.
How to make the cheesecake filling
- In a large mixing bowl, beat together the cream cheese, vanilla and icing sugar until smooth and creamy.
- Pour in the double cream and beat it all together until the double cream is well combined with the cheese and the mixture thickens. Set aside until required. The cheesecake filling is done!
Assembling the cheesecake
- Choose strawberries that are roughly the same height and width. Half each strawberry, then cut a flat edge to remove the leaves and stem. Place on some kitchen towel to absorb some of the juices.
- Pull the tin with the base out of the fridge, and place a strawberry half against the side of the tin. Make sure the flat tops are at on the base, point facing up, and the cut edges are against the side of the tin. Use as many strawberry halves as required to create a strawberry border around the tin.
- Spoon the cheesecake filling onto the base, spreading it out and making sure to fill the space in between the strawberries around the edge. Once all the cheesecake filling has been added to the tin, smooth and level the top using an offset spatula. Chill for at least 3-4 hours, preferably overnight.
Making homemade strawberry sauce
- Remove the green leaves and stem from the strawberries and chop them into small pieces. Place them in a saucepan with the lemon juice and sugar.
- Heat the strawberry mixture to melt the sugar, stirring to make sure the fruit is evenly coated with the lemon and sugar. Once the sugar has melted, cook the mixture until the strawberries break down. Add in the cornflour and cook until the mixture starts to thicken.
- Remove the strawberry mixture from the heat and blitz or mash until smooth. Push the strawberry goo through a sieve to remove any seeds and leave to cool before using on the cheesecake.
Finishing the cheesecake
- Once the cheesecake has chilled and the strawberry sauce has cooled, its time to finish assembling the cheesecake! Remove the cheesecake from the tin and place on a serving dish.
- Spread the strawberry sauce over the top of the cheesecake in an even layer, leaving a little gap around the outer edge.
- Do this part just before serving to keep the crunch of the topping. Sprinkle the reserved biscuit base over the strawberry sauce in an even layer, leaving little gaps to allow the sauce to peak through for some pretty colour.
- Top the cheesecake with some halved strawberries for decoration. Enjoy!
This was so tasty, loved the crunchy topping to offset the creamy cheesecake and smooth strawberry sauce. The tips in the notes section are really helpful too.
A great summer dessert to offer visiting friends – just need the sun now!
This was SO GOOD! I took it to a dinner party and it was devoured with each of the couples taking a slice home – cheers for sharing a slightly different (and delicious!) cheesecake recipe! 😁