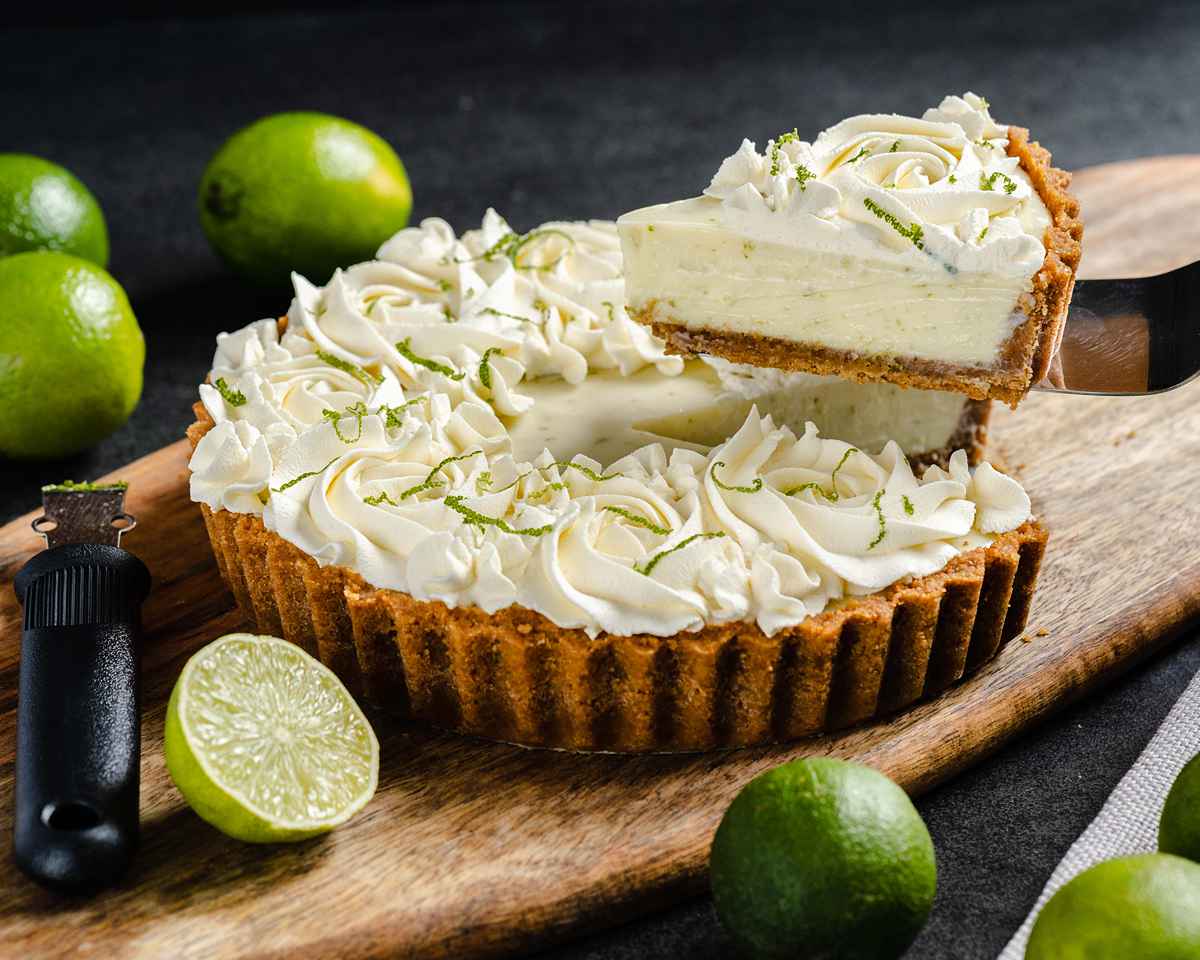
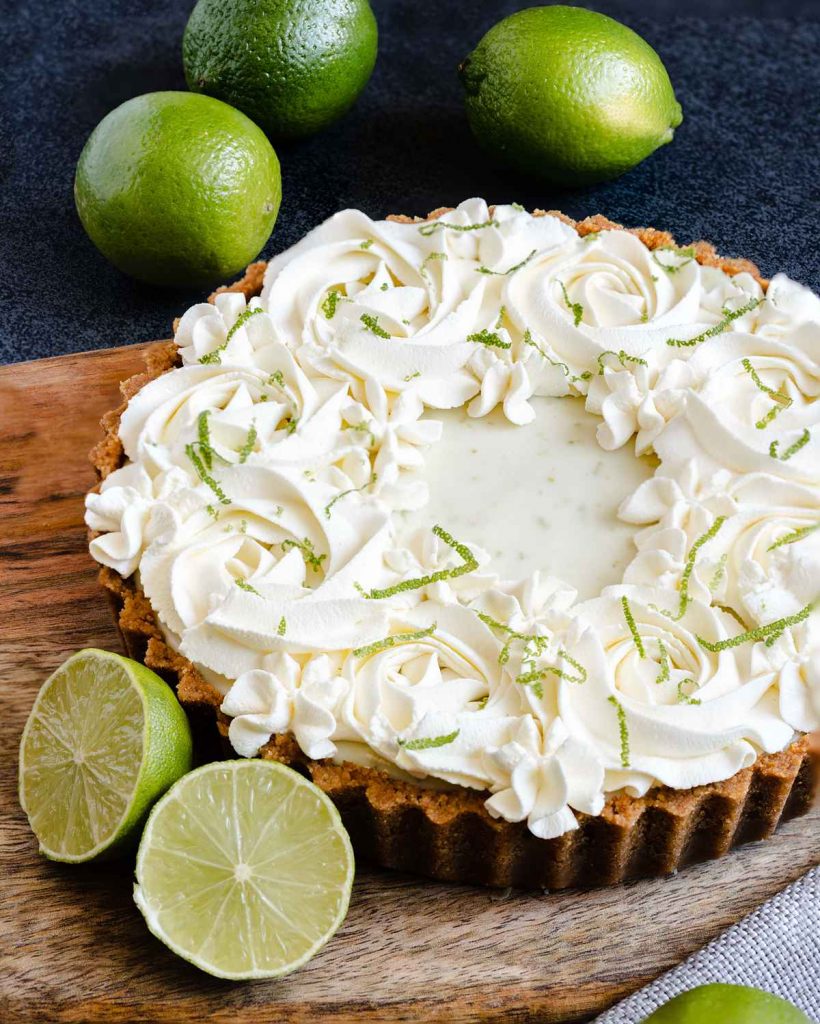
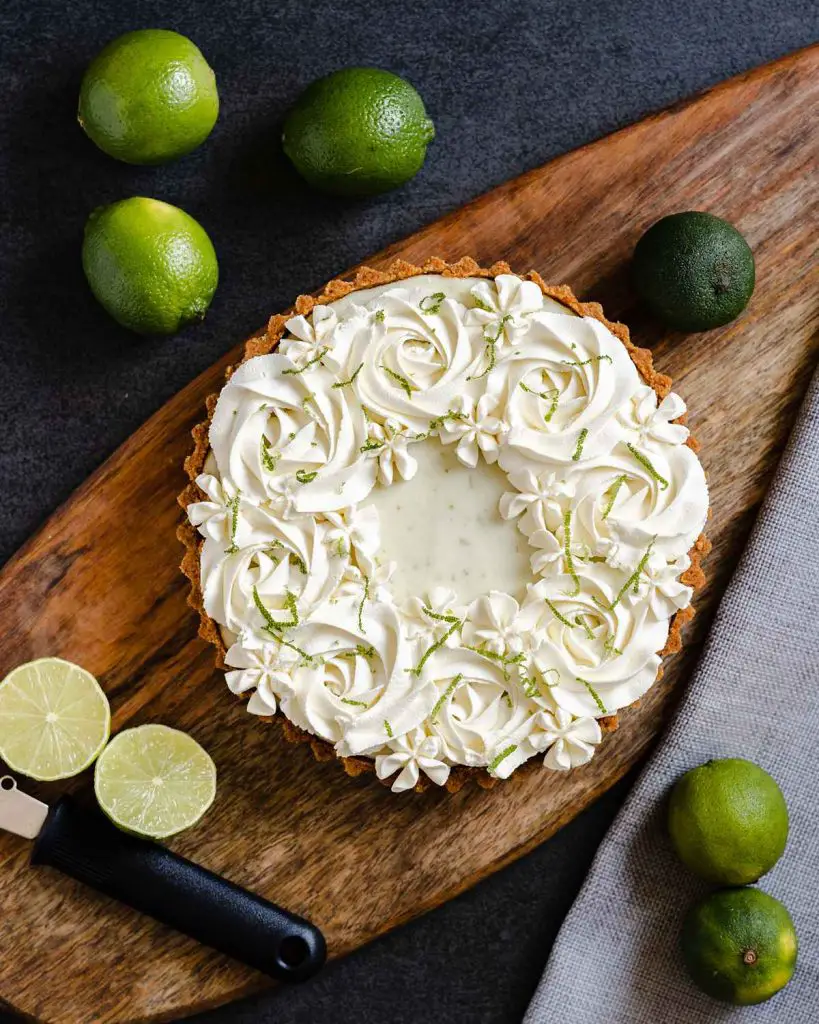
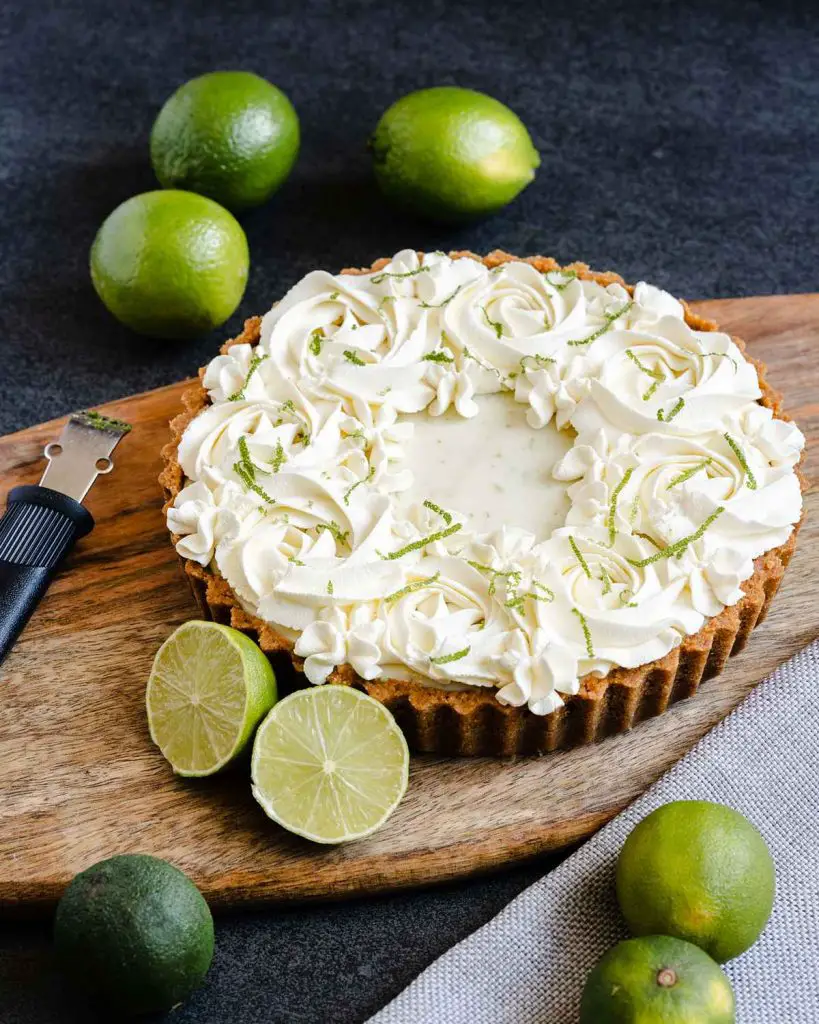
My eggless key lime pie uses no eggs, and can easily be made dairy-free too! A beautiful buttery biscuit base, filled with creamy key lime filling and topped with swirls of softly whipped cream and lime zest. Brilliant for entertaining – or just because!
Citrus flavours in bakes
Loving citrus flavours in bakes is a relatively new thing for me. Certainly as a child, I was not at all a fan! Then again, as I child, dessert meant chocolate and nothing else, so citrus stood no chance! Now however, I will gladly enjoy lemon and lime flavours in bakes. In fact, especially during summer months, I find them so refreshing!
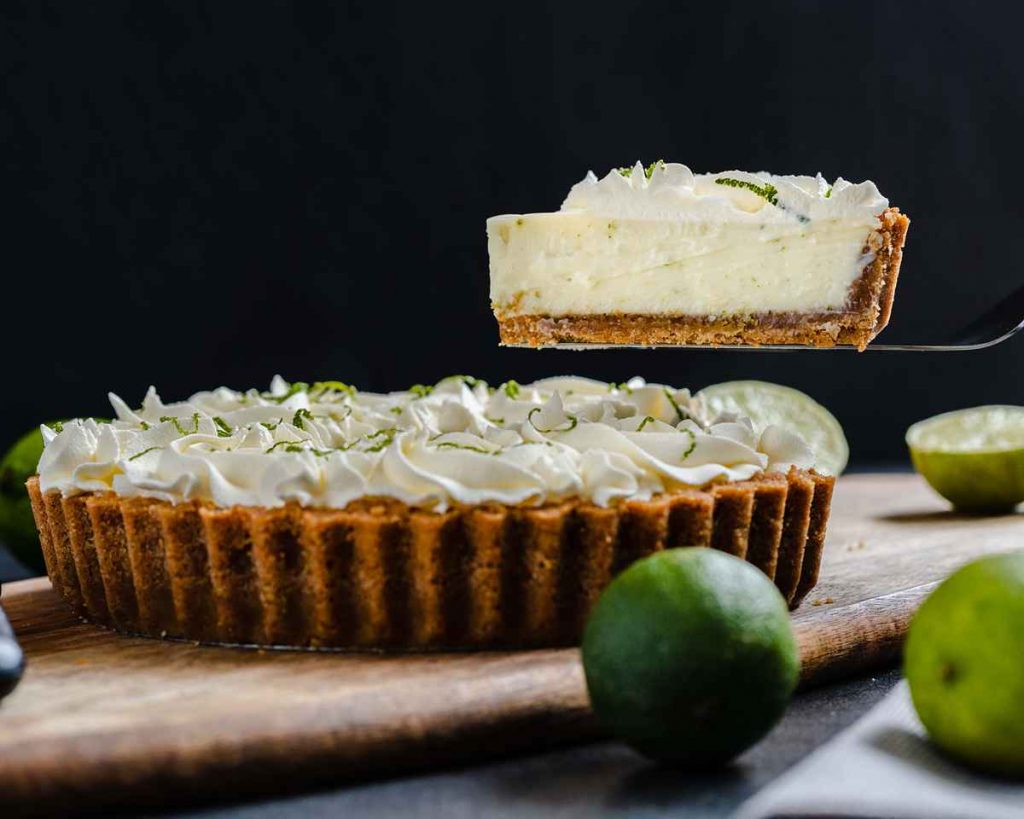
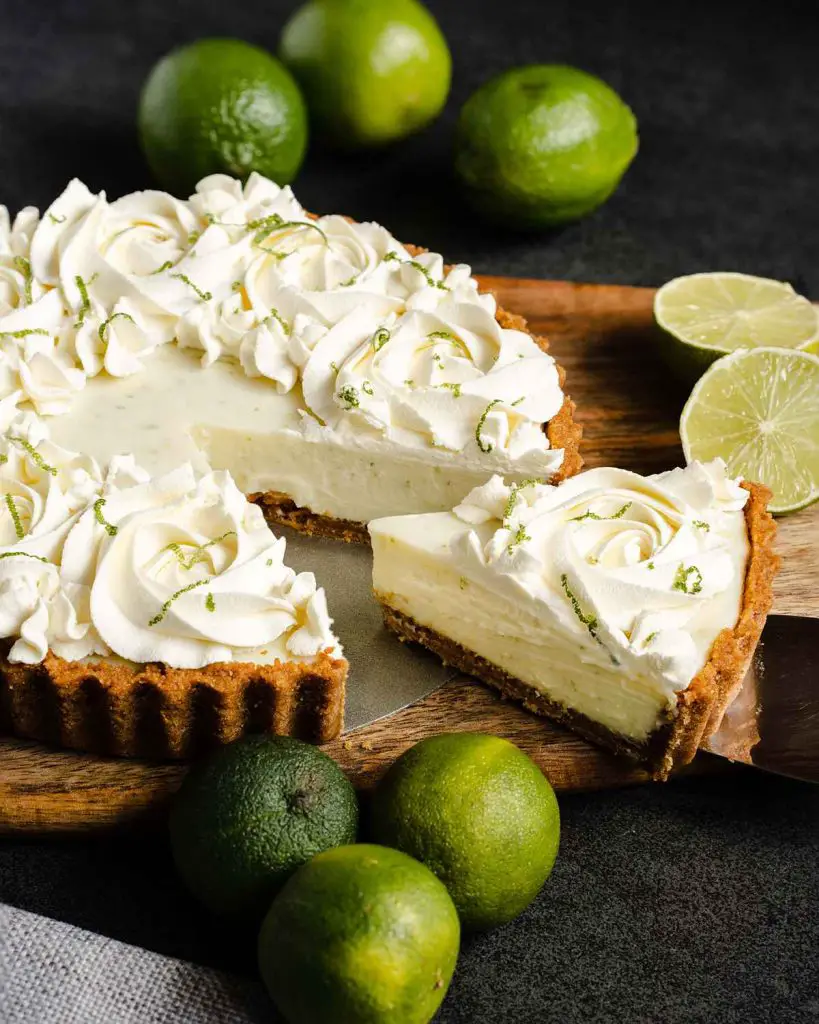
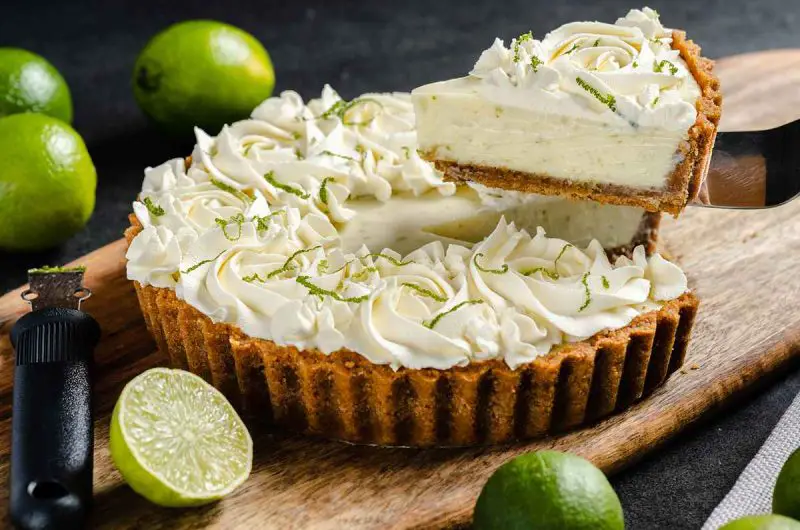
Key lime was something I had heard of from American sitcoms and tv, but not really experienced. A lot of the recipes I came across for this classic bake were either more like a no bake cheesecake or a baked pie using eggs. My experience with the latter often led to cracked or overbaked chalky fillings, both of which I wanted to avoid. This version of eggless key lime pie I am sharing with you today avoids both outcomes and delivers that irresistible creamy texture only a baked filling can have.
What ingredients do I need to make eggless key lime pie?
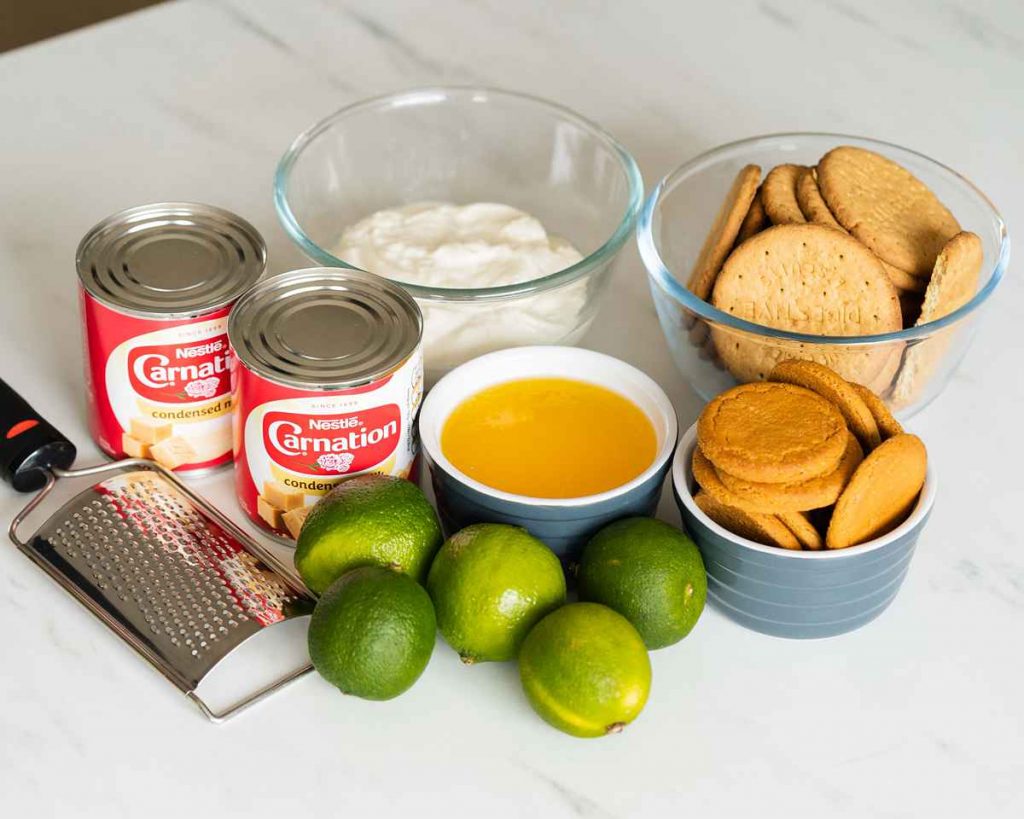
- Digestive biscuits: one half of the biscuits used for the base of the pie.
- Ginger biscuits: the other half of the biscuits used for the base. The ginger biscuits give a lovely gentle warming gingery flavour to the whole pie. If you are not keen, you can replace the ginger biscuits with more digestives instead.
- Butter: use unsalted so your biscuit base is not salty.
- Sweetened condensed milk: used for the filling. No need for any additional sugar, as the sweetness from this ingredient alone is sufficient.
- Yogurt: a part of the filling for a beautiful creamy key lime filling.
- Limes: in the UK, key limes are not so easy to come by. Because of this, I have used regular limes in this recipe. Please adjust the number of limes you use depending on your preferences and tastes. I use both the zest and the juice of my limes in the filling.
- Double (heavy) cream: this is optional for your topping, but totally recommended. I like to whip this up to peaks and pipe it in pretty rosettes on top of the pie. Swirls, blobs, stars or any other decoration works too, of course!
- Icing sugar: to sweeten your whipped cream topping. I use only a little, but do adjust this to your taste too.
What tools do I need to make this pie?
- Digital kitchen scales*: a useful kitchen tool to weigh out ingredients, although I do provide measurements in cups if this is your preference. I would always recommend using mass (grams) over volume (cups) as a way of measuring out your ingredients, purely for accuracy.
- Measuring spoons*: to measure out smaller quantities of ingredients.
- Food processor*: to blitz your biscuits into crumbs for the base. Alternatively, you could always put all your biscuits into a large sealable bag and bash them with a rolling pin. The latter is rather therapeutic and fun!
- Rolling pin*: useful if you decide to have some fun bashing your biscuits instead of blitzing! I also use the flat end of mine to push the biscuit base evenly down in the bottom of my tin.
- Loose-bottomed tart tin*: an 8″ loose bottomed tin makes it a lot easier to remove your pie once baked without breaking it. I like using one with a fluted edge as I think it looks so pretty.
- Mixing bowl*: for mixing together your ingredients at various stages, from the base ingredients to the filling to whipping the cream for the topping.
- Citrus zester*: to get that beautiful flavourful zest off the limes!
- Juicer*: makes it a lot easier to squeeze the juice from the limes than doing it by hand.
- Electric hand mixer*: if you have to you can beat your filling and topping by hand of course, but this handy tool makes it all a whole lot easier.
- Spatula*: for scraping your bowl down.
- Piping bags*: to pipe your whipped cream topping.
- Piping nozzle*: for your whipped cream decorations. I use a 1M nozzle here, but you could use a different one if you wish of course. You could also just spoon or spread a little whipped cream over your tart without piping.
How to make my eggless key lime pie recipe
Making this eggless key lime pie is so so easy! First make and bake the biscuit base, then add on and bake the filling before cooling and chilling to set completely. Finally, whip up your cream and pipe up a beauty on top before serving with additional lime zest garnish!
For the biscuit base:
Step 1: Preheat the oven to 180C/350F. No need to line or brush the 8″ loose bottomed tin with butter as there is no risk of the base sticking.
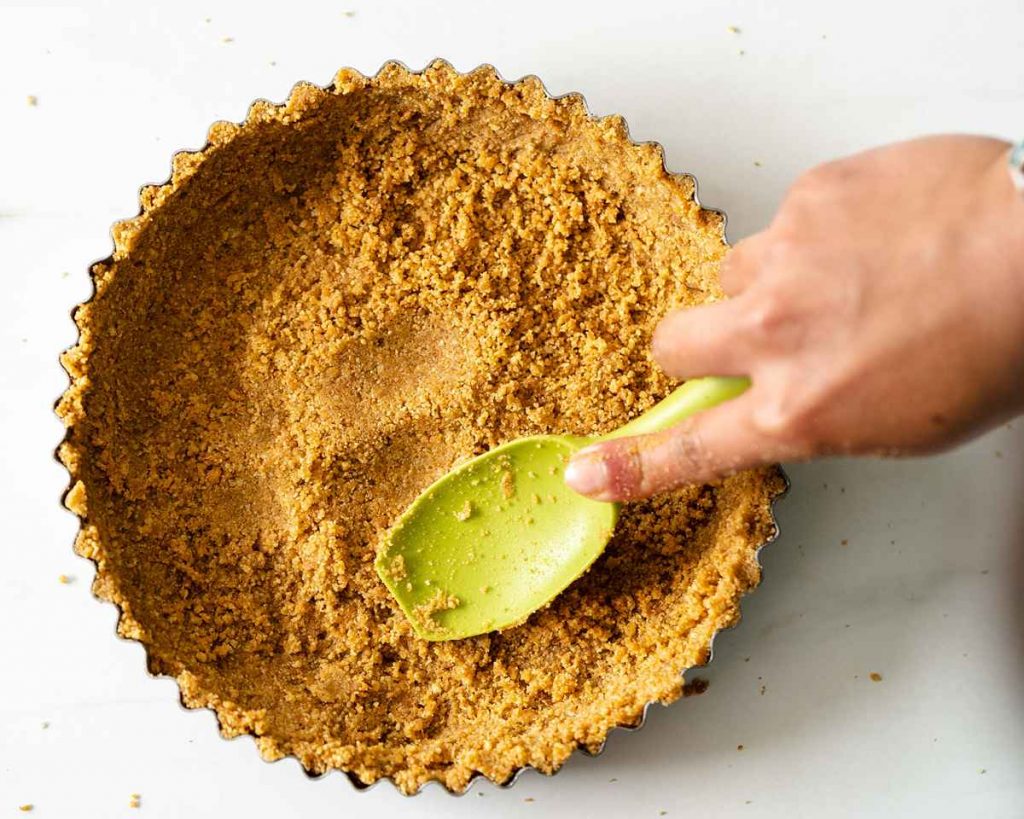
Step 2: Tip both the digestive and ginger biscuits into the food processor and blitz until it is all evenly crumbled. If using a rolling pin, place the biscuits into a large sealable freezer bag. Bash until they are all evenly broken, then tip the crumbled biscuits from the bag into a large bowl. Add in the melted butter and mix it all together until well combined.
Step 3: Spoon the biscuit mix into the tin, then press down firmly on the bottom and up the sides of your tin to compress the base. Bake the biscuit base in the hot oven for 10 minutes. Remove to a wire rack and leave to cool slightly, ready for the filling but leave your oven on.
For the filling:
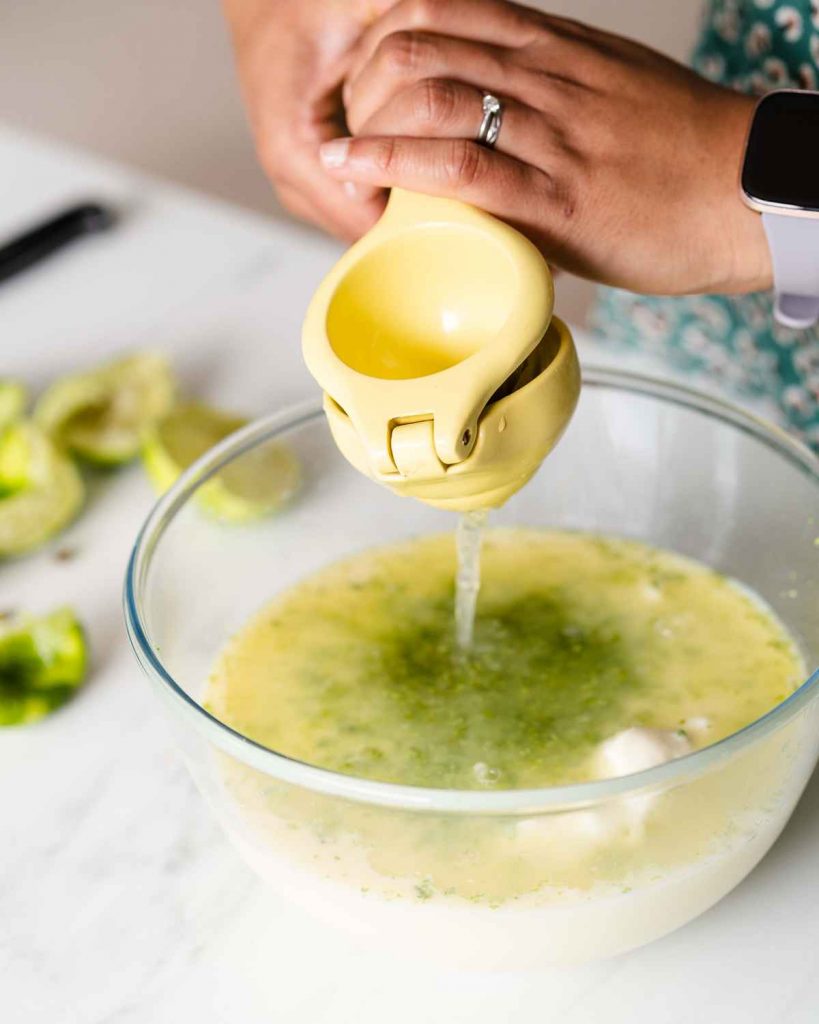
Step 1: Whilst the base is baking, prepare the filling. Into a large mixing bowl, tip in the sweetened condensed milk and Greek yogurt. Zest the limes directly into the mixing bowl, then squeeze in the juice of the fruit. I use four large limes, which I find makes my filling plenty tangy enough. If you like it REALLY limey, you can add more lime zest and juice to suit your taste. Beat these ingredients together until smooth and creamy, then pour it over the baked biscuit base.

Step 2: Return the pie to the oven and bake it for a further 10 minutes until there is only a very slight wobble in the middle. Remove from the oven and cool on a wire rack for about 30 minutes before popping in the fridge to chill completely.
For the decoration:
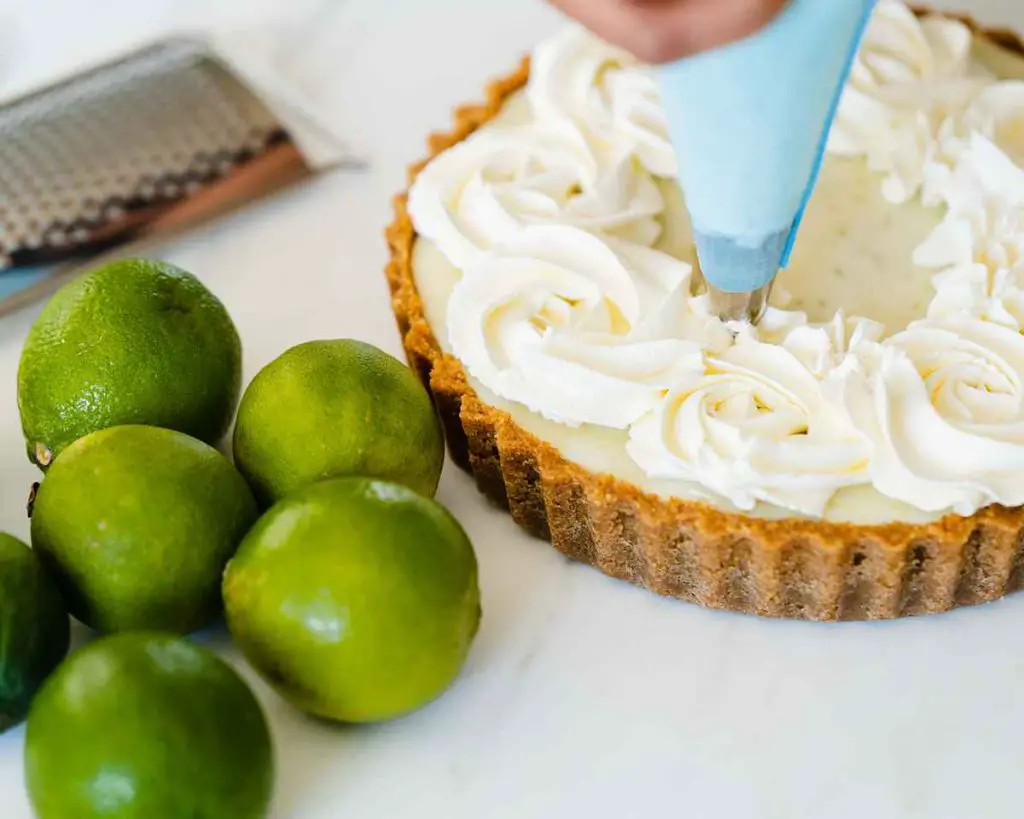
Step 1: Once the pie is completely chilled, and you are ready to serve, it’s time for the decoration. In a large mixing bowl, tip in the double cream and icing sugar. Beat together until it thickens to your liking. I prefer to stop just before it gets to being stiff peaks, as I prefer my whipped cream topping more on the softer side.
Step 2: Spoon it into a piping bag fitted with your nozzle of choice, and pipe your decoration over the top of the key lime pie. I used a 1M nozzle and piped large swirls all the way around before filling in some of the gaps with stars using the same nozzle. Alternatively, you could simply spoon a little of the whipped cream over the top of the pie and spread it out as you wish. Garnish the top with some additional lime zest for a pop of colour and flavour. Enjoy!
What can I use if I don’t have a loose bottomed tin?
If you have not got a loose bottomed tin as I have, you can use a suitably sized pie tin or cake tin instead. Just keep in mind if you do not have the loose bottom, you will need to be a little more careful when removing the pie from the bakeware you use.
Can I use regular limes to make key lime pie?
Key limes are readily available in the US. Here in the UK, they are much harder to come by (I have only come across them once myself!), so I will usually use regular limes to make this pie. Key limes are smaller and contain more seeds, and have more of a tart flavour than regular limes. Do not let that be a deterrent though, these mini key lime pies are still delicious even made with regular limes!
Why do I need to bake the biscuit base?
You certainly do not need to bake the biscuit base of this key lime pie recipe. However, there are a couple of reasons I prefer to do it. I find the base can go a little softer/soggy if not baked before adding the filling on top, and I like the contrasting texture baking the case gives. I also prefer the firmer texture of the biscuit shell when baked, as unbaked it will be more crumbly.
Can I use a shop bought base for ease?
Absolutely you can use a shop bought base if you wish! However, please keep in mind, here in the UK, the ready made cases you buy from your local store are a shortcrust pastry base and not a biscuit base as I make in this recipe. I would highly recommend making this biscuit base over using a shop bought one, as it is so simple and you will really love the difference!
How can I tell when the key lime pie filling is baked?
You can tell the filling is baked when it has leveled off to a smoother flat surface. Whilst it is still in the oven, give your tin a gentle shake. There should only be a slight wobble to the filling right in the middle when the pie is ready to come out of the oven. Please remember not to touch the top of it to check though, or you will leave a little fingerprint in it and spoil the lovely smooth top! It will continue to bake and firm up with the residual heat once you remove it, so it is important to remove it before completely firms up in the oven.
How long will this key lime pie keep and how do I store it?
This eggless pie will keep for 4-5 days once baked. You should store it in an airtight container in the fridge, but remember to only decorate with whipped cream when you are about to serve. You can prepare your whipped cream a few hours in advance and keep it in a separate container in the fridge if you need to. When you are ready to present your dessert, simply decorate the top of the pie with some whipped cream and lime zest before serving.
Can I freeze key lime pie?
This baked key lime pie will freeze well for up to a month. First leave to cool completely, then store in an airtight container, taking care to keep it flat and without risk of being compressed until frozen solid. The day before you wish to serve it, thaw it in the fridge overnight. Please remember not to decorate the pie with whipped cream before freezing, only when you are about to serve it.
How can I make this eggless key lime pie gluten and dairy free?
To make this key lime pie gluten free, simply substitute the digestive and ginger biscuits for a gluten free alternative. For a dairy free dessert, you will need to substitute the butter in the base for a dairy free alternative. Use a thick set dairy free Greek yogurt for the filling and a dairy free condensed milk too. And finally, remember to swap the double cream for a suitable dairy free alternative that will whip to stiff peaks for the decoration on top.
Please note, that I have not tried this recipe using these substitutions myself, but know others have with success.
Additional tips for making this eggless key lime pie recipe
- Ensure the biscuits are all evenly crushed up, especially if doing this by hand using a rolling pin. Any larger pieces of biscuit will make it harder to press the biscuit base evenly into the tin, and is likely to crumble and fall apart more easily too.
- If you are not so keen on using ginger biscuits in the base, simply use additional digestive biscuits in place of the ginger biscuits. Equally, if you want plenty of heat and warmth from the ginger, you could go all in and swap out the digestives for ginger biscuits too! I love the hint of additional warmth and balance the ginger biscuits bring, so I like to do a mix. However, should you not want that too you can adapt the ingredient to suit your preferences.
- Use a good quality, full fat Greek yogurt for the filling. The thicker texture of the yogurt really helps with the filling setting well, so this is important!
- Always zest your limes BEFORE you juice them. It is so so much easier than trying to zest a floppy, half cut sphere. Trust me, I speak from experience!!
- Top tip to help you get the most juice from your limes: roll them firmly on a table before you cut them. If your limes are really REALLY firm, you could also try microwaving them for 5-10 seconds before rolling firmly and then juicing.
- I prefer to keep my whipped cream for the top a little softer than stiff peaks. I find handling the cream when scooping and piping actually make it firm up more. This is why, I stop beating it about 5-10 seconds before you think you will hit the stiff peaks stage.
- Remember not to top the key lime pie with cream until just before you serve it. This is to help ensure the cream holds the best shape for when the pie is presented to the lucky few who enjoy it with you!
Troubleshooting
If you have any other questions about my pie recipe, please use the comments below to get in touch, I would love to help. And if you do make this recipe for eggless key lime pie, please do leave a rating and review below. It means so much to me for you to take the time to do so, as it massively helps me grow my site. Plus it really helps others looking for a good, easy recipe too!
And please please please post a picture of your creation on Instagram, tagging me when you share it with the world. I love seeing your creativity!
More recipes from my site for you to enjoy
Looking for other dessert or entertaining recipes? Check these beauties out:
Chocolate brownie mousse cake: squidgy chocolate brownie base. Light, melt in your mouth chocolate mousse. A beautiful shiny chocolate glaze. Put it all together, and you have the most amazing, decadent and exquisitely indulgent brownie mousse cake.
Eggless red velvet cake: three layers of beautiful decadent red velvet sponge with a smooth and totally irresistible cream cheese icing. This is one showstopper of a cake you will definitely not want to miss!
Rose pistachio and cardamom loaf cake (eggless): this cake was inspired by the stunning smells and flavours of India. Earthy pistachio, fragrant cardamom, and floral rose come together in this eggless bake to create an incredible stunning cake that is truly out of this world. This cake is not fully vegan, but is eggless so can easily be adapted to being vegan too.
Happy baking, my friends! x
Recommended equipment I used for this pie*
| Digital kitchen scales | Measuring spoons |
| Food processor | Rolling pin |
| Loose-bottomed tart tin | Mixing bowl |
| Citrus zester | Juicer |
| Electric hand mixer | Spatula |
| Piping bags | Piping nozzle |
)
Key Lime Pie (Eggless)
10
servings45
minutes20
minutes455
kcal2
hours3
hours5
minutesA delicious (eggless) tangy key lime pie on a buttery biscuit base. Perfect for entertaining!
Keep the screen of your device on
Ingredients
- For the biscuit base
230 g (2 ¼ cups) digestive biscuits
120 g (1 ¼ cups) ginger biscuits
150 g (½ cup + 3 tbsp) unsalted butter, melted
- For the filling
794 g (2x 14oz cans) sweetened condensed milk
280 g (1 cup + 3 tbsp) full-fat Greek yoghurt
4-5 limes, zest and juice
- For the decoration
200 ml (¾ cup + 1 tbsp) double cream
2 tsp icing sugar
1 lime, zest only to decorate
Directions
- For the biscuit base
- Preheat the oven to 180C/350F. No need to line or brush the 8″ loose bottomed tin with butter as there is no risk of the base sticking.
- Tip both the digestive and ginger biscuits into the food processor and blitz until it is all evenly crumbled. If using a rolling pin, place the biscuits into a large sealable freezer bag. Bash until they are all evenly broken, then tip the crumbled biscuits from the bag into a large bowl. Add in the melted butter and mix it all together until well combined.
- Spoon the biscuit mix into the tin, then press down firmly on the bottom and up the sides of your tin to compress the base. Bake the biscuit base in the hot oven for 10 minutes. Remove to a wire rack and leave to cool slightly, ready for the filling but leave your oven on.
- For the filling
- Whilst the base is baking, prepare the filling. Into a large mixing bowl, tip in the sweetened condensed milk and Greek yogurt. Zest the limes directly into the mixing bowl, then squeeze in the juice of the fruit. I use four large limes, which I find makes my filling plenty tangy enough. If you like it REALLY limey, you can add more lime zest and juice to suit your taste. Beat these ingredients together until smooth and creamy, then pour it over the baked biscuit base.
- Return the pie to the oven and bake it for a further 10 minutes until there is only a very slight wobble in the middle. Remove from the oven and cool on a wire rack for about 30 minutes before popping in the fridge to chill completely.
- For the decoration
- Once the pie is completely chilled, and you are ready to serve, it’s time for the decoration. In a large mixing bowl, tip in the double cream and icing sugar. Beat together until it thickens to your liking. I prefer to stop just before it gets to being stiff peaks, as I prefer my whipped cream topping more on the softer side.
- Spoon it into a piping bag fitted with your nozzle of choice, and pipe your decoration over the top of the key lime pie. I used a 1M nozzle and piped large swirls all the way around before filling in some of the gaps with stars using the same nozzle. Alternatively, you could simply spoon a little of the whipped cream over the top of the pie and spread it out as you wish. Garnish the top with some additional lime zest for a pop of colour and flavour. Enjoy!
hi my name’s Paul, I am a self confessed cake expert but I have never tasted cakes like this !!! she is a wizard at what she does I buy my cakes from whinholts in alderly edge but the can not hold a candle to these cakes baked by this lady !!!