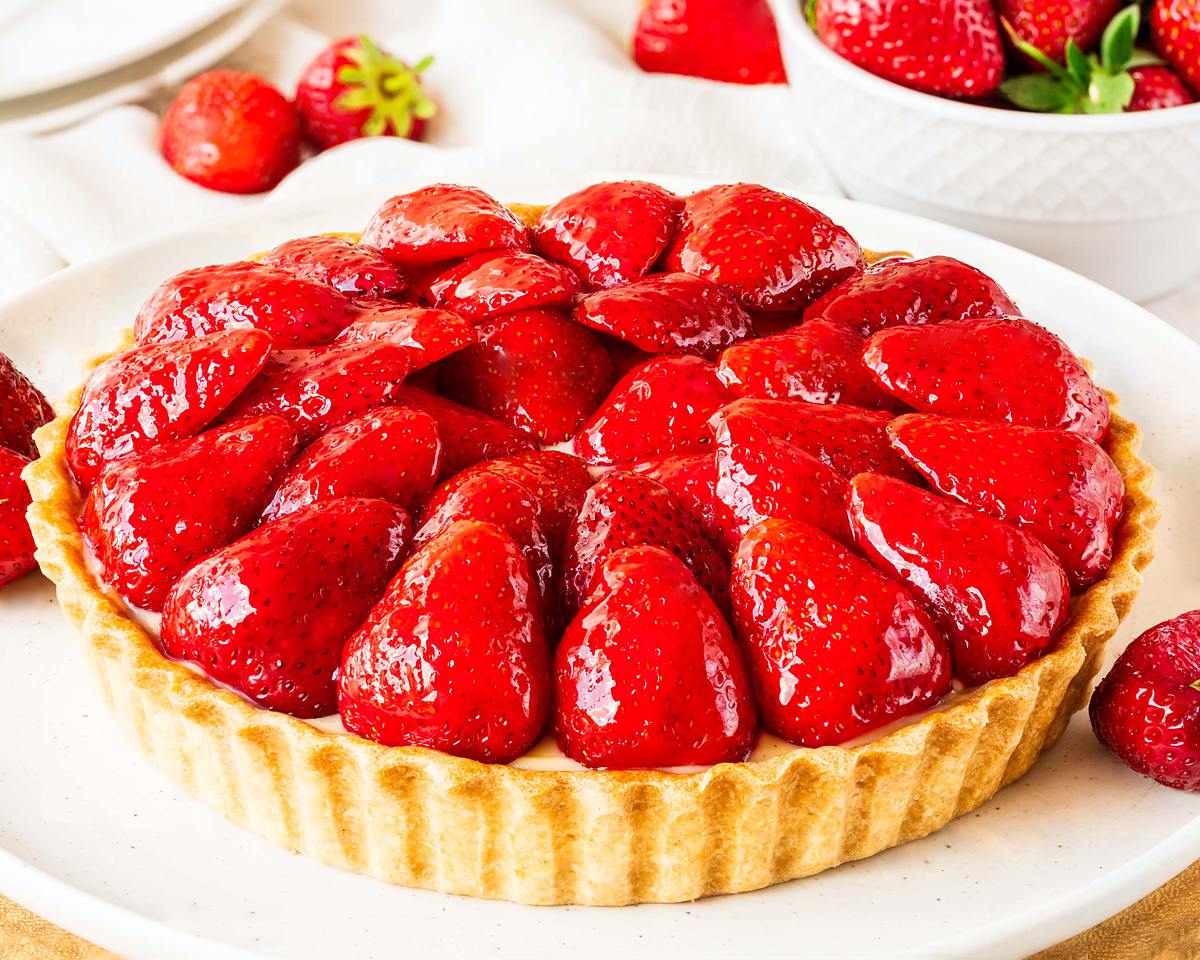
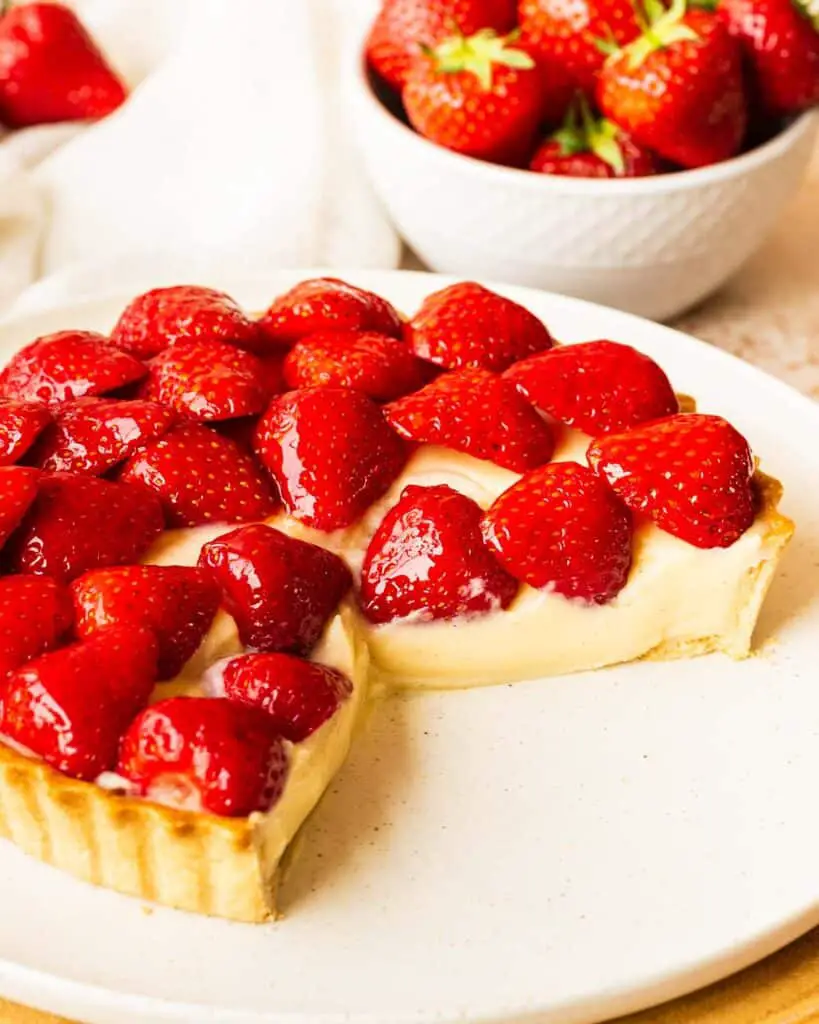
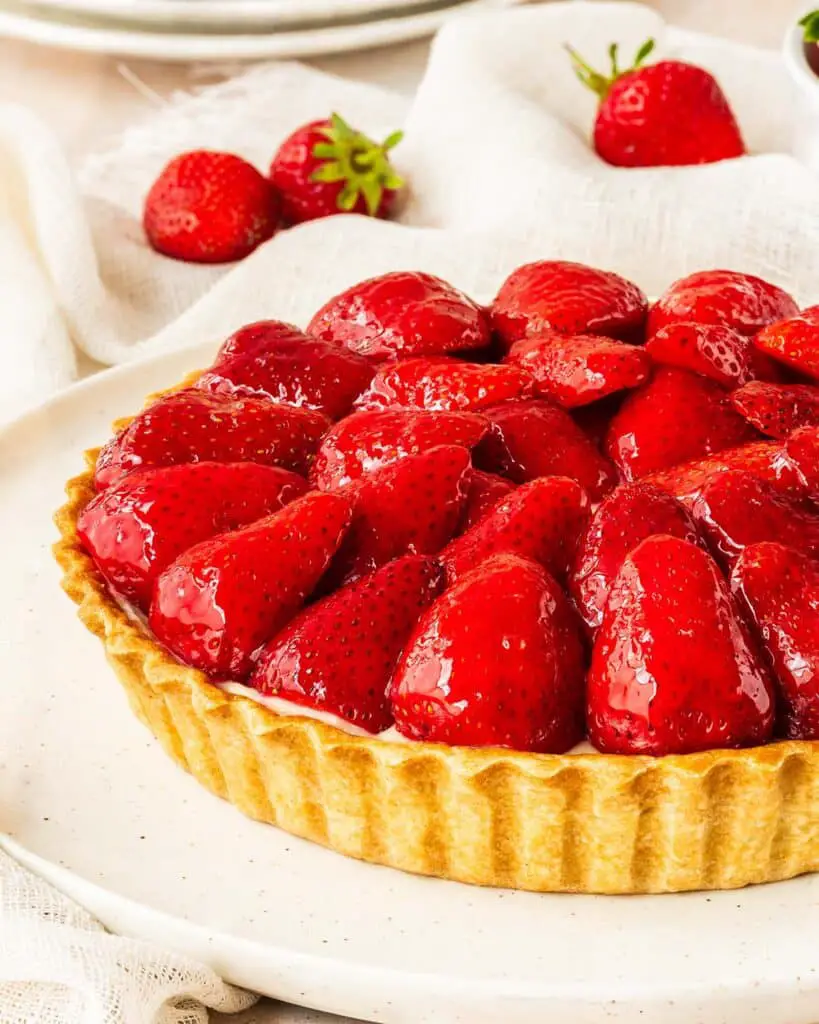
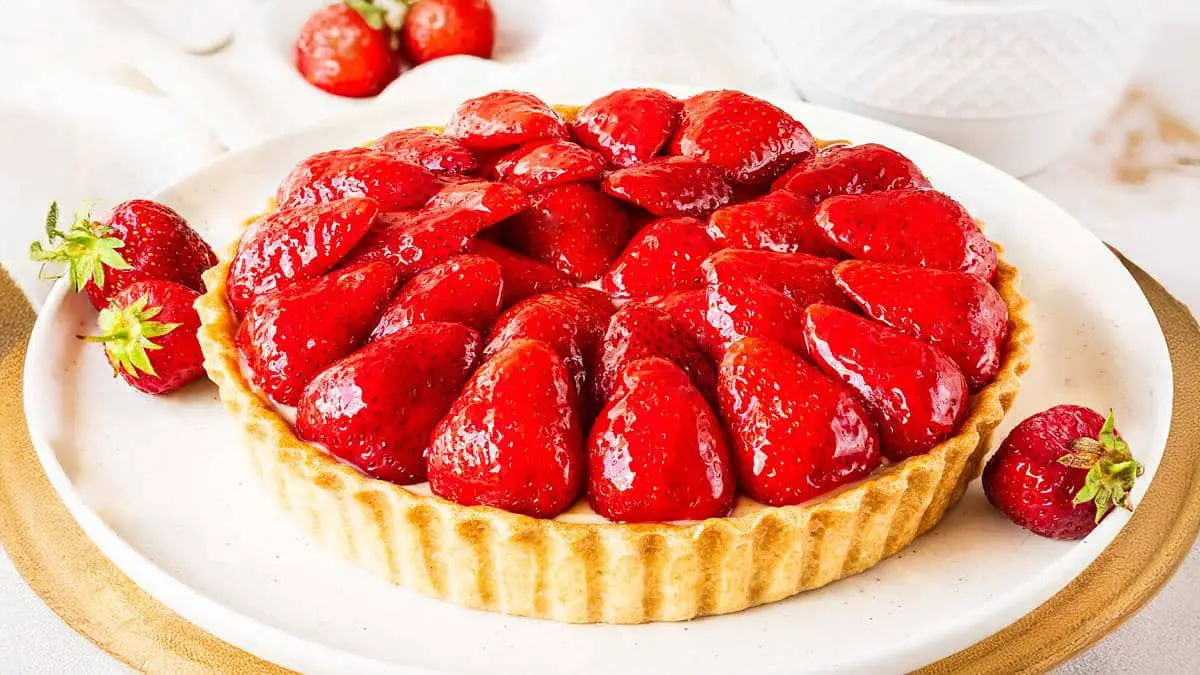
Strawberry tart, or tarte aux fraises, is a favourite of mine every time our family holidays in France! It has three delectable components: a buttery shortbread pastry shell, a smooth and creamy custard filling, and beautiful vibrant fresh strawberries to top. A classic French dessert, and truly a triumph of summertime baking!
Why you’ll love this recipe
- An elegant dessert. This beautiful custard and strawberry tart will be the pièce de résistance of any dinner party. It is so understated, chic and elegant, everyone will love it!
- Brilliant to make ahead. Make the pastry shell and crème pâtissière (or creme pat) ahead of time, then just assemble the strawberry tarts recipe before serving for the easiest entertaining ever.
- Vibrant and fresh. A stunning way to showcase the season’s finest fresh produce, this strawberry custard tart is truly a showstopper dessert!
Are strawberry tarts French?
Yes indeed! One of my favourite desserts ever, this French strawberry tart is always one I seek out during our trips to France. I absolutely love the fresh strawberries, creamy crème pâtissière and melt-in-the-mouth pastry. So good!

What you need to make this recipe
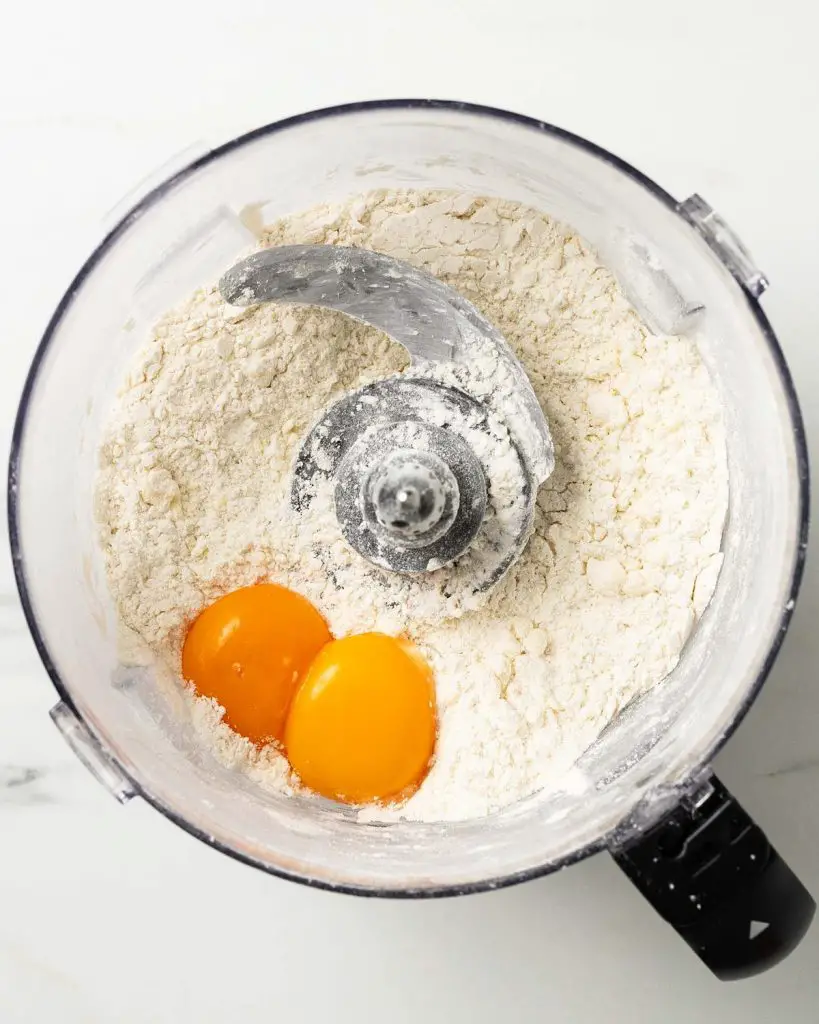
- Flour: I use plain flour for my pastry when making this recipe as I do not want any rise in it.
- Icing/powdered sugar: for sweetness in the pastry.
- Butter: I use unsalted butter so I can control how much salt is in the bake. For best results, use cold butter when making the pastry and room temperature butter for the filling in this easy recipe.
- Eggs: yolks only used in this recipe, both in the pastry and the creme pat.
- Ice cold water: make sure to use cold water when making pastry. You want to keep the dough as cold as possible throughout the whole process.
- Milk: the liquid content needed to make the strawberry tarts with custard.
- Vanilla: for delicious flavour, enhances the sweetness in this bake.
- Sugar: caster sugar is used for sweetness in the crème pâtissière filling.
- Cornflour: the thickening agent used to make the creme pat filling. Helps the recipes strawberry tart set perfectly once chilled.
- Salt: enhances the flavours in the bake. You will not taste it, I promise!
- Butter: I used unsalted butter to give a richness of flavour and smooth texture to the filling in this stunning tart strawberry recipe.
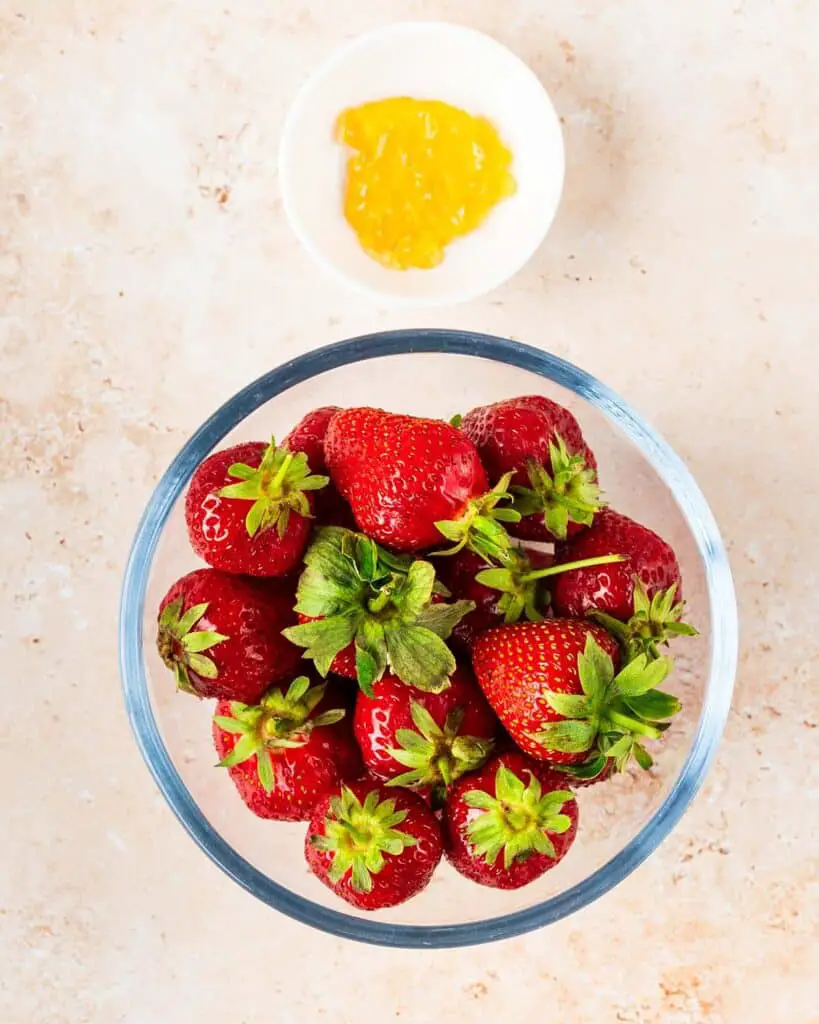
- Strawberries: the star of this exquisite bake are these beautiful summery berries! I cut mine in half and layer them in a pretty pattern over the filling, but you could arrange them however you wish on this strawberry and custard tart!
- Jam: I use apricot jam to glaze the top of the tart, but you could use strawberry jam in a pinch too. Apricot is the traditional choice when making this French strawberry tarte in France.
Recommended tools to make a strawberry tart
- Digital kitchen scales*: I always recommend using digital kitchen scales to weigh ingredients out over using a volume based measuring system, as cups. Weighing out the ingredients is much more accurate than measuring by volume, and will ensure better results in the cookies, so I would definitely take the plunge if you have not already.
- Measuring spoons*: for measuring smaller quantities such as tablespoons (tbsp) and teaspoons (tsp), a set of dedicated measuring spoons is a must! These are far more accurate than everyday eating spoons, and are really easy to get hold of too.
- Food processor*: a quick way to make the pastry. If you do not have a food processor, you can simply use your fingers to rub the ingredients together too.
- Sieve*: useful to remove lumps from the dry ingredients before blending together when making the pastry.
- Rolling pin*: for rolling out the pastry. If you do not have a rolling pin, get creative! A tall glass or even a wine bottle works well!
- Loose-bottomed tart tin*: makes it a lot easier to remove the strawberry tarte from the tin without breaking it. I like using one with a fluted edge as I think it looks so very pretty. However even a loose bottomed cake tin (without the fluted edge) will work well too.
- Pastry brush*: used to brush the egg whites into the baked pastry shell to seal it as well as for the strawberry tart glaze.
- Small saucepan*: to make the custard in for this strawberry custard tarts.
- Whisk*: for mixing together the filling ingredients when making the strawberry tart with custard.
- Spatula*: used when scraping out and levelling the custard filling for this delicious custard strawberry tart.
How to make a strawberry tart
Whilst there are a few more time-taking processes, making this easy strawberry tart recipe could not be more straightforward! First, make the pastry and let it chill for at least half hour. Then, roll out the dough and line the tart tin before chilling again. During the first chill, prepare the crème pâtissière so it can cool. Once the pastry is chilled, bake it until golden and biscuity before filling with the creme pat and leaving overnight to chill. Before serving, simply top with fresh strawberries, brush on the glaze and serve!


Making the pastry
Step 1: In a food processor, blitz the flour and sugar. Add in the cold butter and pulse until the mixture resembles fine breadcrumbs. Tip in the egg yolks and blend again until just combined. Add in the ice water a little at a time until the pastry comes together in clumps.

Step 2: Tip the dough out onto a clean work surface and gather it together. Squeeze to bring it together, but try to avoid kneading and working it too much or the pastry will be tough. Divide the pastry dough into two equal parts and flatten into discs. Wrap each disc tightly in cling film then pop in the fridge to chill for at least 30 minutes. This recipe makes two discs of dough, enough to make two tarts. At this point, you can freeze one of the dough discs for another day, if you wish.
Roll and shape the pastry
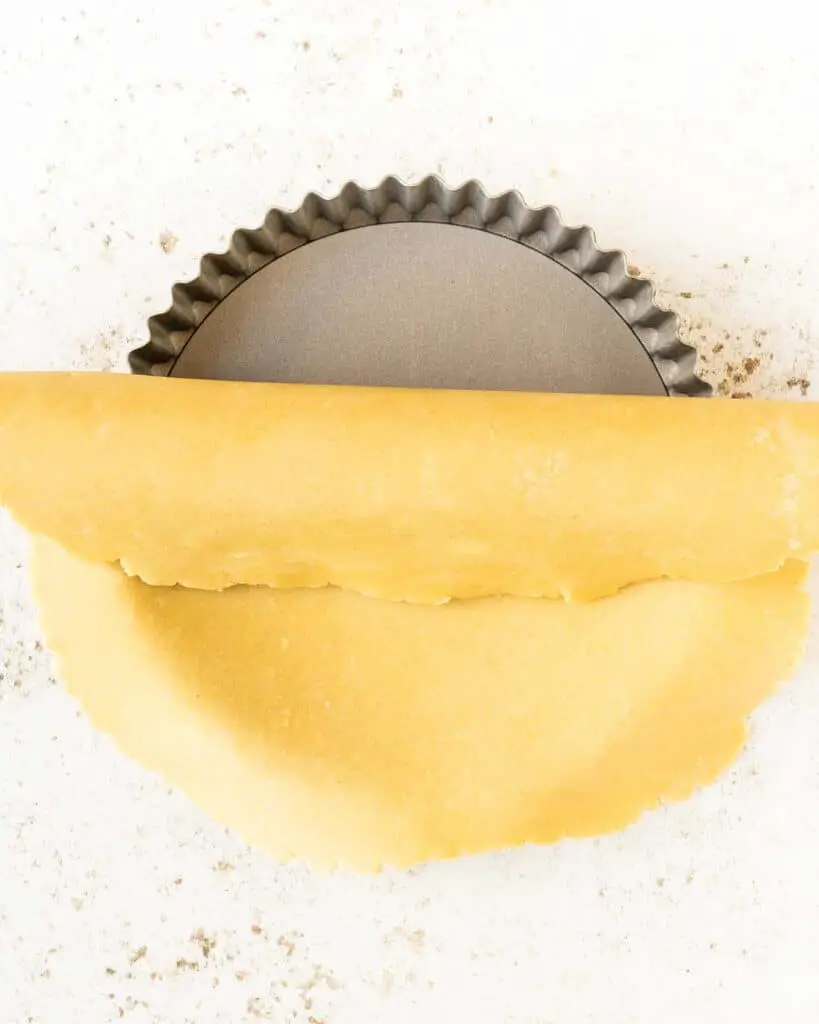
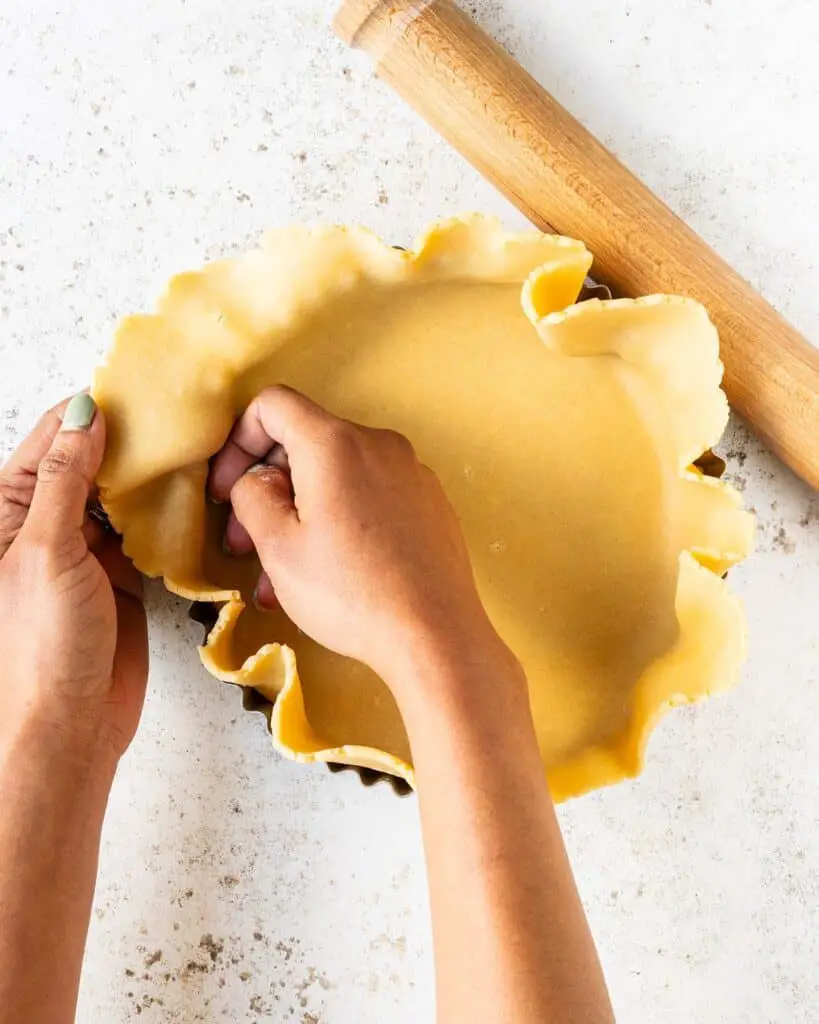
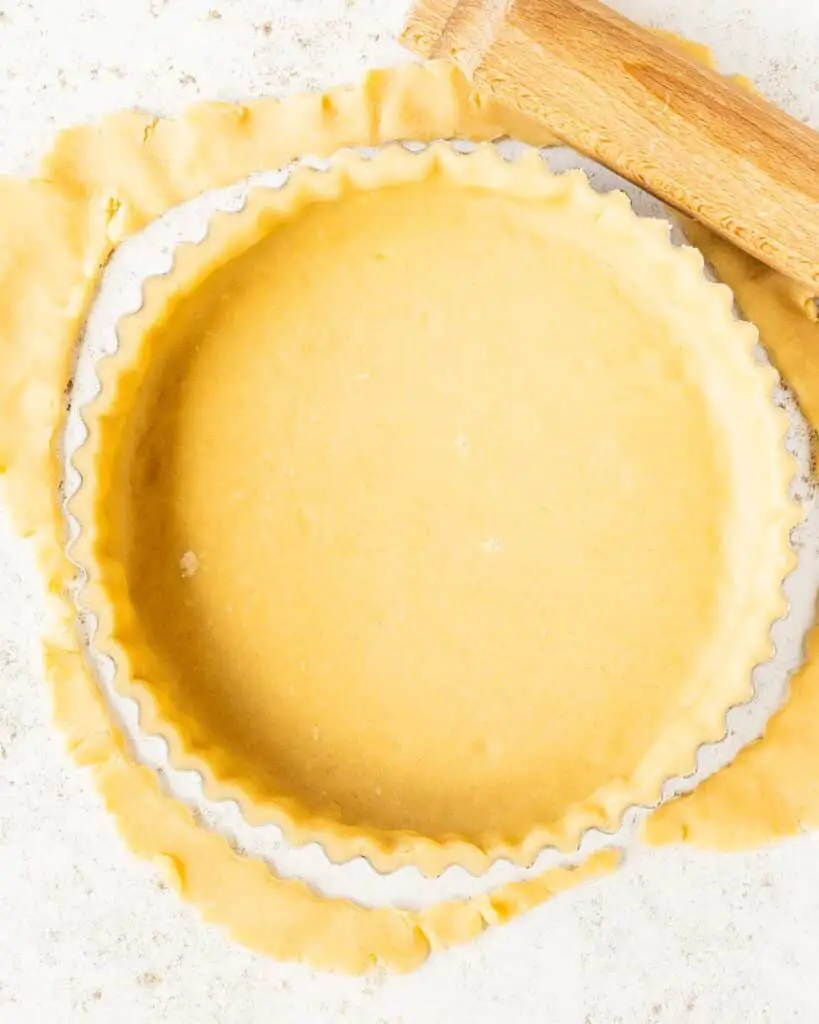
Step 1: Once the dough has chilled, roll out one of the chilled pastry discs into a circle about 10″ diameter. Drape it carefully over the rolling pin and lift it into the tin, easing the pastry into the crevices. Do not stretch the pastry to make it fit. After lining the tin with pastry, gently fold the overhang of pastry over the lip of the tin. Using a rolling pin, roll over the top of the tin to cut off excess pastry. Prick several holes in the bottom of the pastry, then pop in the fridge to chill for a further 30 minutes.

Step 2: Preheat the oven to 160C/320F. When the pastry shell has chilled sufficiently, prepare a piece of parchment paper large enough to fit inside the pastry with some overhang. Scrunch it up, then open again, so that it is malleable. Remove the tin from the fridge and press the paper into the shell, easing into the corners. Fill with baking beans (see notes), then pop the tin into the hot oven. Bake blind for 20 minutes, then remove the paper and baking beans. Bake a further 10 minutes until golden and biscuity. Working quickly, remove the tin from the oven and brush all over the inside bottom and sides with egg white. Pop back in the oven for a further 5 minutes until golden. Remove from the oven and cool completely.
For the crème pâtissière
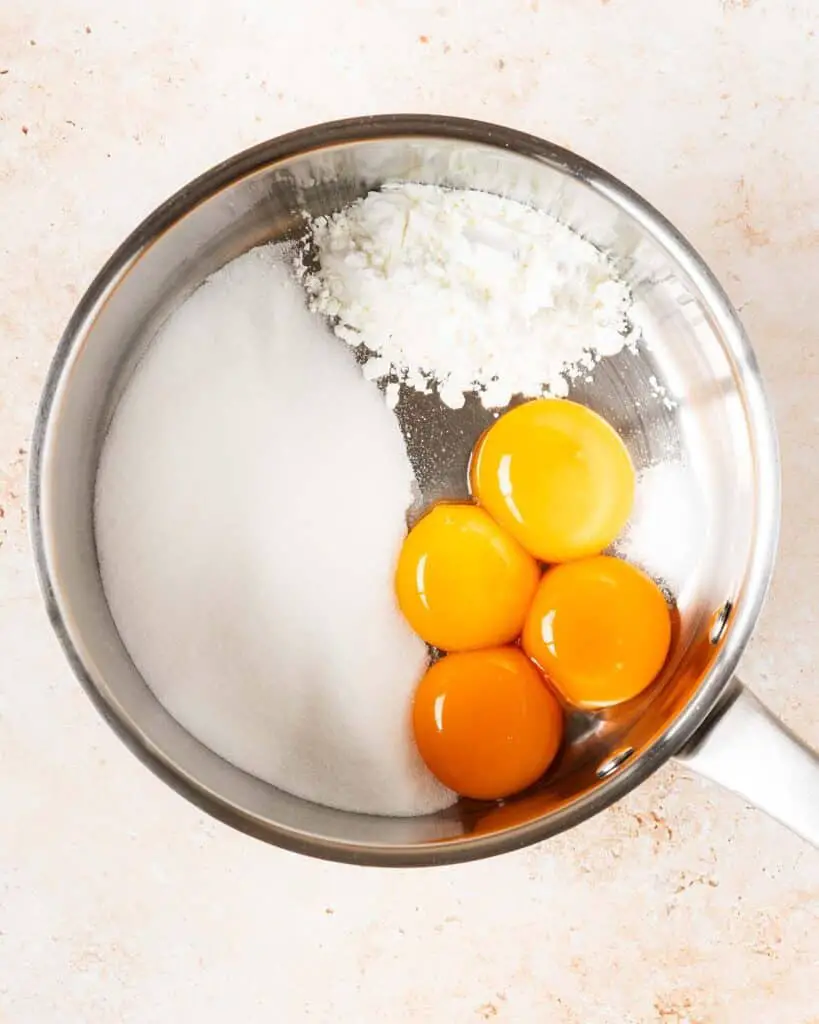
Step 1: Into a large saucepan, tip in the egg yolks, caster sugar, cornflour and salt. Whisk until combined, then gradually add in the vanilla and milk, whisking until completely smooth.
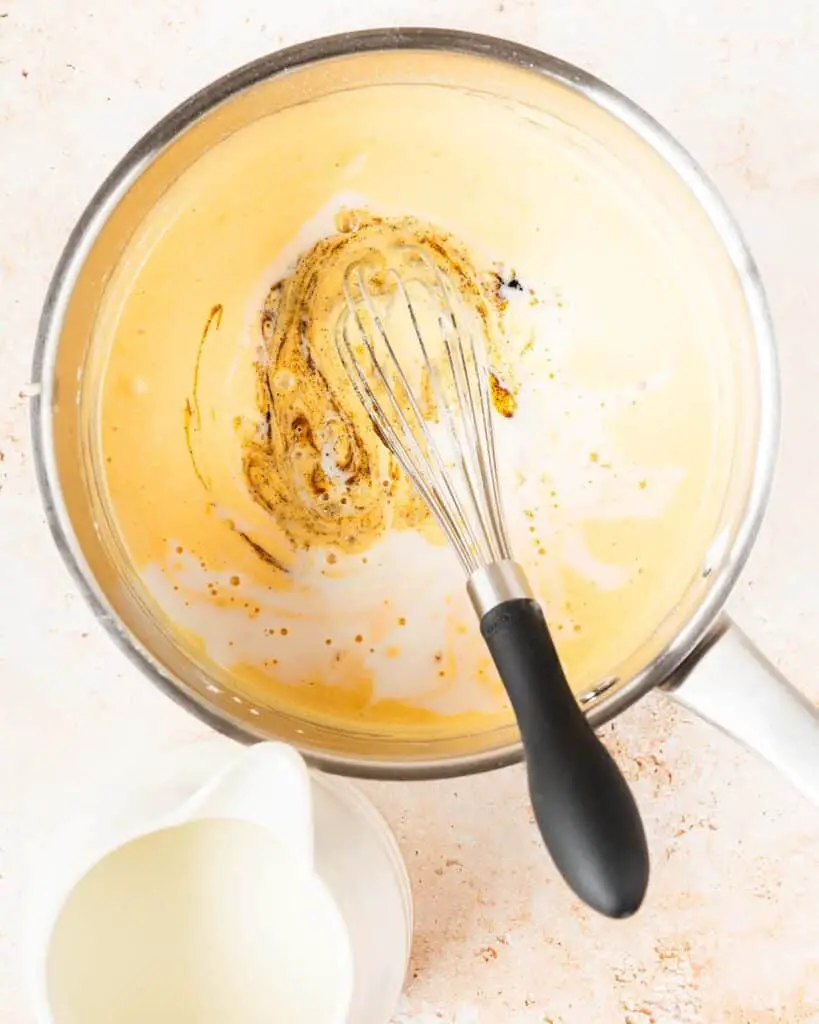
Step 2: Place the pan over a medium heat and cook until the mixture starts to bubble gently. Keep cooking for around 7-9 minutes until thickened and the bubbles rise and pop lazily on the surface.
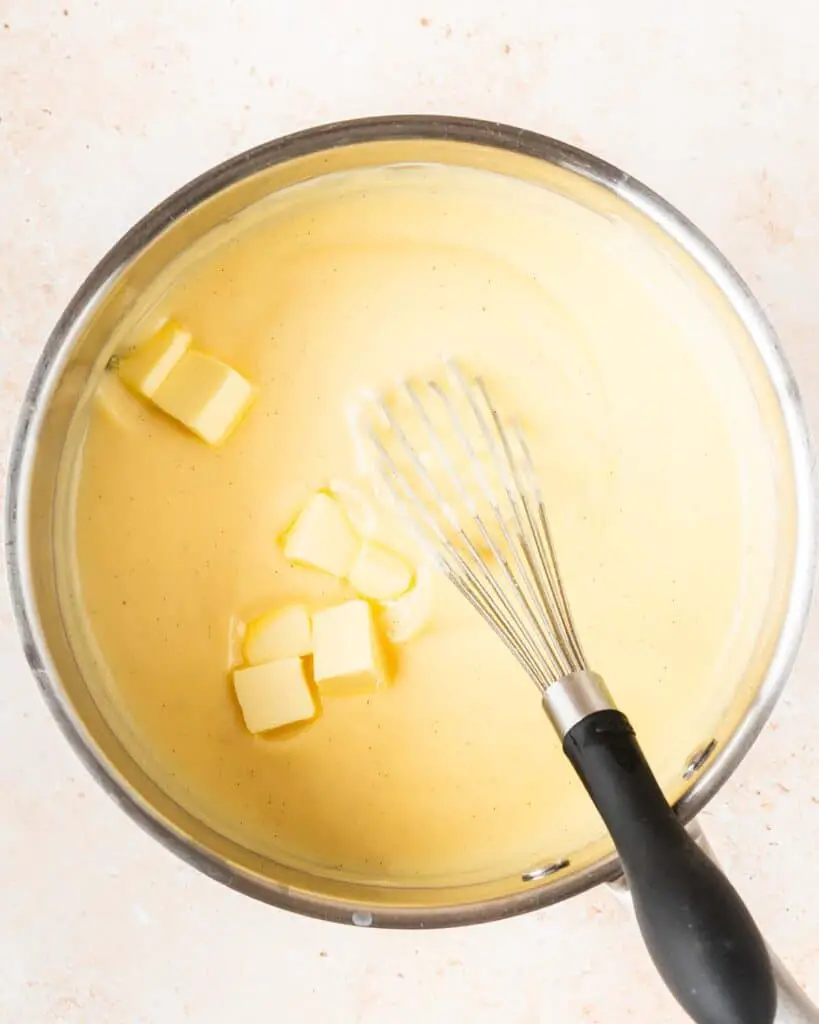
Step 3: Remove the pan from the heat and stir in the butter until melted and silky. Transfer the mixture to a clean bowl and place some cling film directly on the surface of the creme pat. Leave to cool before using.
Assembling the strawberry tart
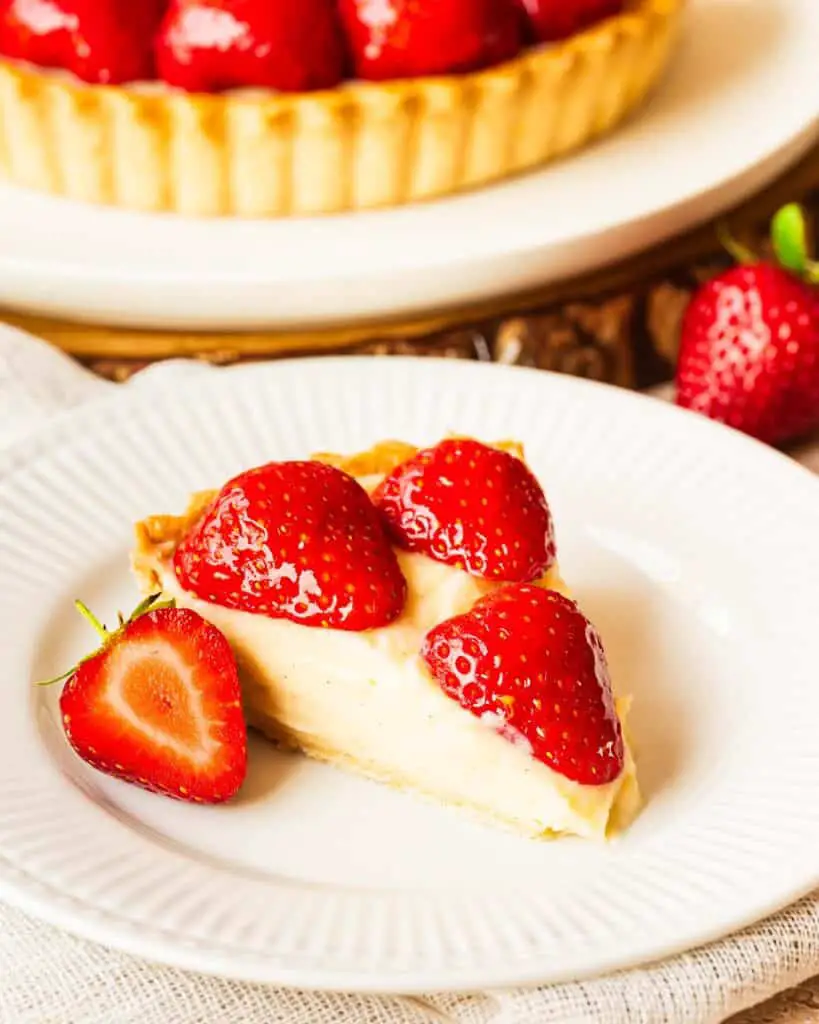
Step 1: Once the creme pat has cooled, gently stir it to smooth, then transfer into the pastry shell. Smooth over the top, then place in the fridge whilst preparing the strawberries.
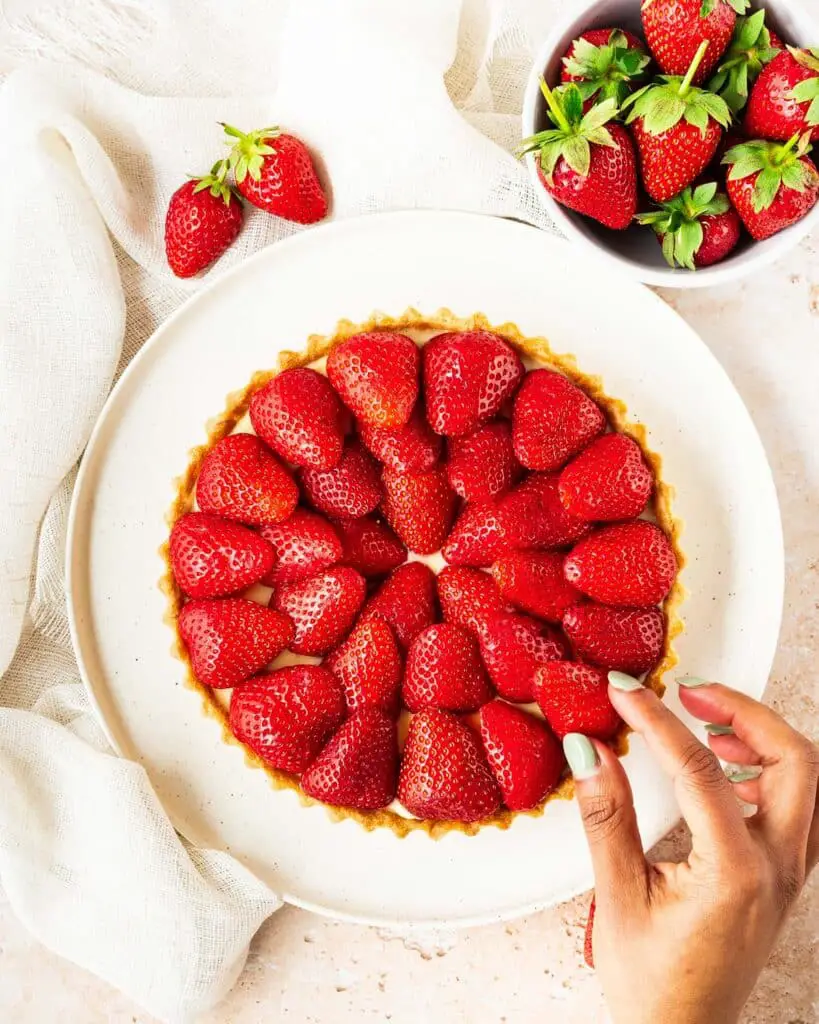
Step 2: Cut the green leaves and stem off the strawberries, then cut each strawberry vertically in half. Place each half, cut side down, on a sheet of kitchen towel to absorb some of the juices ahead of using them to decorate the tart.
Step 3: Pull the tart out of the fridge and arrange the strawberry halves in a circle starting in the middle with the pointed ends facing in. Keep building the layers, working out, until the whole of the top of the tart is covered. Then stand back and admire your beautiful work!
How to glaze strawberry tart
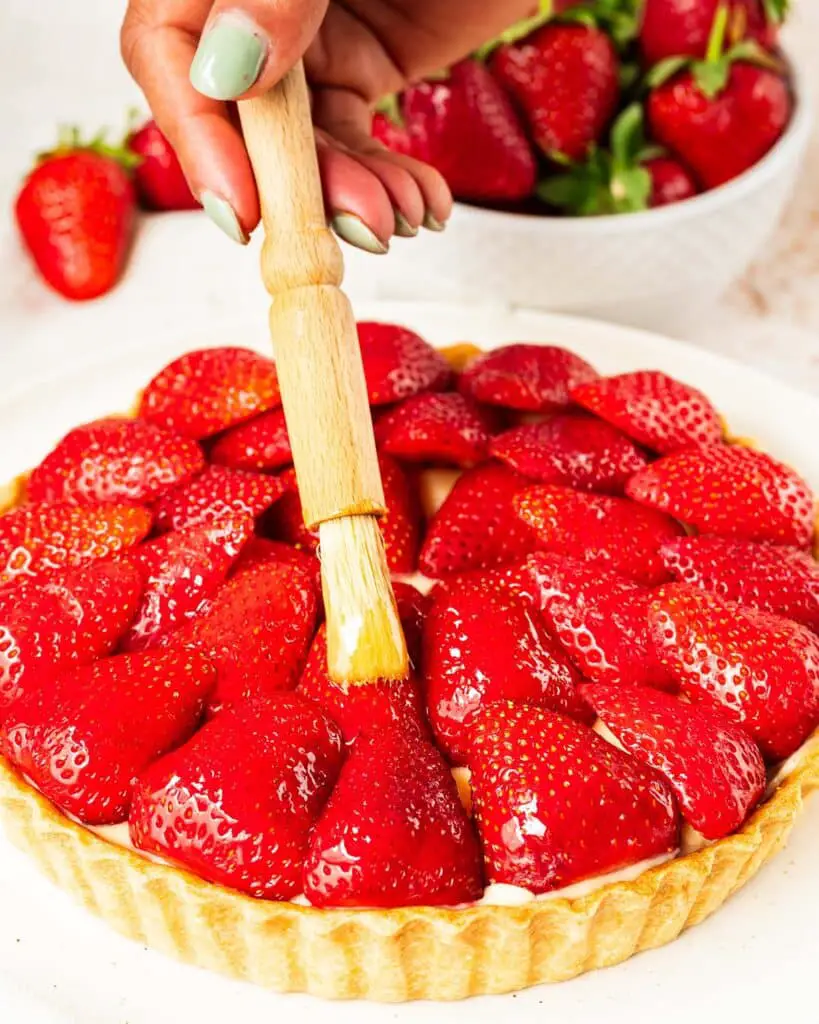
Step 1: Glazing this beautiful tart could not be easier! Place the apricot jam in a small container and loosen by stirring or smooshing. Add a drop or two of water if you feel it’s a little thick for brushing over the berries.
Step 2: Using a pastry brush, gently brush all over each strawberry half with a little of the loosened jam, paying extra attention to the berries around the edges as an area easily missed. Pop the tart back in the fridge until ready to serve. Enjoy!
Frequently asked questions about pastry
Pastry is one of the bakes that has a few factors that could go wrong, and bit of information worth knowing. I have tried to answer as many commonly asked questions as I can, but please do use the comments below if you have any I have not answered for you here.
Why is my shortcrust pastry fragile and crumbly?
This is likely because the dough is too dry and needs a little more liquid adding to it. Break it up into crumbs again and gently mix through enough liquid until the dough naturally forms clumps before bringing back together, chilling and then rolling again.
Why is my shortcrust pastry tough?
If the pastry is tough or gummy, it is likely that too much gluten has developed. The most likely cause of this is overworking (over mixing or over kneading) the dough.
Why my shortcrust pastry sticking to my work surface/rolling pin?
The moisture in the dough makes it stick to surfaces. A very simple solution is to lightly dust the work surface and rolling pin with a little extra flour (not too much, you do not want to dry out your pastry!) and try rolling it out again. As you roll, keep turning the pastry through 90º so it doesn’t stick to the work surface. If you find it is not rolling out too easily, gently lift the pastry over your rolling pin and lightly dust the surface under it with flour before rolling again. This should allow you to get beautiful thin pastry!
Do I need to blind bake my pastry?
In this recipe, you will definitely need to blind bake (and then baked after blind baking too!) the pastry. This is required to seal the pastry since the filling is really quite wet and isn’t baked once in the pastry shell.. It helps to ensure you do not end up with a soggy pastry base.
How do I know when my pastry is baked?
The pastry is baked, after the blind bake and the second “browning” bake, when it is pale golden in colour and biscuity looking. If it looks a little doughy or wet, leave it to bake for a few minutes longer. I do an egg wash after the second bake to help avoid a soggy bottom as the pastry absorbs liquid from the filling.
What filling is in a strawberry tart?
Strawberry tart recipes will normally offer some sort of a custard, or crème pâtissière, filling in the pastry shell before being topped with glazed strawberries.
How to make a glaze for a strawberry tart?
A glaze is so simple to make! I always use apricot jam, but you could use a smooth strawberry jam too. Just make sure the jam doesn’t have any “bits” in it, such as peel or chunks of fruit. Give the jam a decent stir so it is loose and brushable adding a few drops of water to loosen slightly if required. Then brush away, there’s nothing more to it!
How long will a strawberry tart last?
Since this strawberry tart recipe easy uses fresh fruit in the topping, I would recommend this tart is consumed within a day of being made. Ideally it will be eaten on the day it is put together, as the strawberries will leak juices and some colour into the filling, spoiling the overall look of the dessert.
How to store a French strawberry tart
Due to the tart having a custard filling, it needs to be stored in the fridge at all times. I enjoy this tart both cold and at room temperature, so do remove from the fridge a little time before serving if you want it to warm up a little first.
Can I freeze this strawberry tart recipe?
I would not recommend freezing anything apart from the pastry, as defrosting will affect the texture of the whole bake, making it soggy and weepy and very sad.
Pro tips for making this recipe
- As an exception to most baking, make sure to use ingredients as cold as possible when making pastry: so cubed butter straight from the fridge and ice cold water. Keeping pastry cold helps avoid overworking the gluten and keep it relaxed to avoid shrinkage during baking.
- Handle the pastry dough as little as possible throughout making. This is especially important when bringing it together, as overworking the gluten will lead to tough pastry.
- When placing the pastry into the tin, try not to stretch the dough to make it fit. Stretching the dough may look fine once in the tin, but doing so will result in the dough shrinking back to its pre-stretched size and shape during baking, spoiling the look of the tart.
- Chill the pastry again once rolled and shaped into the tin. Chilling the pastry a second time allows the gluten to relax again, helping it hold its shape better and not be tough once baked.
- During cooking of the creme pat, make sure to keep stirring it throughout the cooking time or you will end up with a lumpy end result.
- Once the custard has finished cooking, transfer it to a clean bowl immediately and cover with cling film touching the surface. This stops a skin forming on top of the crème pâtissière as it cools, keeping it lump free ready to be used in the strawberry tart.
- Place the halved strawberries on a piece of kitchen towel to absorb some of the moisture before placing on the tart.
Troubleshooting
If you have any other questions about this easy strawberry tart recipe, please use the comments below to ask away and I will do my best to help. And if you do make this recipe for French strawberry tart, please take a moment to leave a rating and review below. I would love to know how you enjoy making it and following along, plus it really helps others looking for a similar recipe too. You could even post a picture on Instagram and tag me when you share it with the world, you know I love seeing all your bakes!
If you love this recipe try these out

Strawberry cheesecake crunch. Creamy, crunchy, fruity, fresh and oh so very pretty, this absolute showstopper is a summertime dessert everyone is sure to love!
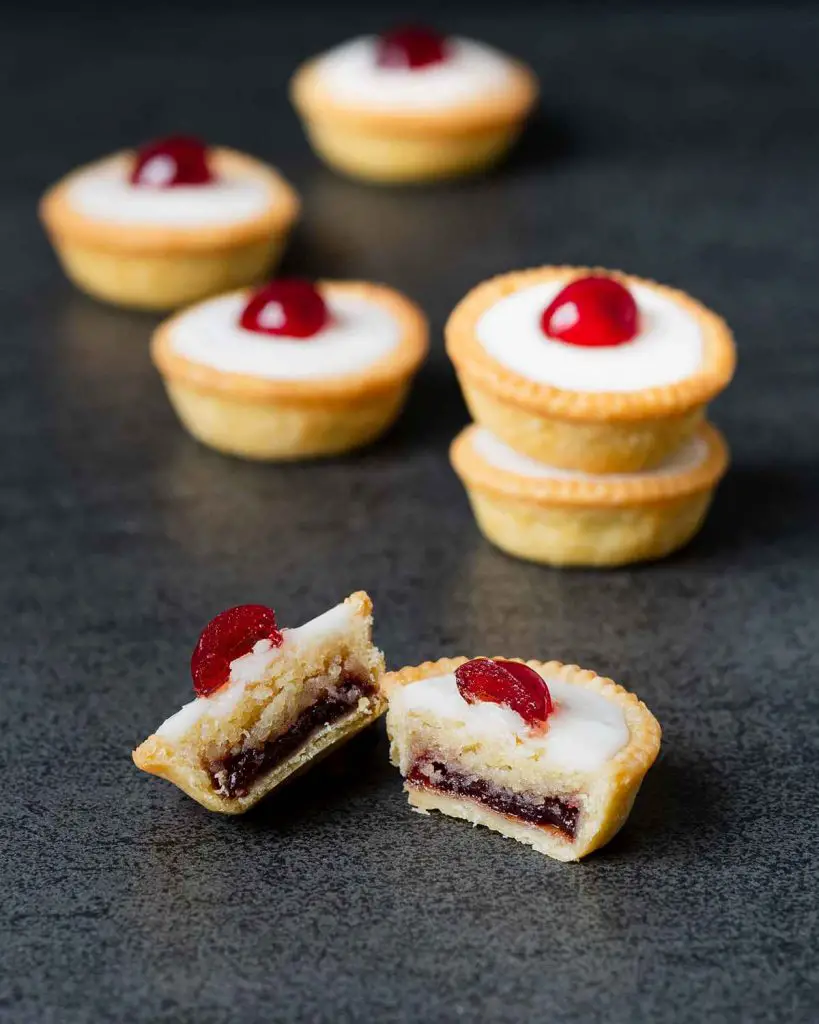
Mini cherry Bakewell tartlets. This mini Bakewell tarts recipe is the only one you will ever need for the perfect adorable bake. Beautiful buttery pastry, rich cherry jam, scrumptious almond frangipane. All topped with a layer of icing and, of course, the obligatory cherry on top!
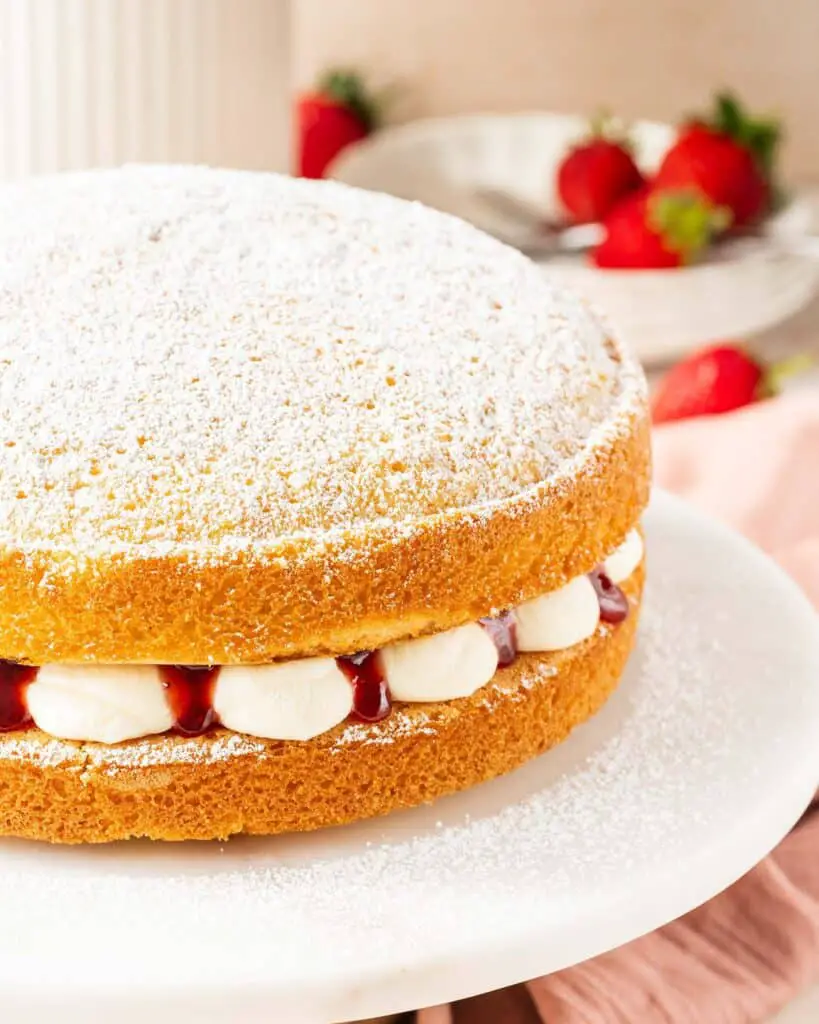
Classic Victoria sandwich cake. Two delicious vanilla flavoured sponge cakes sandwich layers of strawberry jam and smooth vanilla buttercream, with a simple dusting of icing sugar to finish. Heaven!
And that’s all from me for today! Hope you enjoy making this beauty as much as I enjoy sharing her with you. Happy baking, my friends! x
Recommended equipment I used *
| Digital kitchen scales | Measuring spoons |
| Food processor | Sieve |
| Rolling pin | Loose-bottomed tart tin |
| Pastry brush | Small saucepan |
| Whisk | Spatula |
Strawberry Tart Recipe
12
servings30
minutes35
minutes198
kcal6
hours1
hour10
minutesThe classic French strawberry tart is truly a triumph of summertime baking!
Keep the screen of your device on
Ingredients
- For the pastry (makes double)
250 g (1½ cups + 1 tbsp) plain (all-purpose) flour
60 g (¼ cup + 3 tbsp) icing (powdered) sugar
125 g (½ cup + 1 tbsp) unsalted butter, cold and cubed
2 large eggs, yolks only
2-4 tbsp ice (ie very very cold!) water
- For the crème pâtissière
4 large eggs, yolks only (save the whites to make meringues)
100 g (½ cup) caster sugar
2 tbsp cornflour (cornstarch)
0.25 tsp salt
420 ml (½ cup) (1 cups + ¾ cup) whole milk
0.5 tsp vanilla bean paste
20 g (1 tbsp + 1 tsp) unsalted butter
- For the topping and glaze
250 g (1 ¼ cups) strawberries
1 tsp apricot jam, loosened with a few drops of water
Directions
- Making the pastry
- In a food processor, blitz the flour and sugar. Add in the cold butter and pulse until the mixture resembles fine breadcrumbs. Tip in the egg yolks and blend again until just combined. Add in the ice water a little at a time until the pastry comes together in clumps.
- Tip the dough out onto a clean work surface and gather it together. Squeeze to bring it together, but try to avoid kneading and working it too much or the pastry will be tough. Divide the pastry dough into two equal parts and flatten into discs. Wrap each disc tightly in cling film then pop in the fridge to chill for at least 30 minutes. This recipe makes two discs of dough, enough to make two tarts. At this point, you can freeze one of the dough discs for another day, if you wish.
- Once the dough has chilled, roll out one of the chilled pastry discs into a circle about 10 inch diameter. Drape it carefully over the rolling pin and lift it into the tin, easing the pastry into the crevices. Do not stretch the pastry to make it fit. After lining the tin with pastry, gently fold the overhang of pastry over the lip of the tin. Using a rolling pin, roll over the top of the tin to cut off excess pastry. Prick several holes in the bottom of the pastry, then pop in the fridge to chill for a further 30 minutes.
- Preheat the oven to 160C/320F. When the pastry shell has chilled sufficiently, prepare a piece of parchment paper large enough to fit inside the pastry with some overhang. Scrunch it up, then open again, so that it is malleable. Remove the tin from the fridge and press the paper into the shell, easing into the corners. Fill with baking beans (see notes), then pop the tin into the hot oven. Bake blind for 20 minutes, then remove the paper and baking beans. Bake a further 10 minutes until golden and biscuity. Working quickly, remove the tin from the oven and brush all over the inside bottom and sides with egg white. Pop back in the oven for a further 5 minutes until golden. Remove from the oven and cool completely.
- For the crème pâtissière
- Into a large saucepan, tip in the egg yolks, caster sugar, cornflour and salt. Whisk until combined, then gradually add in the vanilla and milk, whisking until completely smooth.
- Place the pan over a medium heat and cook until the mixture starts to bubble gently. Keep cooking for around 7-9 minutes until thickened and the bubbles rise and pop lazily on the surface.
- Remove the pan from the heat and stir in the butter until melted and silky. Transfer the mixture to a clean bowl and place some cling film directly on the surface of the creme pat. Leave to cool before using.
- Assembling the strawberry tart
- Once the creme pat has cooled, gently stir it to smooth, then transfer into the pastry shell. Smooth over the top, then place in the fridge whilst preparing the strawberries.
- Cut the green leaves and stem off the strawberries, then cut each strawberry vertically in half. Place each half, cut side down, on a sheet of kitchen towel to absorb some of the juices ahead of using them to decorate the tart.
- Pull the tart out of the fridge and arrange the strawberry halves in a circle starting in the middle with the pointed ends facing in. Keep building the layers, working out, until the whole of the top of the tart is covered. Then stand back and admire your beautiful work!
- For the glaze, place the apricot jam in a small container and loosen by stirring or smooshing. Add a drop or two of water if you feel it’s a little thick for brushing over the berries.
- Using a pastry brush, gently brush all over each strawberry half with a little of the loosened jam, paying extra attention to the berries around the edges as an area easily missed. Pop the tart back in the fridge until ready to serve. Enjoy!
Notes
- As an exception to most baking, make sure to use ingredients as cold as possible when making pastry: so cubed butter straight from the fridge and ice cold water. Keeping pastry cold helps avoid overworking the gluten and keep it relaxed to avoid shrinkage during baking.
- Handle the pastry dough as little as possible throughout making. This is especially important when bringing it together, as overworking the gluten will lead to tough pastry.
- When placing the pastry into the tin, try not to stretch the dough to make it fit. Stretching the dough may look fine once in the tin, but doing so will result in the dough shrinking back to its pre-stretched size and shape during baking, spoiling the look of the tart.
- Chill the pastry again once rolled and shaped into the tin. Chilling the pastry a second time allows the gluten to relax again, helping it hold its shape better and not be tough once baked.
- During cooking of the creme pat, make sure to keep stirring it throughout the cooking time or you will end up with a lumpy end result.
- Once the custard has finished cooking, transfer it to a clean bowl immediately and cover with cling film touching the surface. This stops a skin forming on top of the crème pâtissière as it cools, keeping it lump free ready to be used in the strawberry tart.
- Place the halved strawberries on a piece of kitchen towel to absorb some of the moisture before placing on the tart.