
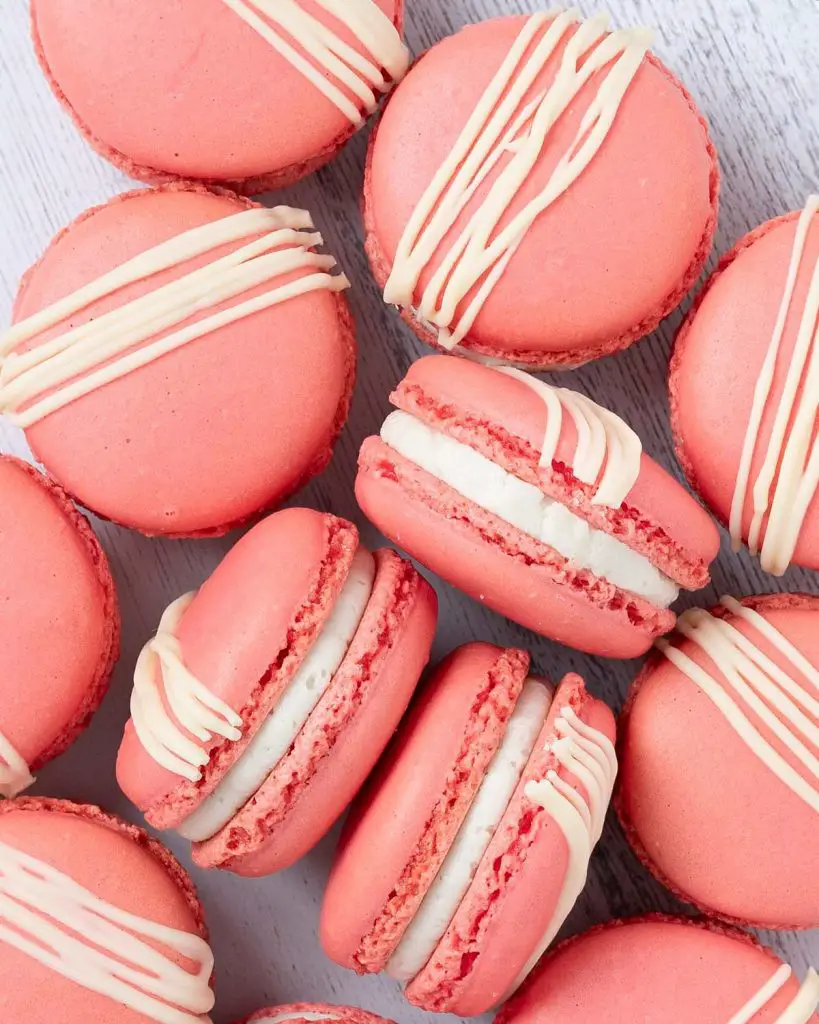
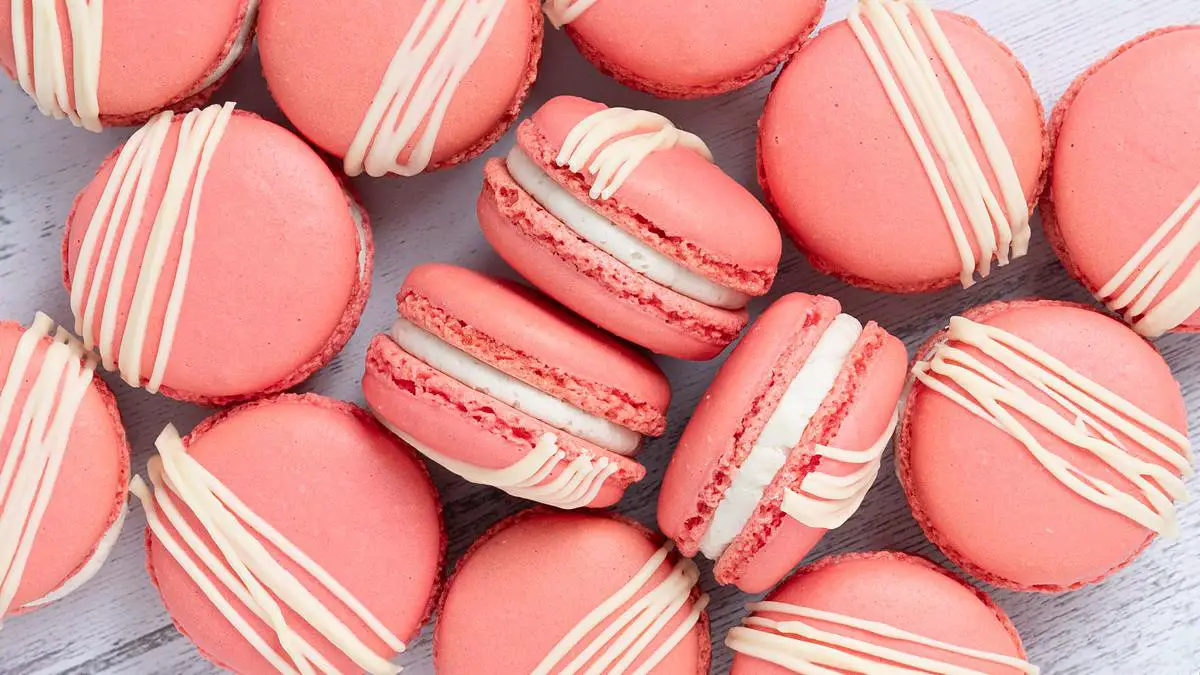
I absolutely adore macarons! They are crisp and chewy and sweet and soft and nutty and totally irresistible! And with it being strawberry season, I certainly need no better excuse to make some sensational strawberry macarons!

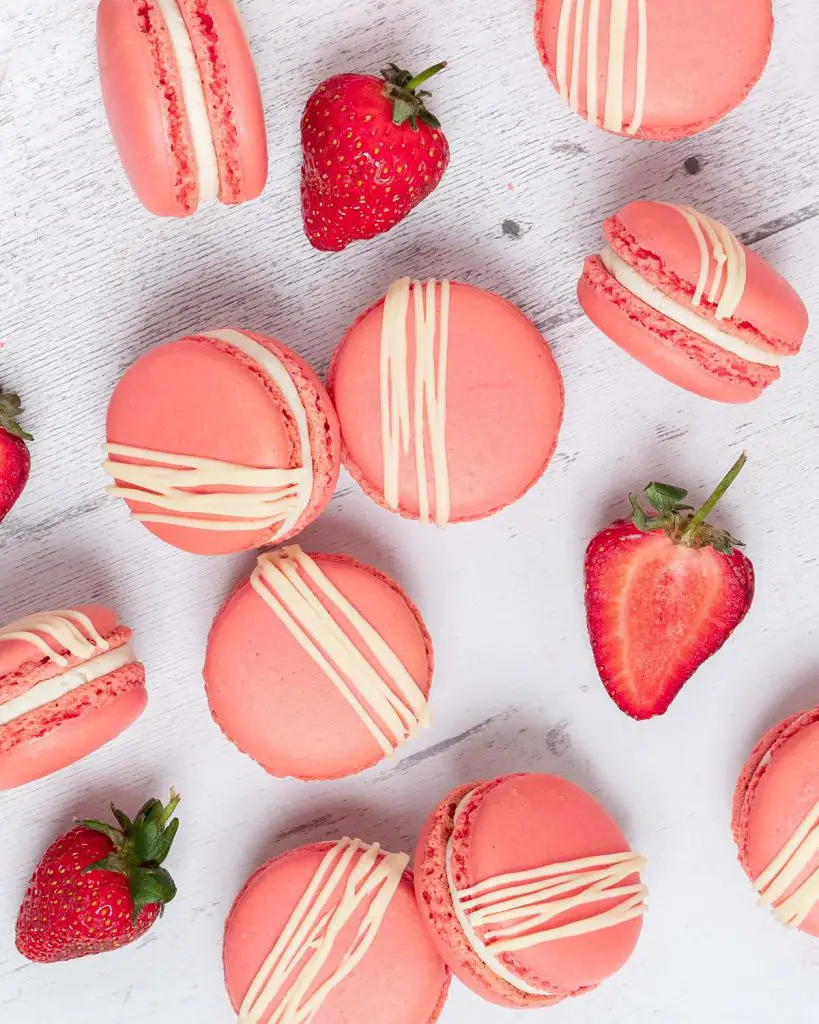
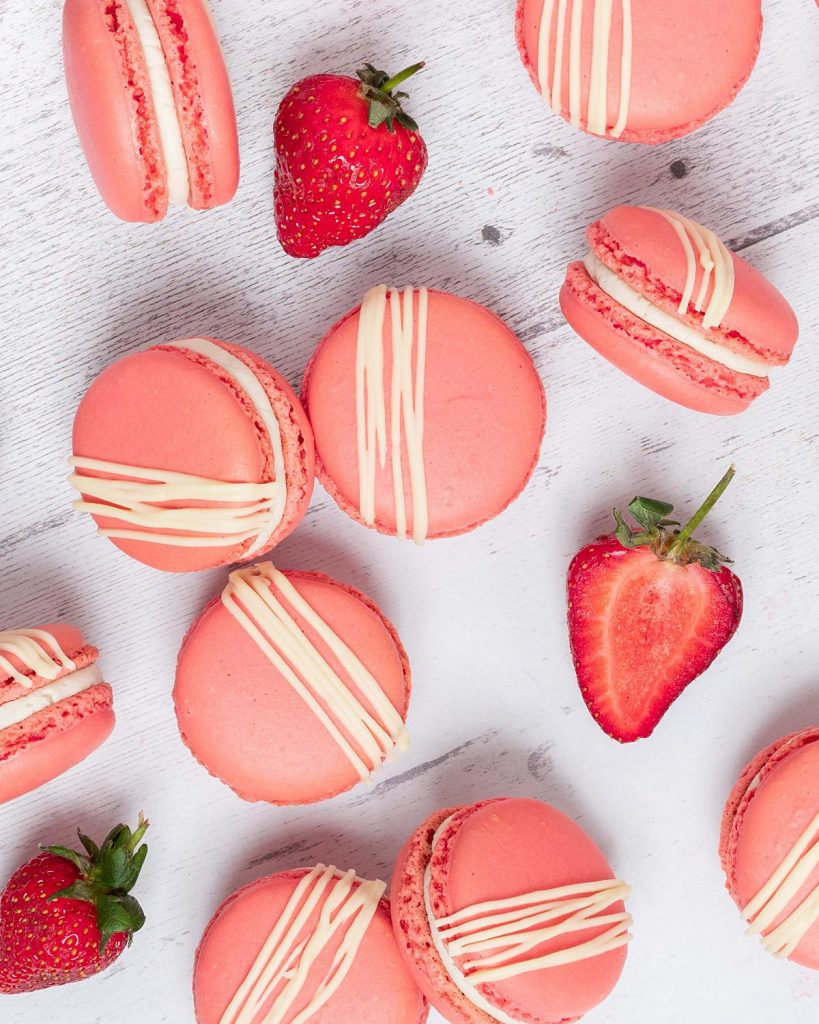
Pretty in pink!
Strawberry anything has my heart, but the pretty pink of so many strawberry flavoured creations are certainly something special too! I love going strawberry picking with the kids each summer. Then we use the glut we come home with to make delicious jam. These heavenly macarons are absolutely fabulous with store bought jam too, so no need to fret about making your own.
The history of macarons
There is some uncertainty of the true origins of the macaron. Queen Catherine de Medici is the most famous name linked with them, bringing the macaron to France in the 16th Century. Some sources even suggest macaron-like cooking techniques and bakes in 7th Century Middle Eastern cultures.
However macarons as we know them today, with the smooth filling sandwiched between two almond meringue shells, were indeed invented in France. Parisian confectioners came up with the ‘Macaron Parisien’ during the 1830s. This version was later made popular by the Ladurée family (of the Ladurée patisserie fame) and remains a popular French creation to this day.
Parisian confectioners created the ‘Macaron Parisien’ during the 1830s. It was later made popular by companies such as Ladurée – a company formed in 1862 that still operates till this day. The Pastry Chef Pierre Herme known as the ‘Picasso of Pastry’ was the first to create flavoured macarons in the 1980s. He made the then ground breaking pistachio, rose and vanilla macarons.
What is the difference between macarons and macaroons?
Despite the names of the two being very similar, these two bakes could not be more different! Macarons are the delicate almond meringue bakes sandwiched together with a soft filling such as buttercream or ganache. Macaroons made with whipped egg whites too, but that is where the similarities end. Macaroons have the addition of desiccated coconut to them, and are baked and treated more like cookies in baking, and are not often filled and sandwiched together.
Ingredients for strawberry macarons
- Ground almonds: the main ingredient in making any macaron. I grind this down to a super fine consistency with the icing sugar. This makes for super smooth strawberries and cream macarons shells.
- Icing sugar: for sweetness in the bake.
- Egg whites: another essential in this recipe to make this easy strawberry macaron recipe.
- Lemon juice: helps keep the meringue element of the bake stable when baking for perfect results.
- Caster sugar: used when whipping up the egg whites into stiff peaks.
- Pink food colouring: gives the strawberry macarons their gorgeous pink colour. Definitely not one to miss out!
- Unsalted butter: used to make the buttercream for the strawberry macaron filling.
- Vanilla: used in the buttercream for beautiful flavour.
- Double/heavy cream: I add a little cream, if needed, to make the buttercream softer so it can be easily piped.
- Strawberry jam: this recipe necessitates a strawberry jam macaron filling!
- White chocolate: just a little needed, to drizzle a pretty decoration over the macaron shells.
What equipment do I need to make strawberry macarons?
- Silicone mat*/Parchment paper: a silicone mat is the most convenient way to ensure you have equally sized circles on which to pipe the mixture. However you could also simply draw out some circles on parchment if you do not have mats.
- Baking trays*: to bake the strawberry macaron shells on.
- Digital kitchen scales*: I provide all my measurements in cups too. However I would encourage all bakers to weigh out ingredients when baking. A set of digital kitchen scales is so useful and totally an essential baking tool for me.
- Measuring spoons*: a set of measuring spoons is essential for any baker. This is because these are more accurate than using everyday teaspoons and tablespoons, which can vary greatly in size.
- Food processor*: used to whizz up the ground almonds and icing sugar together until no larger bits remain.
- Stand mixer*/Handheld electric mixer*: both useful tools to make life easier in the kitchen! You can, of course, make this whole recipe entirely by hand. But it will be quite the workout for your arm!
- Sieve*: use to remove lumps from the dry ingredients, to ensure everything gets mixed together evenly.
- Spatula*: helpful to scoop out the macaron and buttercream mixtures from the mixing bowls. This is really helpful to transfer into piping bags when making this strawberry macarons recipe.
- Piping bags*: used for piping the mixture before baking, as well as to accurately fill the shells once baked.
- Piping nozzle*: a round nozzle is really useful to ensure evenly sized shells. If you do not have a nozzle, you could try simply snipping the end off the piping bag too. A nozzle does offer far greater control and accuracy.
How to make strawberry macarons
Macarons are notoriously tricky to make and get right. Today I will share with you a few pointers to help you along the way. Soon you will soon have some beautiful homemade strawberry macarons to show off! The making of the macaron shells is where the challenge is for many. In this recipe, I walk you through each step of the process. And I will include plenty of tips along the way, to help you successfully make macarons every time!
For the macaron shells: prep
Step 1: Place the baking mats on two baking trays. Set aside whilst making the macarons. Prepare a large piping bag fitted with a round nozzle.
Extra fine
Step 2: Using a food processor, pulse the ground almond and icing sugar until it is really fine and no lumps remain. I do this in a couple of batches to avoid it clumping together. Once blitzed, sift the mixture twice into a mixing bowl. Discard any larger bits that remain. Set the bowl aside.
TIP: DO NOT try to push any leftover mixture through the sieve. You want this dry mixture to be really fine and well aerated.
Take your time
Step 3: In a separate bowl, or using a stand mixer with a whisk attachment, whisk up the egg whites with the lemon juice until foamy. Turn the speed to a medium-low and add in the caster sugar one tablespoon at a time, waiting a few seconds between additions. Once all the sugar has been added, the mixture will be soft and pillowy. Add in the food colouring and mix to combine.
TIP: Add in more food colouring than you think. Once the egg whites are whipped to stiff peaks and the sifted dry ingredients are added, the colour will be diluted. Add more colour at this stage, to allow for it to pale once ready.
Stiff peaks
Step 4: Turn the mixer speed up to medium-high and whisk until the egg white mixture reaches stiff peaks, about 4-5 minutes.
TIP: The egg whites will give you visual clues when they are reaching stiff peaks. First, you will see the mixture forming a larger ball in the middle of the whisk during mixing, like it is clumping together. When you think it is done, remove the whisk and hold it pointing up: the egg white mixture should remain stiff and pointing towards the ceiling, without the tip flopping over. If this happens, whisk it for a minute or so longer and test again. The final test (for the really brave!) is to turn the whole bowl upside down. If the mixture has reached stiff peaks, it will not budge. However, it risks a messy splat on your floor!
Combine the two
Step 5: Carefully add in half the sifted almond mixture. Gently fold the two together with a spatula. When almost combined, add in the rest of the almond mix and fold gently again. Make sure to scrape the bottom of the bowl so everything is mixed together.
TIP: At this stage, until everything is combined, you want to mix everything together well but without losing too much of the air beaten into the egg whites. Once combined, this mixture will be lumpy, even if it looks well combined. No need to worry, the next step will fix this.
Macaronage
Step 6: This next step is called macaronage. It is where we keep folding the mixture until it achieves the texture and consistency required for the best macaron shells. You are looking for the mixture to become smooth and more glossy. When you lift the spatula, it should form a V shape as it falls back into the bowl. It will be smooth but still stiff enough to not disappear completely when dripped back into the mixture. The consistency will be like slow moving lava, so still fairly thick. When ready, transfer to a piping bag fitted with a round nozzle.
TIP: You can do the slower more gentle method of this step by folding and turning your bowl a quarter turn, then repeating. If you want a quicker way (which is not without risk), you can gently press the mixture up the sides of the bowl, then fold it all back together, checking the consistency each time. This way is quicker, but it is very easy to be over zealous and over mix, resulting in deflated or hollow macaron shells once baked.
Preparing the shells
Step 7: Holding the piping bag facing straight down, pipe rounds of the macaron mixture using the circles on the mat as a guide. Once one tray is piped, drop the tray from a few inches off the table a couple of times. This helps any trapped air bubbles come to the surface of the piped shells. Use a toothpick or skewer to pop the air bubbles and smooth out the top of the shells. Leave the mixture on the table to form a light skin on top. This can take anything from twenty minutes to an hour, depending on the temperature and humidity of the room.
TIP: To test if the skin has formed and the shells are ready to be baked, the first clue will be visual: the shells will look dull on top. If this is the case, very VERY gently run a finger across the top of a shell. It should not stick to your finger at all, but be smooth and dry to touch. The shells are now ready to be baked!
Baking time
Step 8: Preheat the oven to 160C/320F. Bake the dried shells on the preheated oven for 20 minutes until baked through. Leave to cool completely on the tray.
TIP: You can check if the macaron shells are baked through by gently pushing the side of one of the shells. If it moves, even a little, bake it for an additional two minutes and check again. When baked through, the shells will not move at all when pushed, and will have grown beautiful “feet” in the oven.
For the filling and decoration
Step 1: Beat the butter until pale and fluffy. This takes me about 3-4 minutes. Add in half the icing sugar, beating on low to combine thoroughly. Add in the vanilla and mix through, then tip in the remaining sugar and beat again on low. If the buttercream is a little stiff, add in enough cream for it to be soft and spreadable. Turn the speed up and beat the buttercream until fluffy, then transfer to a piping bag fitted with a small round nozzle. Set aside.
Step 2: Stir the jam to loosen it a little, then place into a second piping bag and cut a small hole at the end. Set aside
Step 3: Melt the white chocolate and drizzle a little over half the macaron shells. Once done, release the shells from the mat.
How to assemble strawberry macarons
Step 1: Take an undecorated macaron shell and pipe a ring of buttercream a little in from the edge on the flat side of the shell. This will be the bottom of the macaron, and the lower shell.
Step 2: Fill the middle of the buttercream ring with some jam, being careful not to overfill so it does not sit higher than the buttercream ring “dam”.
Step 3: Top the filling with a decorated macaron shell. Gently and evenly press the shells together to spread the filling to the edge all the way around. Chill the strawberry macarons for 24 hours before serving. Enjoy!
Macaron FAQ
Here are some of the more common questions and issues that come up when making macarons. If you have any other questions, please leave me a comment below and I will try to get back to you with an answer!
What is macaronage and how do I do it?
This is probably the trickiest part of making macarons. Macaronage is when the almond mixture is combined and folded into the meringue. Unlike most other recipes involving whipped up egg whites, minimal and light folding to combine the ingredients is not the goal. Instead, it is to achieve a specific texture of the macaron batter before it is piped out.
During macaronage, when first folding the two mixtures together, it will be thick and clump in the mixing bowl. As the mixture is folded further, it becomes looser, gaining a more glossy and smooth texture, not the stiff lumpy one it was to begin. When the batter reaches the stage of being like slow flowing lava, dripping off the spatula in a V-shape, you know it is ready.
Knowing the signs to look for, and the confidence to keep folding until you reach this stage is the tricky part. It goes against everything bakers are told about folding whipped up egg whites with anything, it is no wonder! However, stopping when the batter is not mixed enough and is still too thick will yield crinkled looking macarons. Equally, over mixing of the batter will result in flat macarons.
Why did my strawberry macarons not come out right?
There are various reasons for each version of why the macaron shells did not bake as they should. Below are just a few possible reasons for each.
- Hollow shells: The egg whites were either under whipped or over whipped. The batter was not folded to the correct consistency before piping. The macarons were under baked.
- Lopsided macarons: The macarons were left to rest too long. The oven heat was uneven. They were not piped correctly.
- Cracked macarons: Too much air in the batter. Overbeating the batter. Not letting the shells dry well enough before baking.
- Flat shells: Usually due to an overmixed batter.
How do I store these strawberry macarons?
Store these macarons for up to three days at room temperature and up to a week in the fridge. They will need to be kept in an airtight container, to keep as much air out as possible so that they do not dry out.
How far in advance can I make these?
You can make these strawberry macarons up to a week before they are served and enjoyed. However, you must make them at least a day in advance to allow them to develop their flavours and iconic chew.
Can I freeze macarons?
Yes! These strawberry macarons can be stored in an airtight container and frozen for up to three months. Thaw them thoroughly and always serve at room temperature.
Tips and tricks for making macarons
Making the macaron batter
- Have all ingredients and tools ready before you begin anything: line the baking trays, prepare the piping bags and have all electrical items to hand along with ingredients. Read through the recipe a couple of times, especially my tips, so you know what to expect at each step. Macarons are brilliant fun to make, when you know what you are doing, but can be very stressful if you are not too sure. Being prepared helps!
- When sifting the ground almonds and icing sugar together, DO NOT try to push any leftover mixture through the sieve. You want this dry mixture to be really fine and well aerated.
- Add in more food colouring than you think you will need into the egg white mixture. Once the egg whites are whipped to stiff peaks and the sifted dry ingredients are added, the colour will be diluted. Adding more colour at this stage, will allow for it to lighten once it is baked but still hold its colour.
- Wondering how to tell if the egg whites have reached stiff peaks? They will give you visual clues when they are reaching this stage. First, you will see the mixture forming a larger ball in the middle of the whisk during mixing, like it is clumping together. When you think it is ready, remove the whisk and hold it pointing up: the egg white mixture should remain stiff and pointing towards the ceiling, without the tip flopping over. If it does flop over, whisk it for a minute or so longer and test again. The final test (for those who are really brave!) is to turn the whole bowl upside down over your head. If the mixture has reached stiff peaks, it will not budge. However, it risks a messy splat on your floor!
When it comes to macaronage
- When adding in the dry ingredients to the egg white mixture, you want to mix everything together well but without losing too much of the air beaten into the egg whites. Once totally incorporated together, the mixture will still be lumpy, even if it looks well combined. No need to worry, the next step of macaronage will fix this.
- Macaronage: you can do the slower more gentle method of this step by folding and turning your bowl a quarter turn, then repeating. If you want a quicker way (which is not without risk), you can gently press the mixture up the sides of the bowl, then carefully fold it all back together, checking the consistency each time. This way is quicker, but it is very easy to be over zealous and so over mix, resulting in deflated or hollow macaron shells once baked.
Remember when baking the macaron shells
- Once they have been left to air dry, test if the skin has formed so the shells are ready to be baked. The first clue will be visual: the shells will look dull on top. If this is the case, very VERY gently run a finger across the top of a shell. It should not stick to your finger at all, but be smooth and dry to touch. The macaron shells are now ready to be baked!
- When baking, keep an eye on the baking shells through the oven door. Check if the macaron shells are baked through by gently pushing on the side of one of the shells. If it moves, even a little, bake it for an additional two minutes and check again. When baked through, the shells will not move at all when pushed, and will have grown beautiful “feet” in the oven.
Tips for filling the macaron shells
- Use buttercream that is not too stiff for the strawberry macaron filling. If it is too firm, it could cause the shells to crack and break as you assemble together.
- Make sure the strawberry macaron filling jam level does not come above the level of the piped buttercream. If it does, you may end up with some jam oozing out and spoiling the look of the finished macarons.
- Chilling the macarons once assembled allows the flavours to blend and mature, and the macarons to soften slightly giving their signature chew. I stack mine in an airtight container and place in the fridge for 24 hours after they have been made before serving.
Troubleshooting
If you have any questions about this recipe, please comment below and I will do my best to help. And do remember: if you enjoy this strawberry macaron recipe, please leave a rating and review below. You could even post a picture on Instagram and tag me when you share it with the world. You already know I would love to see!
More recipes from my blog for you to enjoy
Union Jack meringue cake: I absolutely adore meringues, in all its forms. However, a meringue cake has to be one of the most beautiful and special desserts ever! I absolutely love my meringue with fresh fruit and whipped cream. So getting creative with the Union Jack design on top of this one just had to be done!
Raspberry chocolate macaroons: My delicious raspberry dark chocolate macaroons are so easy and need just four ingredients to make! It has a chewy middle and a crisp exterior. This wonderful recipe uses fresh raspberries and is drizzled in deep dark chocolate. A wonderful bake to get little hands helping in the kitchen!
Eton mess mini pavlova nests: Everyone loves Eton mess and everyone loves pavlova… right? In fact, what could be better than combining the two to make a heavenly strawberries and cream mini pavlova dessert? This was exactly how to make Eton mess mini pavlova nests was born. A truly perfect British summertime dessert!
Thanks for joining me today, my friends. Hope you enjoy making and sharing these stunning strawberry macarons and happy baking! x
Recommended equipment I used *
| Silicone mat | Baking trays |
| Digital kitchen scales | Measuring spoons |
| Food processor | Stand mixer/Handheld electric mixer |
| Sieve | Spatula |
| Piping bags | Piping nozzle |
Strawberry Macarons
Ingredients
For the macaron shells
- 100 g (½ cup + 2 tbsp) ground almonds
- 100 g (¾ cup) icing sugar
- 65 g egg whites
- 0.25 tsp lemon juice
- 60 g (¼ cup + 1 tbsp) caster sugar
- pink food colouring
For the filling and decoration
- 150 g (½ cup + 3 tbsp) unsalted butter, softened
- 300 g (2 ¼ cups) icing sugar
- 1 tsp vanilla
- 1 tbsp double cream
- 8 tsp strawberry jam
- white chocolate, melted
Instructions
For the macaron shells
- Place the baking mats on two baking trays. Set aside whilst making the macarons.
- Using a food processor, pulse the ground almond and icing sugar until it is really fine and no lumps remain. I do this in a couple of batches to avoid it clumping together. Once blitzed, sift the mixture twice into a mixing bowl. Discard any larger bits that remain. Set the bowl aside. TIP: DO NOT try to push any leftover mixture through the sieve. You want this dry mixture to be really fine and well aerated.
- In a separate bowl, or using a stand mixer with a whisk attachment, whisk up the egg whites with the lemon juice until foamy. Turn the speed to a medium-low and add in the caster sugar one tablespoon at a time, waiting a few seconds between additions. Once all the sugar has been added, the mixture will be soft and pillowy. Add in the food colouring and mix to combine. TIP: Add in more food colouring than you think. Once the egg whites are whipped to stiff peaks and the sifted dry ingredients are added, the colour will be diluted. Add more colour at this stage, to allow for it to pale once ready.
- Turn the mixer speed up to medium-high and whisk until the egg white mixture reaches stiff peaks, about 4-5 minutes. TIP: The egg whites will give you visual clues when they are reaching stiff peaks. First, you will see the mixture forming a larger ball in the middle of the whisk during mixing, like it is clumping together. When you think it is done, remove the whisk and hold it pointing up: the egg white mixture should remain stiff and pointing towards the ceiling, without the tip flopping over. If this happens, whisk it for a minute or so longer and test again. The final test (for the really brave!) is to turn the whole bowl upside down. If the mixture has reached stiff peaks, it will not budge. However, it risks a messy splat on your floor!
- Carefully add in half the sifted almond mixture. Gently fold the two together with a spatula. When almost combined, add in the rest of the almond mix and fold gently again. Make sure to scrape the bottom of the bowl so everything is mixed together. TIP: At this stage, until everything is combined, you want to mix everything together well but without losing too much of the air beaten into the egg whites. Once combined, this mixture will be lumpy, even if it looks well combined. No need to worry, the next step will fix this.
- This next step is called macaronage. It is where we keep folding the mixture until it achieves the texture and consistency required for the best macaron shells. You are looking for the mixture to become smooth and more glossy. When you lift the spatula, it should form a V shape as it falls back into the bowl. It will be smooth but still stiff enough to not disappear completely when dripped back into the mixture. The consistency will be like slow moving lava, so still fairly thick. When ready, transfer to a piping bag fitted with a round nozzle. TIP: You can do the slower more gentle method of this step by folding and turning your bowl a quarter turn, then repeating. If you want a quicker way (which is not without risk), you can gently press the mixture up the sides of the bowl, then fold it all back together, checking the consistency each time. This way is quicker, but it is very easy to be over zealous and over mix, resulting in deflated or hollow macaron shells once baked.
- Holding the piping bag facing straight down, pipe rounds of the macaron mixture using the circles on the mat as a guide. Once one tray is piped, drop the tray from a few inches off the table a couple of times. This helps any trapped air bubbles come to the surface of the piped shells. Use a toothpick or skewer to pop the air bubbles and smooth out the top of the shells. Leave the mixture on the table to form a light skin on top. This can take anything from twenty minutes to an hour, depending on the temperature and humidity of the room. TIP: To test if the skin has formed and the shells are ready to be baked, the first clue will be visual: the shells will look dull on top. If this is the case, very VERY gently run a finger across the top of a shell. It should not stick to your finger at all, but be smooth and dry to touch. The shells are now ready to be baked!
- Preheat the oven to 160C/320F. Bake the dried shells on the preheated oven for 20 minutes until baked through. Leave to cool completely on the tray. TIP: You can check if the macaron shells are baked through by gently pushing the side of one of the shells. If it moves, even a little, bake it for an additional two minutes and check again. When baked through, the shells will not move at all when pushed, and will have grown beautiful "feet" in the oven.
For the filling and decoration
- Beat the butter until pale and fluffy. This takes me about 3-4 minutes. Add in half the icing sugar, beating on low to combine thoroughly. Add in the vanilla and mix through, then tip in the remaining sugar and beat again on low. If the buttercream is a little stiff, add in enough cream for it to be soft and spreadable. Turn the speed up and beat the buttercream until fluffy, then transfer to a piping bag fitted with a small round nozzle. Set aside.
- Stir the jam to loosen it a little, then place into a second piping bag and cut a small hole at the end. Set aside
- Melt the white chocolate and drizzle a little over half the macaron shells. Once done, release the shells from the mat.
How to assemble strawberry macarons
- Take an undecorated macaron shell and pipe a ring of buttercream a little in from the edge on the flat side of the shell. This will be the bottom of the macaron, and the lower shell.
- Fill the middle of the buttercream ring with some jam, being careful not to overfill so it does not sit higher than the buttercream ring "dam".
- Top the filling with a decorated macaron shell. Gently and evenly press the shells together to spread the filling to the edge all the way around. Chill the macarons for 24 hours before serving. Enjoy!
Video
Notes
- When sifting the ground almonds and icing sugar together, DO NOT try to push any leftover mixture through the sieve. You want this dry mixture to be really fine and well aerated.
- Add in more food colouring than you think you will need into the egg white mixture. Once the egg whites are whipped to stiff peaks and the sifted dry ingredients are added, the colour will be diluted. Adding more colour at this stage, will allow for it to lighten once it is baked but still hold its colour.
- Wondering how to tell if the egg whites have reached stiff peaks? They will give you visual clues when they are reaching this stage. First, you will see the mixture forming a larger ball in the middle of the whisk during mixing, like it is clumping together. When you think it is ready, remove the whisk and hold it pointing up: the egg white mixture should remain stiff and pointing towards the ceiling, without the tip flopping over. If it does flop over, whisk it for a minute or so longer and test again. The final test (for those who are really brave!) is to turn the whole bowl upside down over your head. If the mixture has reached stiff peaks, it will not budge. However, it risks a messy splat on your floor!
- When adding in the dry ingredients to the egg white mixture, you want to mix everything together well but without losing too much of the air beaten into the egg whites. Once totally incorporated together, the mixture will still be lumpy, even if it looks well combined. No need to worry, the next step of macaronage will fix this.
- Macaronage: you can do the slower more gentle method of this step by folding and turning your bowl a quarter turn, then repeating. If you want a quicker way (which is not without risk), you can gently press the mixture up the sides of the bowl, then carefully fold it all back together, checking the consistency each time. This way is quicker, but it is very easy to be over zealous and so over mix, resulting in deflated or hollow macaron shells once baked.
- Once they have been left to air dry, test if the skin has formed so the shells are ready to be baked. The first clue will be visual: the shells will look dull on top. If this is the case, very VERY gently run a finger across the top of a shell. It should not stick to your finger at all, but be smooth and dry to touch. The macaron shells are now ready to be baked!
- When baking, keep an eye on the baking shells through the oven door. Check if the macaron shells are baked through by gently pushing on the side of one of the shells. If it moves, even a little, bake it for an additional two minutes and check again. When baked through, the shells will not move at all when pushed, and will have grown beautiful “feet” in the oven.
- Use buttercream that is not too stiff for the strawberry macaron filling. If it is too firm, it could cause the shells to crack and break as you assemble together.
- Make sure the strawberry macaron filling jam level does not come above the level of the piped buttercream. If it does, you may end up with some jam oozing out and spoiling the look of the finished macarons.
- Chilling the macarons once assembled allows the flavours to blend and mature, and the macarons to soften slightly giving their signature chew. I stack mine in an airtight container and place in the fridge for 24 hours after they have been made before serving.