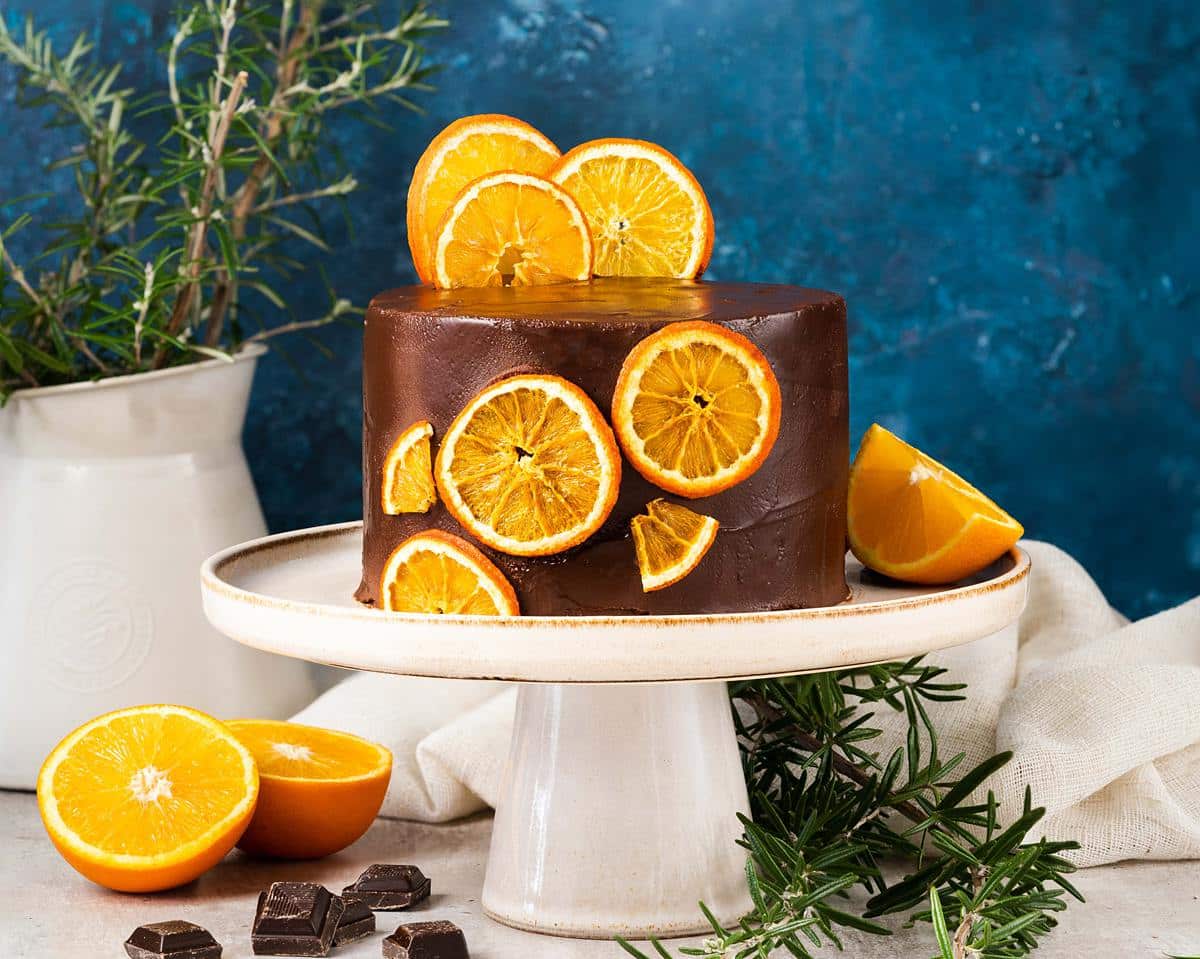
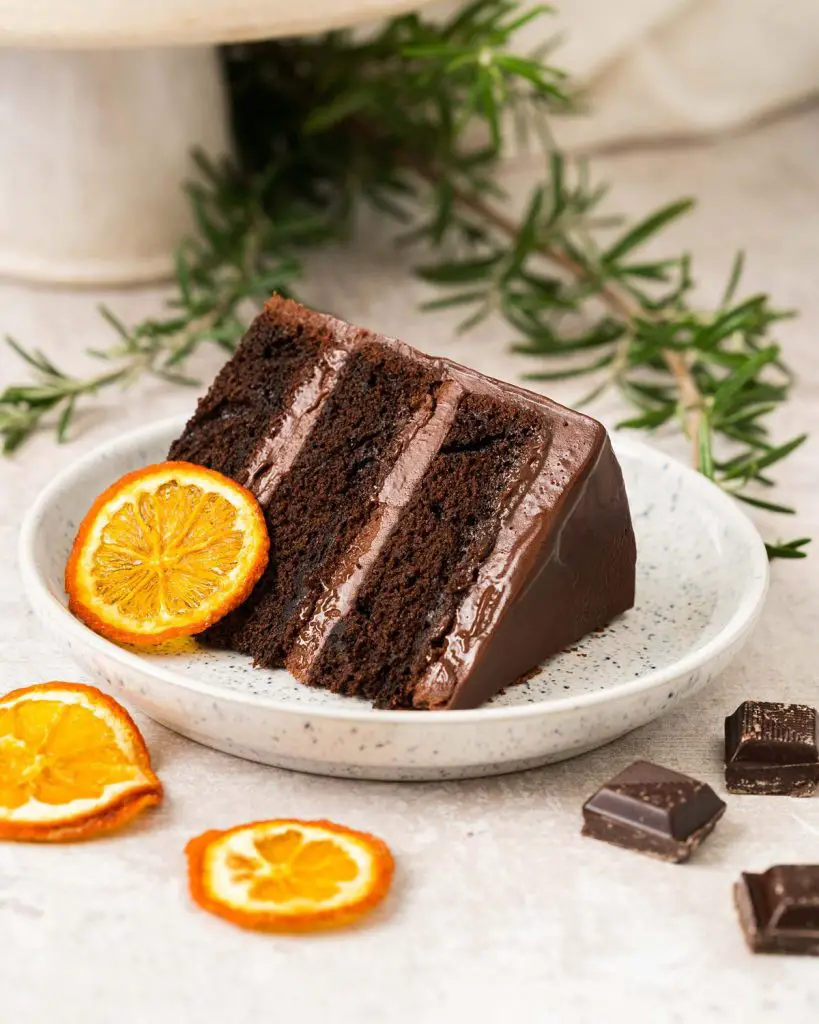
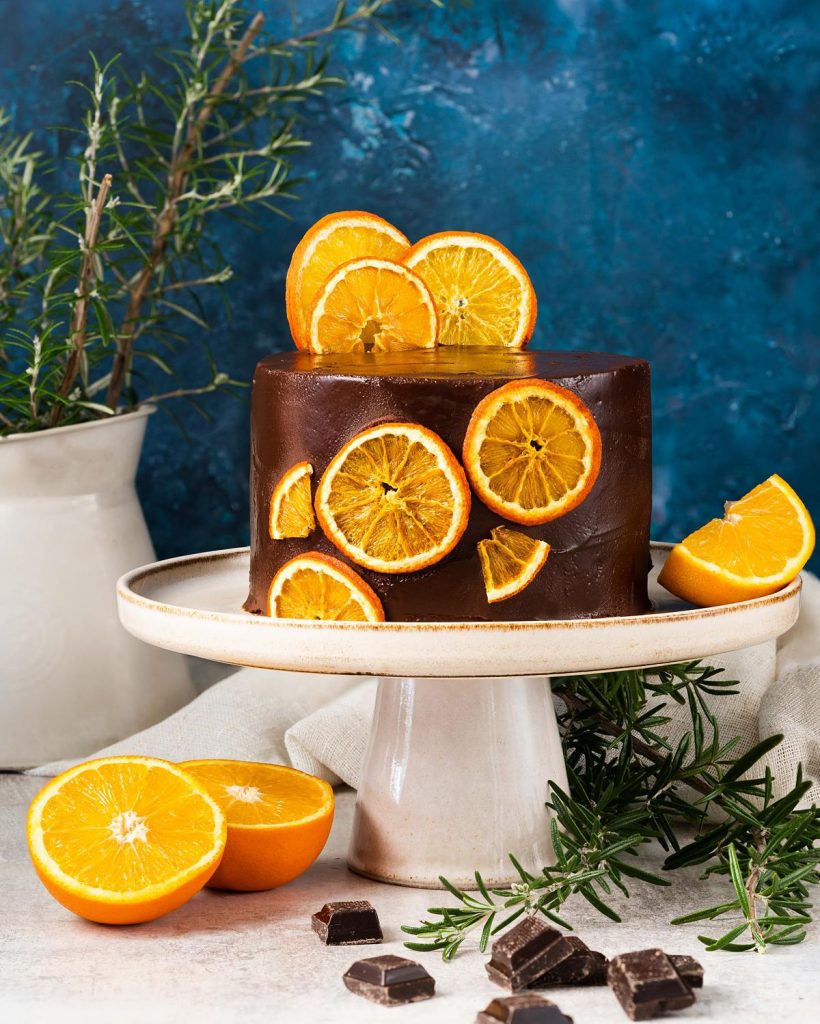
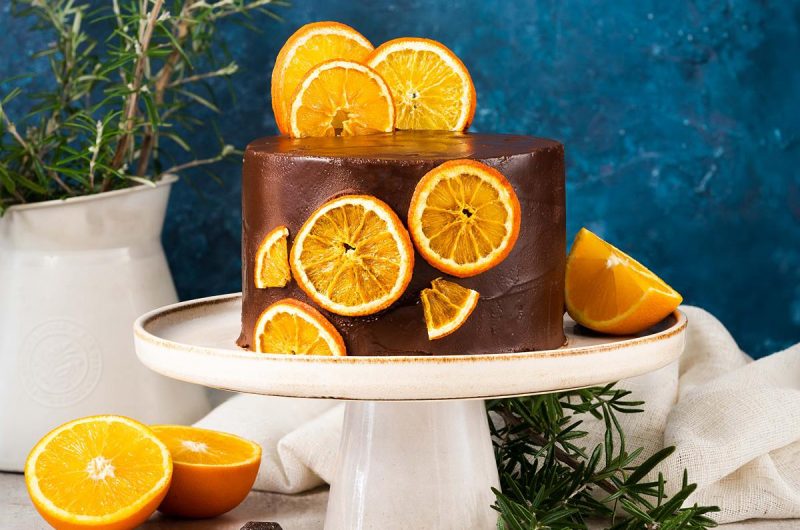
Rich, dark and slightly fudgy, my chocolate orange cake is a wonderfully indulgent bake that really packs a flavoursome punch! Three layers of moist orange and chocolate cake are filled and covered with a smooth dark chocolate orange ganache. Decorated with dehydrated orange slices for a simple and sophisticated look, this is one cake that is sure to impress!
Chocolate pairings…
I might be a little obsessed with chocolate in general. However, I do also love chocolate with other flavours. Whether it is chocolate with orange, strawberries, raspberries, cherries, peanut butter or coconut to name but a few, I am always open to combining flavours together!
But chocolate orange.. it’s certainly not just for Christmas! In this beautiful cake however, there is absolutely no store bought chocolate orange (sorry to disappoint if that’s what you expected!). Instead, all the flavour of orange comes from fresh oranges, using either the juice or zest of the fruit. This means you could turn this orange and chocolate cake into an equally beautiful bloody orange chocolate cake too if you wish! Just divine!
What are the ingredients chocolate orange cake?
- Flour: I use plain/all purpose flour to make this orange chocolate cake. I prefer adding raising agents separately, as I do with salt, so I can control the rise of each of my bakes.
- Caster sugar: for sweetness in this easy chocolate orange cake.
- Cocoa powder: gives a rich chocolate flavour to the orange dark chocolate cake.
- Baking powder: the raising agent used in this beautiful bake.
- Salt: enhances the flavour of the bake, but it will not be so much that you taste it in the cake.
- Eggs: gives structure and stability to the moist chocolate orange cake as it bakes.
- Buttermilk: I make my buttermilk using equal quantities of greek yogurt and whole milk for a wonderfully thick and creamy buttermilk. However, you could just as easily use milk curdled with a little lemon juice instead if you do not have yogurt to hand when making this chocolate and orange cake.
- Oil: I use vegetable oil in this recipe to help keep the bake super moist and tender.
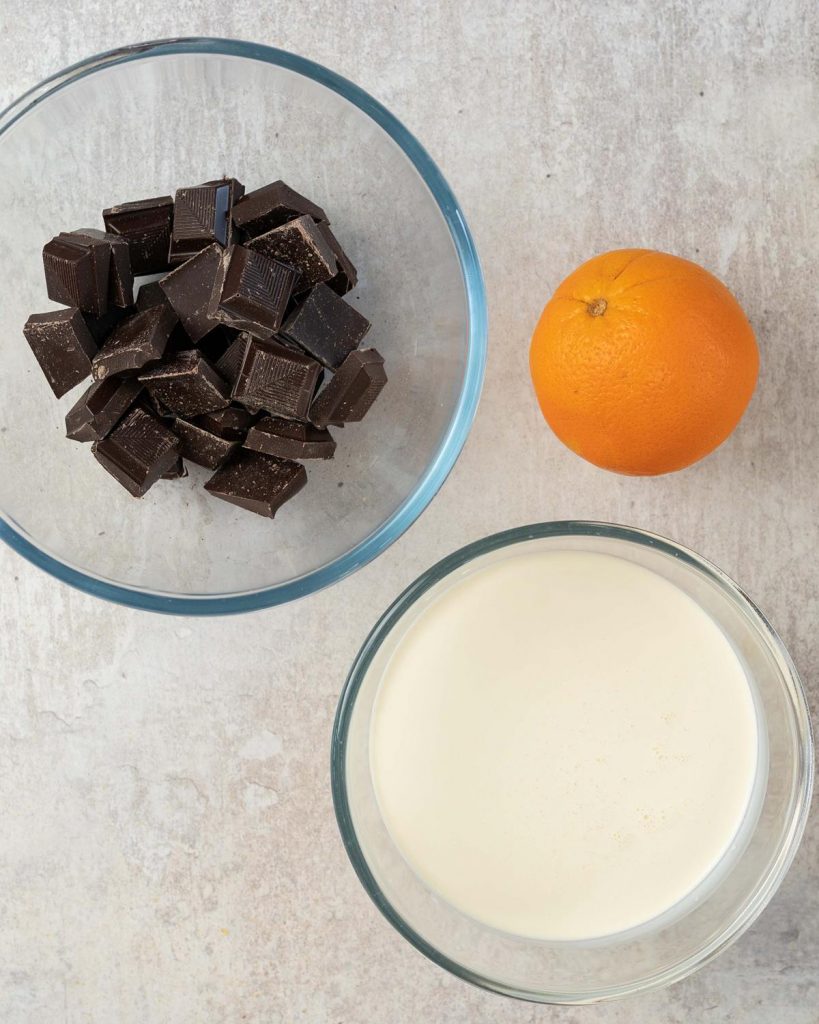
- Oranges: I use the juice and zest of a fresh orange in the cake and the zest of another orange when making the ganache for this dark chocolate orange cake.
- Double cream: used when making the ganache to fill and cover this yummy cake.
- Dark chocolate: gives a deep and rich chocolate flavour in the ganache icing for this easy orange chocolate cake.
- Dehydrated orange slices (optional): used to decorate the cake, this is totally optional. You could decorate with orange zest or curls, or use simple slices of fresh orange to decorate the cake. Get creative with it!
What equipment do I need to make this orange chocolate cake recipe?
- Cake tins*: to bake the cakes in. I use three tins to make this cake rather than one and cutting in three. This helps ensure each layer of the choc orange cake bakes up evenly and all through.
- Parchment/baking paper: to line the tins before baking the delicious sponge cakes in them.
- Digital kitchen scales*: I provide all my measurements in cups, however I would encourage all bakers to weigh out ingredients when baking. A set of digital kitchen scales is so useful and totally an essential baking tool for me.
- Measuring spoons*: a set of measuring spoons is essential for any baker. This is because these are more accurate than using everyday teaspoons and tablespoons, which can vary greatly in size.
- Mixing bowl*: to mix all the ingredients together to make the cake.
- Sieve*: to sift the dry ingredients before mixing in for the chocolate orange sponge cake.
- Jug*: I use a jug to mix together my wet ingredients separately before adding them in with the dry ingredients.
- Handheld electric mixer*: a useful tool to make life easier in the kitchen! You can, of course, make this whole recipe entirely by hand. But it will be quite the workout for your arm!
- Zester*: to get all that beautiful zest of the oranges before squeezing them for the juice. Remember to zest first before juicing for a much easier job!
- Lemon squeezer*: makes getting the juice from the orange a total breeze!
- Spatula*: to scrape down the bowl with as ingredients are added, ensuring everything mixes together thoroughly when making this orange chocolate fudge cake.
How to make the best chocolate orange cake
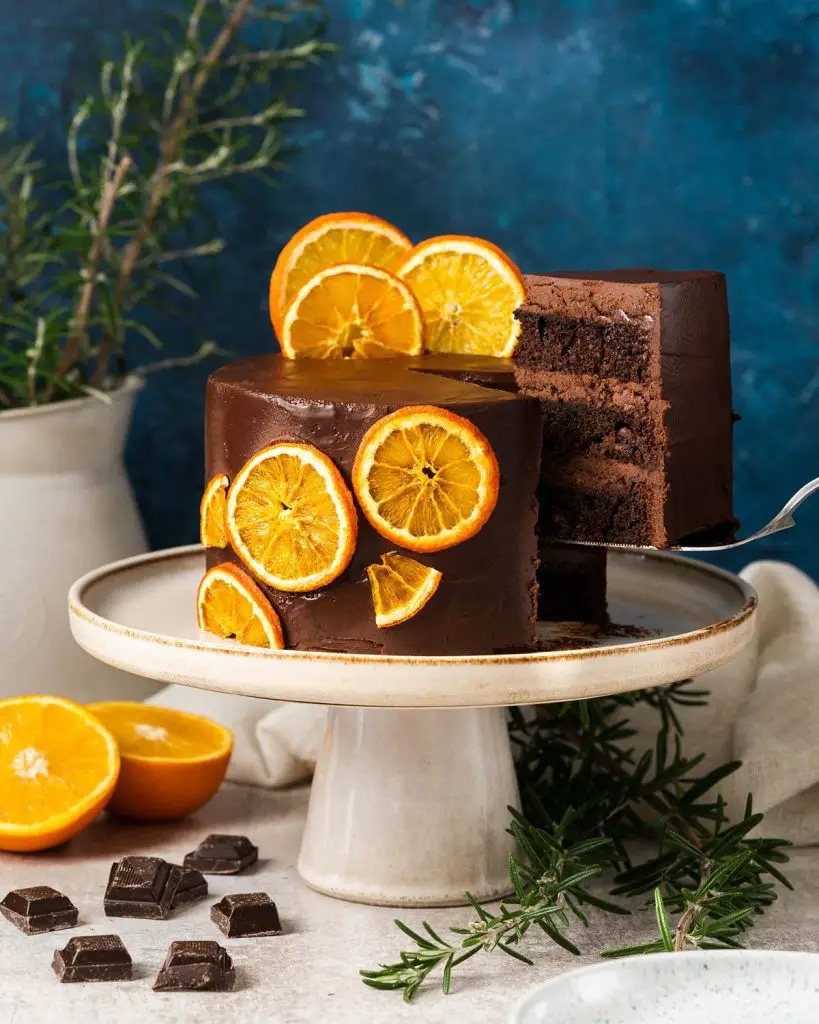
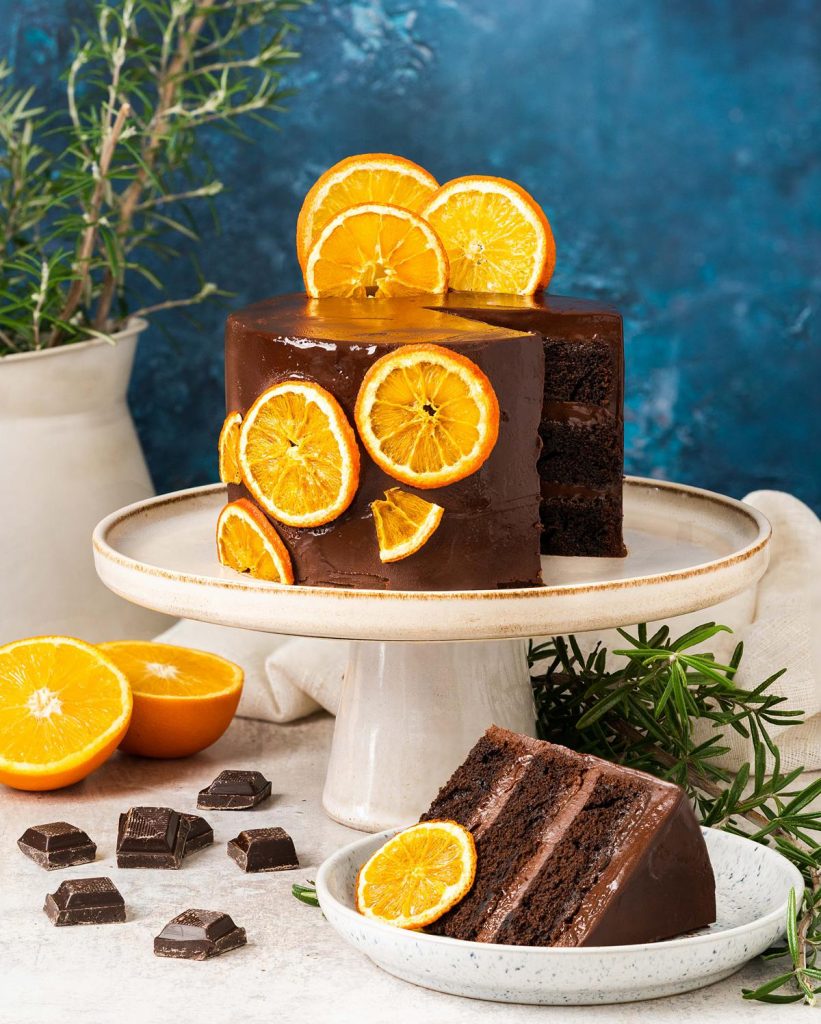
First you will make the choc orange sponge cakes. Then, once the cakes are cool, they are filled and covered with the most gloriously decadent orange and dark chocolate ganache icing before being decorated with a few simple orange slices to finish. Perfectly understated and totally irresistible!

For the cakes
Step 1: Preheat the oven to 160C/320F. Grease and line three 6″ loose bottomed cake tins, then set these aside whilst making the cake.
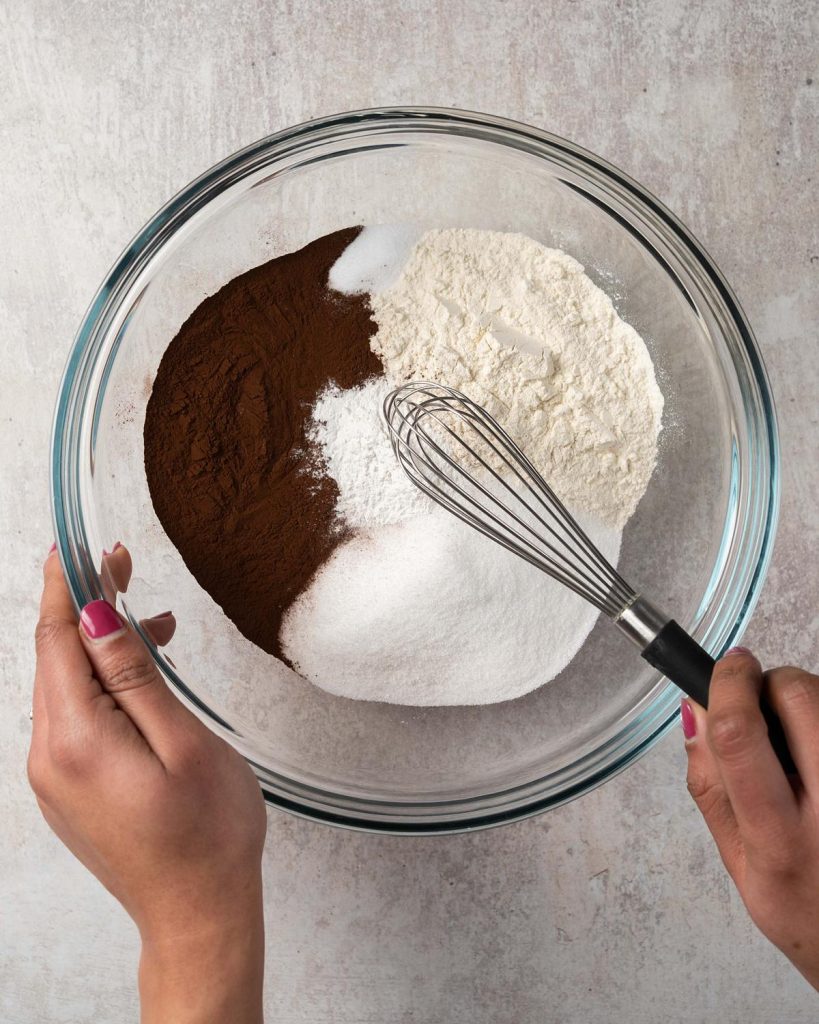
Step 2: In a large mixing bowl, sieve together the flour, sugar, cocoa powder, baking powder and salt. Give it a quick whisk, then set this bowl aside.
Step 3: Separately (I like to use a large jug, but another bowl will be perfect too), mix together the eggs, buttermilk, oil, orange juice and orange zest until totally combined.
Step 4: Tip the wet mix into the bowl with the dry ingredients and beat it all together. The mixture will be quite thick. This is perfect, just make sure it is all really thoroughly mixed at this stage.
Step 5: With the mixer running on a low setting, drizzle the boiling water in and mix it all in until the cake mixture is silky smooth and shiny.
Step 6: Divide the mixture between the three tins and bake in the hot oven for 25-30 minutes until the cakes have shrunk from the sides slightly and are springy to touch. A wooden skewer inserted into the cakes will come out clean or with a couple of moist crumbs. Leave to cool for five minutes in the tins, then turn out onto a cooling rack to cool completely.
For the ganache and decoration
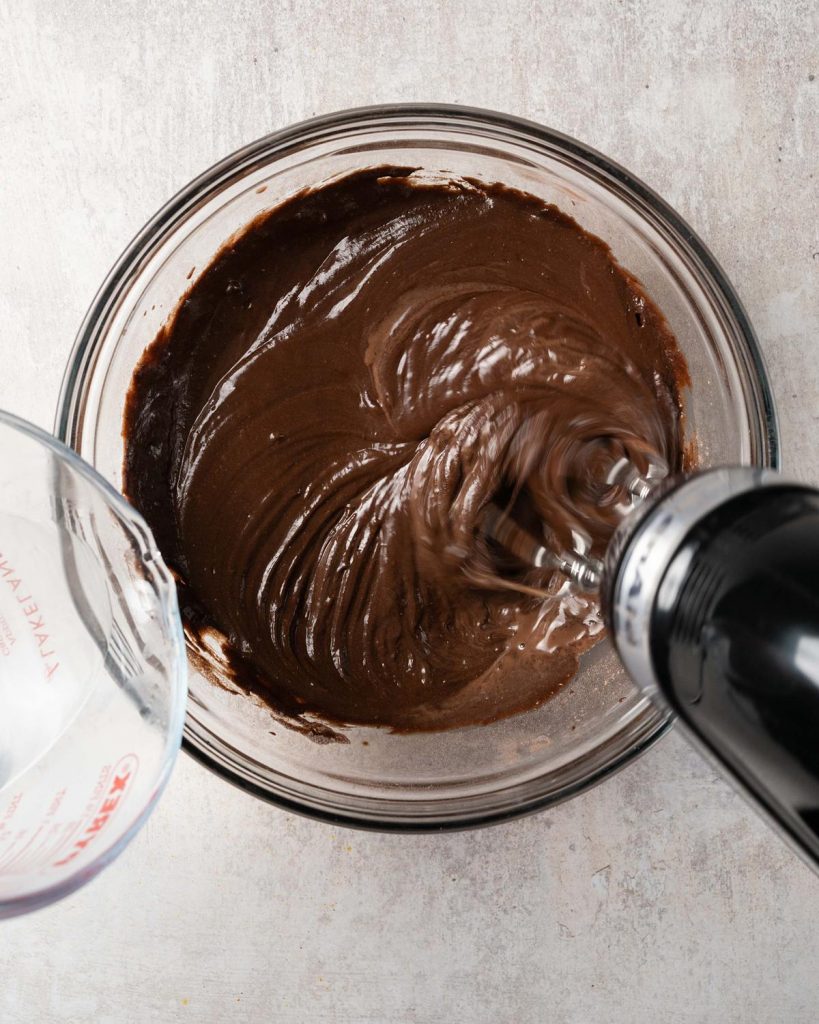
Step 1: Break or chop the chocolate into small pieces and place in a mixing bowl. Heat the double cream until almost boiling, then pour over the chocolate. Leave to sit for one minute, then stir to dissolve the chocolate and mix everything together until glossy and smooth. Zest the orange directly into the bowl, mixing it in really thoroughly to make sure all the zest and oils are incorporated into the ganache. Leave to cool and firm up.
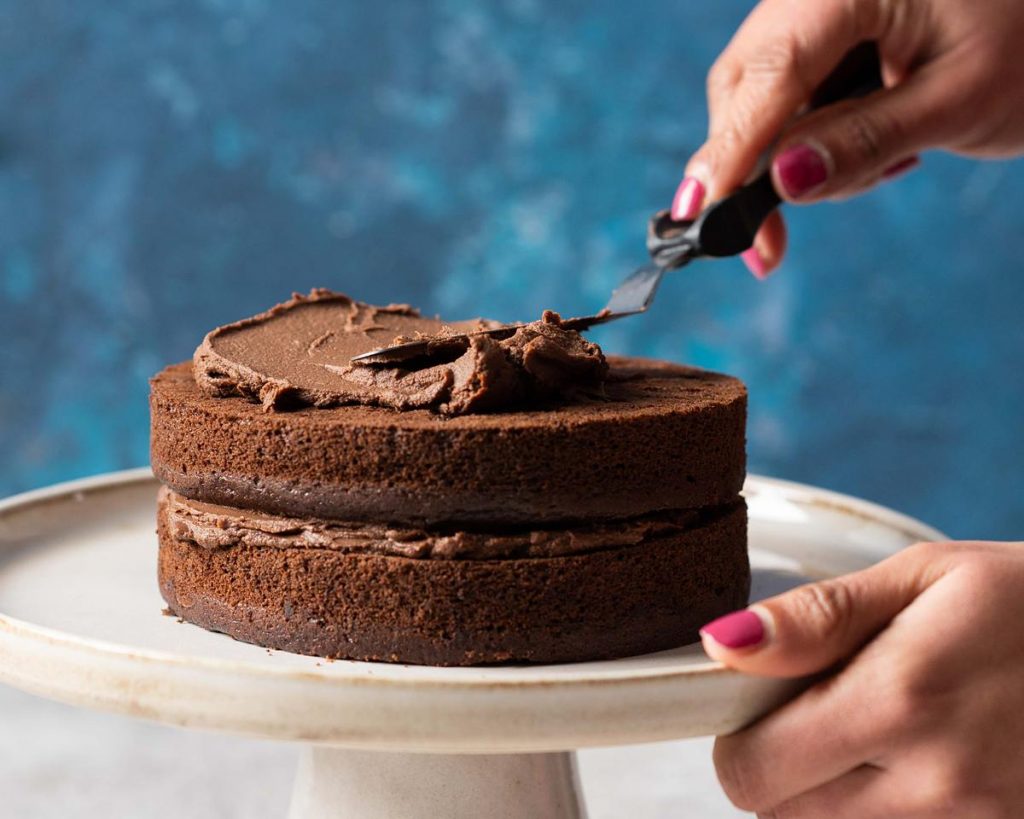
Step 2: Once the cakes are fully cool, level them if necessary. Place a splodge of ganache on the cake plate/cake stand and place the first layer of cake on this. Spoon some ganache on top of the cake and spread out evenly to the edges of the cake. Place the second cake layer on top, pressing down to make sure it is level. Repeat with the ganache and the third layer of cake.
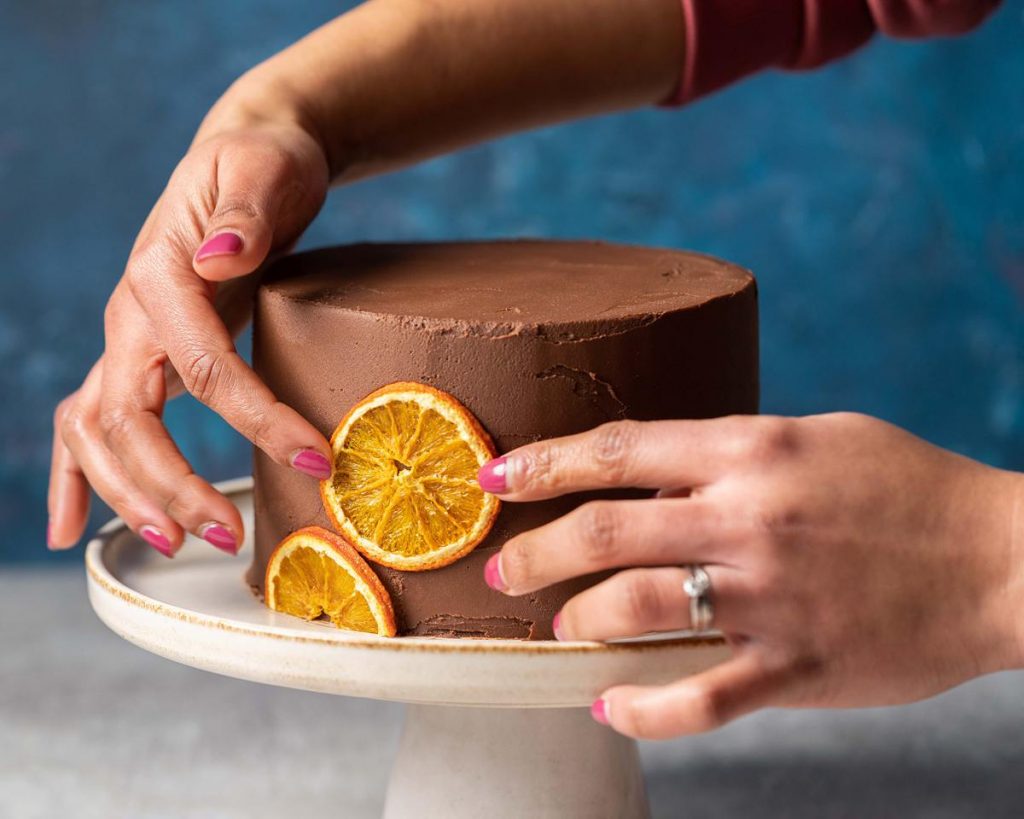
Step 3: Cover the top and sides of the whole cake with as much ganache as you would like (you might not use all the ganache). Smooth the top and sides to the effect you want. Press some dehydrated orange slices in a diagonal pattern coming up the side of the cake, then push a few slices into the top. Enjoy!
How do I line my cake tins?
Place the cake tin on some parchment paper and trace around the base of the tin. Cut out this shape (three times, for three cake layers) and set aside. Brush inside the base of the cake tin with a little oil. Place the cut out circle of parchment paper on the oiled base and use the brush to flatten and ease it into the corners. Brush a little more oil over the parchment circle and up the sides of the cake tin. The tins are now ready to be used.
How can I tell when my cakes are baked?
You will know when the cakes are done as they will be firm to touch and will have shrunk away from the sides of the pan slightly. Additionally, a toothpick or wooden skewer inserted into the cake will come out clean or with just a few crumbs.
How long does this chocolate orange cake last? And how do I store the cake?
This cake is best eaten within two days of being made because of the fresh cream used in making the ganache. It can be stored at cool room temperature, but if it is especially warm I would recommend storing it in the fridge. If storing in the fridge, leave the cake out for about 20-30 minutes before serving. This chocolate orange fudge cake is best enjoyed at room temperature.
How to freeze cake
If you wish to make this cake ahead of time and freeze it, this is not a problem. For best results in the final cake, I would not recommend freezing the assembled orange chocolate sponge cake, but the individual cake layers instead. Then, when you are ready, you can defrost the layers, make the rich chocolate orange ganache, and decorate the cake.
To freeze the cake layers, first make sure they are completely cool. Wrap each layer of cake tightly and securely in cling film, then a layer of tin foil and another tight layer of cling film. You do not want any moisture getting to the cakes, or they will turn out a soggy mess or risk freezer burn, hence thoroughness. Freeze the cakes on a flat surface until frozen before stacking in the freezer.
How to defrost your frozen cake layers
When you are ready to defrost and decorate the dark chocolate and orange cake, simply remove the layers from the freezer and unwrap them. Place each cake in a single layer on a cooling rack, brushing off any remaining ice crystals, and leave to come to room temperature. The cakes are ready to be decorated once defrosted.
Additional tips for making the best dark chocolate and orange cake
- Use ingredients at room temperature when making the cake. The reason for this is simple: ingredients all at room temperature will combine better and make for a better bake!
- Zest oranges before juicing them, every time. Trying to zest a floppy orange half is hard and frustrating, so save yourself the stress and zest first!
- Before juicing any citrus fruit, I like to roll it firmly on my kitchen worktop. This softens the pulp of the fruit, helping to release the juices more easily when I come to squeezing it. If your fruit is especially firm, you could also try gently heating it in the microwave for a few seconds before rolling and juicing too.
- To make buttermilk, I like to use equal quantities of whole milk and a thick yogurt, such as Greek yogurt. You can also make buttermilk by adding 2-3 tsp of lemon juice to some milk and leaving it to sit for about 15 minutes.
- The cake mixture is really thin and runny before baking. This is perfect, it will bake up to wonderful moist cakes in the oven, no need to worry!
- I would recommend making the ganache while the cakes are baking. This is to allow the ganache time to cool down and firm up before you use it to decorate the cake. The ganache can be left to cool and firm up at room temperature, but if you are in a hurry, you could pop it in the fridge to speed up the cooing process.
- I used orange slices I dehydrated myself to decorate this cake. If you want to make your own, simply place thinly sliced oranges on a parchment lined baking tray, then bake in the oven at 120C/250F for 60-90 minutes until dried out, flipping over halfway through. Allow to cool before using.
Troubleshooting
If you have any questions about this cake, please comment below and I will do my best to help. And do remember: if you enjoy this recipe for chocolate orange cake, please leave a rating and review below. You could even post a picture on Instagram and tag me when you share it with the world. You already know I would love to see!
More recipes from my blog for you to enjoy
If you enjoyed this cake, please do have a look at these recipes I think you will love too!
Chocolate orange shortbread: This beautiful buttery melt-in-the-mouth shortbread is bursting with vibrant orange zest and rich dark chocolate. It is so good, you will struggle to stop at just one!
Sticky toffee pudding cake: My sticky toffee pudding cake combines the best of everyone’s favourite sticky toffee pudding in a cake. Beautiful, rich sticky toffee sponge cake, filled with caramelised white chocolate buttercream and a perfect toffee drip. Topped with absolutely spectacular caramelised white chocolate shards, this bake makes for a truly jaw-dropping celebration cake!
Chocolate chip loaf cake: This chocolate chip loaf cake is one of my favourite treats! A fluffy vanilla loaf cake with plenty of chocolate chips in every bite, topped with a smooth and shiny chocolate ganache. A truly perfect tea time treat!
Thanks for joining me today, my friends. Hope you enjoy this gorgeous moist chocolate orange cake recipe, and happy baking! x
Recommended equipment I used *
| Cake tins | Digital kitchen scales |
| Measuring spoons | Mixing bowl |
| Sieve | Jug |
| Handheld electric mixer | Zester |
| Lemon squeezer | Spatula |
Chocolate Orange Cake
12
servings1
hour30
minutes534
kcal1
hour30
minutesRich and decadent, this chocolate orange cake is sure to win over anyone who tries it!
Keep the screen of your device on
Ingredients
- For the cakes
240 g (1 ½ cups + 3 tbsp) plain (all purpose) flour
230 g (1 cup + 2 tbsp) caster sugar
70 g (½ cup + 2 tbsp) cocoa powder
2 tsp baking powder
1 tsp salt
2 large eggs
180 ml (¾ cup) buttermilk (see notes below)
60 ml (¼ cup) oil (I used vegetable oil)
120 ml (½ cup) boiling water
60 ml (¼ cup) orange juice (about one large orange)
1 large orange, zest
- For the ganache and decoration
580 ml (2 ¼ cups + 3 tbsp) double (heavy) cream
325 g (2 ½ cups) dark chocolate
1 large orange, zest only
7 dehydrated orange slices, to decorate (optional)
Directions
- For the cakes
- Preheat the oven to 160C/320F. Grease and line three 6″ loose bottomed cake tins, then set these aside whilst making the cake.
- In a large mixing bowl, sieve together the flour, sugar, cocoa powder, baking powder and salt. Give it a quick whisk, then set this bowl aside.
- Separately (I like to use a large jug, but another bowl will be perfect too), mix together the eggs, buttermilk, oil, orange juice and orange zest until totally combined.
- Tip the wet mix into the bowl with the dry ingredients and beat it all together. The mixture will be quite thick. This is perfect, just make sure it is all really thoroughly mixed at this stage.
- With the mixer running on a low setting, drizzle the boiling water in and mix it all in until the cake mixture is silky smooth and shiny.
- Divide the mixture between the three tins and bake in the hot oven for 25-30 minutes until the cakes have shrunk from the sides slightly and are springy to touch. A wooden skewer inserted into the cakes will come out clean or with a couple of moist crumbs. Leave to cool for five minutes in the tins, then turn out onto a cooling rack to cool completely.
- For the ganache and decoration
- Break or chop the chocolate into small pieces and place in a mixing bowl. Heat the double cream until almost boiling, then pour over the chocolate. Leave to sit for one minute, then stir to dissolve the chocolate and mix everything together until glossy and smooth. Zest the orange directly into the bowl, mixing it in really thoroughly to make sure all the zest and oils are incorporated into the ganache. Leave to cool and firm up.
- Once the cakes are fully cool, level them if necessary. Place a splodge of ganache on the cake plate/cake stand and place the first layer of cake on this. Spoon some ganache on top of the cake and spread out evenly to the edges of the cake. Place the second cake layer on top, pressing down to make sure it is level. Repeat with the ganache and the third layer of cake.
- Cover the top and sides of the whole cake with as much ganache as you would like (you might not use all the ganache). Smooth the top and sides to the effect you want. Press some dehydrated orange slices in a diagonal pattern coming up the side of the cake, then push a few slices into the top. Enjoy!
Notes
- Use ingredients at room temperature when making the cake. The reason for this is simple: ingredients all at room temperature will combine better and make for a better bake!
- Zest oranges before juicing them, every time. Trying to zest a floppy orange half is hard and frustrating, so save yourself the stress and zest first!
- Before juicing any citrus fruit, I like to roll it firmly on my kitchen worktop. This softens the pulp of the fruit, helping to release the juices more easily when I come to squeezing it. If your fruit is especially firm, you could also try gently heating it in the microwave for a few seconds before rolling and juicing too.
- To make buttermilk, I like to use equal quantities of whole milk and a thick yogurt, such as Greek yogurt. You can also make buttermilk by adding 2-3 tsp of lemon juice to some milk and leaving it to sit for about 15 minutes.
- The cake mixture is really thin and runny before baking. This is perfect, it will bake up to wonderful moist cakes in the oven, no need to worry!
- I would recommend making the ganache while the cakes are baking. This is to allow the ganache time to cool down and firm up before you use it to decorate the cake. The ganache can be left to cool and firm up at room temperature, but if you are in a hurry, you could pop it in the fridge to speed up the cooing process.
- I used orange slices I dehydrated myself to decorate this cake. If you want to make your own, simply place thinly sliced oranges on a parchment lined baking tray, then bake in the oven at 120C/250F for 60-90 minutes until dried out, flipping over halfway through. Allow to cool before using.
Hello! Thank you for your recipe. The person I would like to bake this for does not like dark chocolate. Could I use semi sweet instead?
Hi Becky! The dark chocolate used in the ganache will make for a rich filling and covering for the cake. If you’re wanting to replace with milk chocolate, it will result in a softer icing, but should still work out for you. I would suggest doing half dark and half milk chocolate to help with this, since the addition of cream makes the dark chocolate a little less bitter. Hope that helps!
Thank you!! One other question, for the cocoa powder, which type do you use? Is it Dutch processed or natural?
I can’t wait to make it!
Hi Becky, I just use store bought cocoa powder not Dutch processed. Just make sure not to use drinking chocolate as this is normally already sweetened. Enjoy!