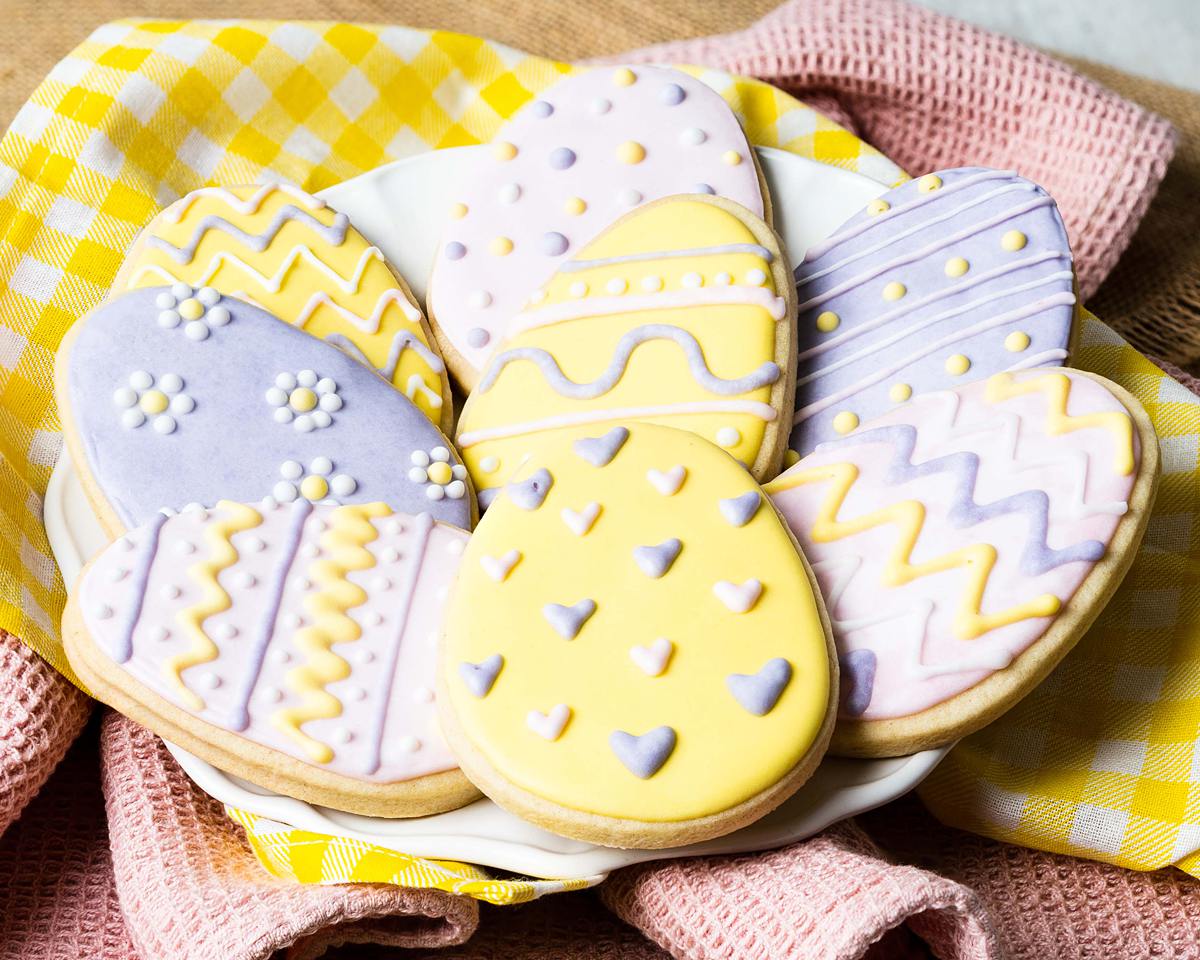
Are you looking for something creative to do and make with little hands in the kitchen this Easter? Or even some tasty bakes you can give away as edible gifts? These sweet little Easter sugar cookies are so simple to make and delicious to eat! Time to get creative with plenty of Easter cookies decorating ideas!
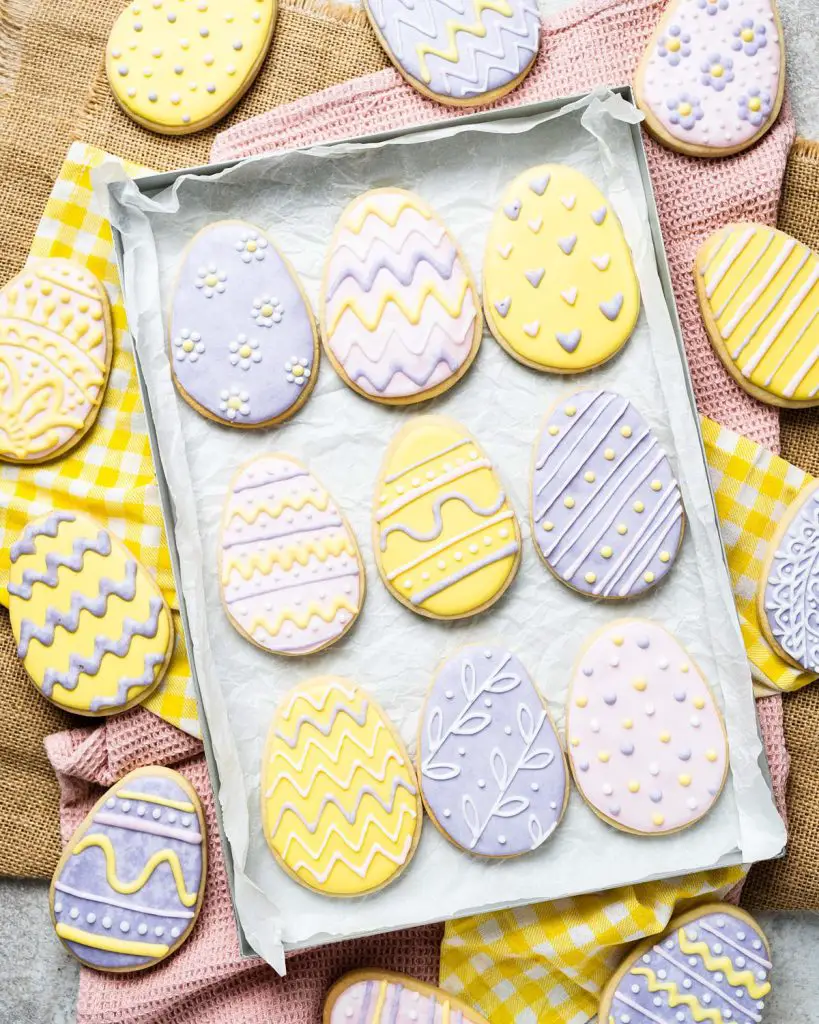
So much to love about these Easter cookies
- Basic ingredients. Using easy to find ingredients make these cookies easy to make anytime the urge to bake hits!
- Fun to make. Bringing together, kneading dough, rolling and stamping all make for a great activity with the children too.
- No spreading. The biscuits hold their shape when baked, meaning cut out shapes are still recognisable!
- Flat surface. Makes decorating cookies for Easter less stressful!
- Beautiful flavour. Buttery vanilla flavour makes these melt-in-the-mouth biscuits totally irresistible!
Are sugar cookies and shortbread the same?
Sugar cookies are not the same as traditional shortbread. Scottish shortbread uses just three ingredients on a basic level: flour, butter and sugar. Sugar cookies are similar, but they actually use a few more ingredients including an egg and baking powder. The texture of both is fairly similar, but I find sugar cookies are more stable and hold their shape a little better than traditional shortbread does. I find sugar cookes are slightly less sweet too, which allows for them to be iced and decorated, balancing out the need for sugar.
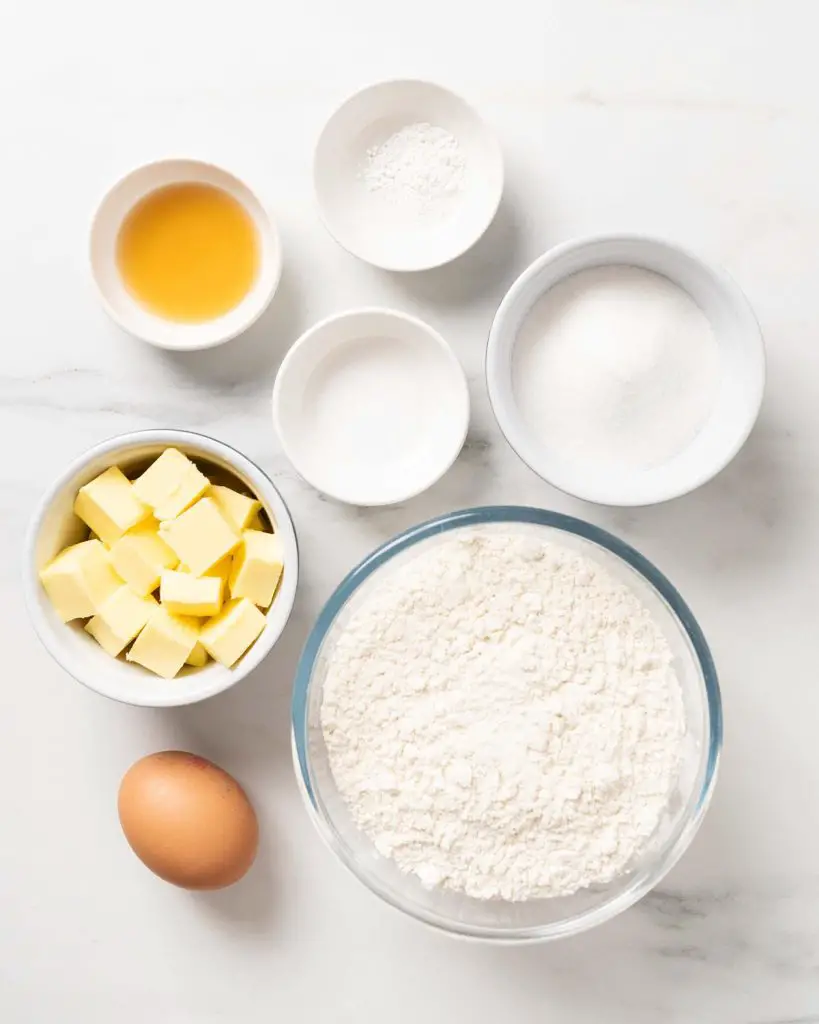
Ingredients in Easter egg sugar cookies
- Unsalted butter: I like to use unsalted butter so I can control how much salt is in the bake. For easiest biscuit/cookie making, always use butter at room temperature.
- Caster sugar: for sweetness, and a little crisp, in the egg Easter cookies.
- Egg: helps with the binding and structure of the biscuits.
- Vanilla: for delicious flavour in the BEST EVER Easter sugar cookies!
- Flour: I use plain/all purpose flour to make these easy cookies. I prefer adding raising agents separately, as I do with salt, so I can control the rise of each of my bakes.
- Salt: enhances the flavours in the Easter decorated cookies. You will not taste it, I promise!
- Baking powder: the leavening agent in this bake, to give the decorated Easter cookies enough lightness so they bake into firm but soft delights!
- Royal icing sugar: used to make the decoration for these royal icing Easter cookies. This is the simplest way to make this kind of icing, as you simply add enough water to the sugar to get the right consistency, then it dries to a firm finish. Perfect!
- Food colouring: to colour the icing before decorating the Easter royal icing cookies.
Recommended tools for your Easter cookies
- Baking tray*: to bake the Easter cookies easy on. I would recommend at least couple of baking trays so you can bake multiple trays of cookies at a time.
- Digital kitchen scales*: I always recommend using digital kitchen scales to weigh ingredients out over using a volume based measuring system, as cups. Weighing out the ingredients is much more accurate than measuring by volume, and will ensure better results in the cookies, so I would definitely take the plunge if you have not already.
- Measuring spoons*: for measuring smaller quantities such as tablespoons (tbsp) and teaspoons (tsp), a set of dedicated measuring spoons is a must! These are far more accurate than everyday eating spoons, and are really easy to get hold of too.
- Mixing bowl*: to mix all the ingredients together to make the Easter egg cookies.
- Handheld electric mixer*: investing in a good electric mixer is a brilliant help with all baking, and will make baking these Easter sugar cookies a total breeze!
- Rolling pin*: for rolling out the biscuit dough. If you do not have a rolling pin, get creative! A tall glass or even a wine bottle works well too!
- Cookie cutter*: to cut out the Easter themed shapes for the biscuits.
- Piping bag*: used to pipe the royal icing decorations on the Easter decorated sugar cookies.
How to make the best Easter egg sugar cookies
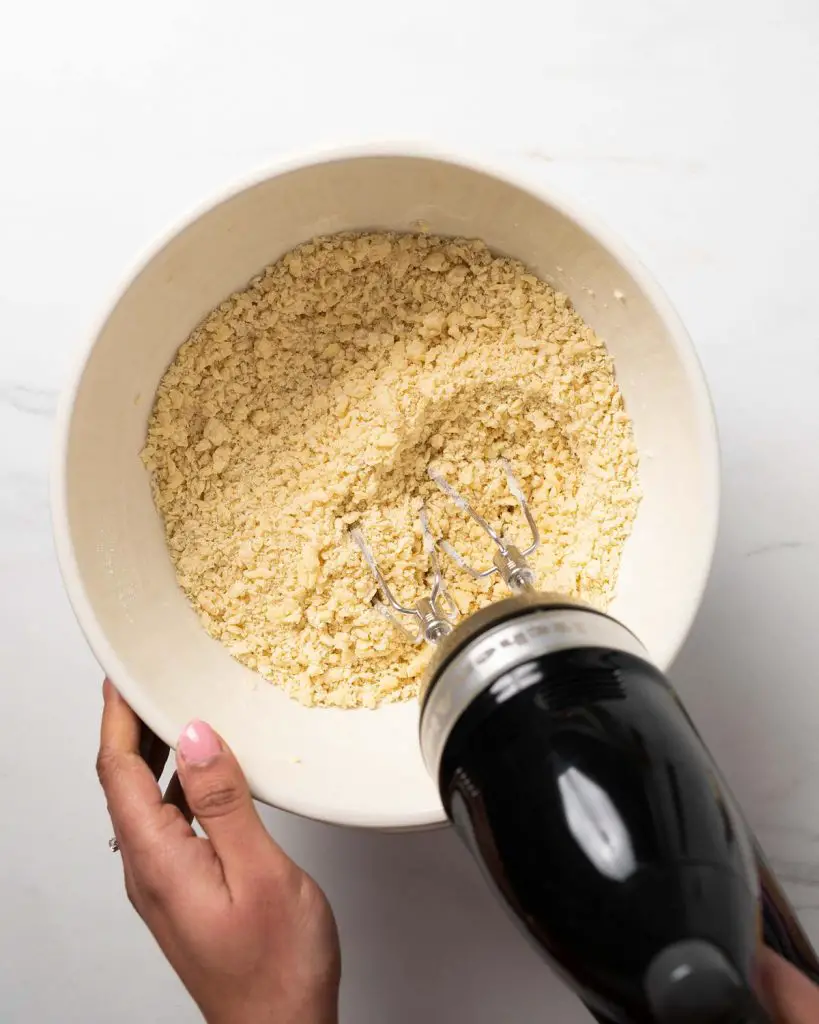
Making these delicious biscuits are easier than you think! Simply beat together the butter and sugar before adding in the egg and vanilla (or other flavourings if you wish instead) before beating in the dry ingredients. The dough is then chilled for a couple of hours before being rolled, stamped and baked. Allow the biscuits to cool before decorating with royal icing. That’s it!
Step 1: In a large mixing bowl, beat together the butter and caster sugar until pale and fluffy, about 3-5 minutes. Add in the egg and vanilla and beat again until combined.
Step 2: Sift in the flour, baking powder and salt. Beat again until the mixture comes together into a stiff dough.
Step 3: Press the dough together, shaping into a flat disc. Wrap it tightly in cling film and place in the fridge to chill for at least two hours.
Step 4: Once the dough has chilled, preheat the oven to 160C/320F and line two baking trays with parchment paper.
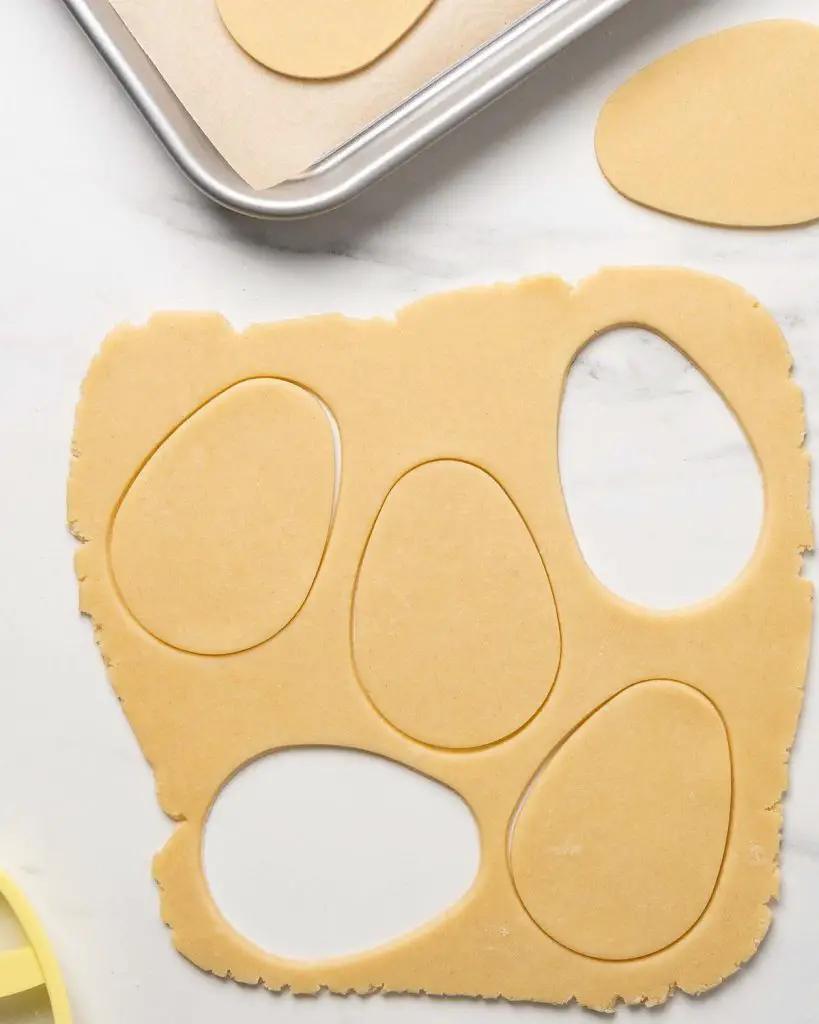
Step 5: On a lightly floured surface, roll the dough out to roughly ¼” thickness and stamp out biscuits using a cookie cutter. Place them on the prepared baking tray, leaving a little space between for even baking.
Step 6: Bake the biscuits in the preheated oven for 9-10 minutes until firm and the edges are just turning golden. Cool for a few minutes on the baking tray, then transfer to a cooling rack to cool completely before decorating.
How to decorate sugar cookies with royal icing
Step 1: After all the biscuits have been baked and are cool, its time to make some icing and decorate! Mix the royal icing sugar with enough water to form the icing. It should have the consistency of lightly whipped cream. When drizzled off a spoon back into the bowl, the icing should take about 15 seconds to blend back in. This is the consistency you are looking for.

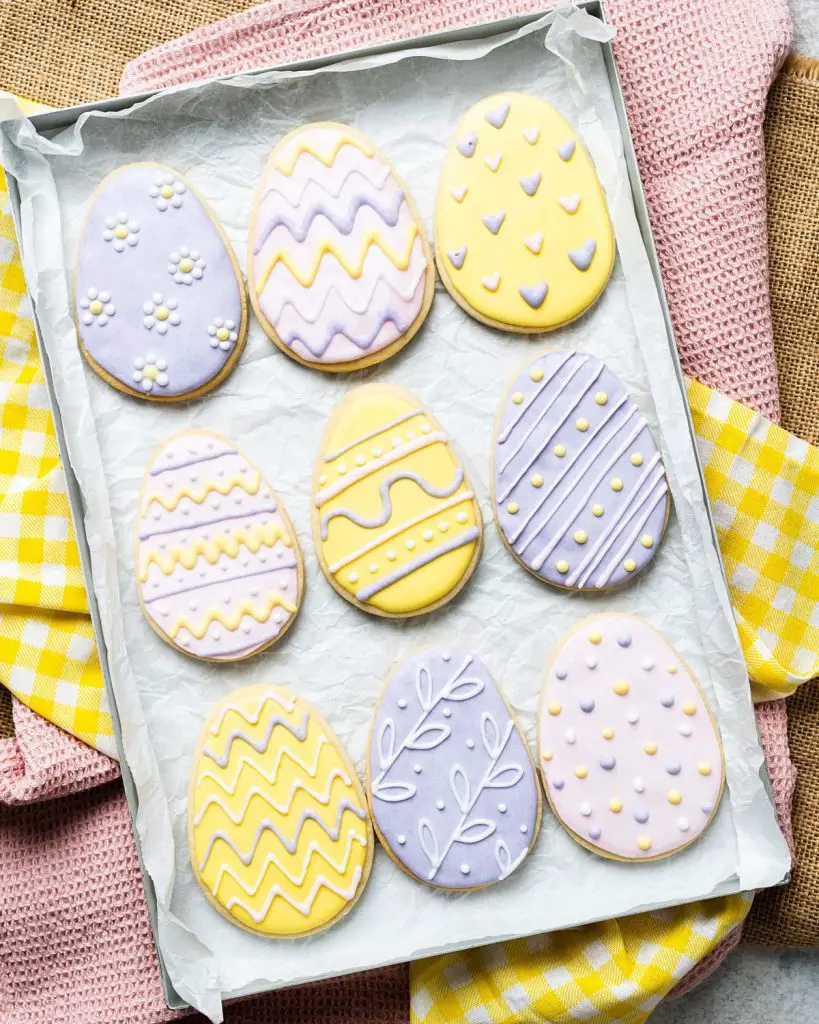
Step 2: Divide the mixture into four separate bowls, colouring them each a different colour, as you wish (I used pink, purple, yellow and left one white). Place each colour of icing into four separate piping bags. Snip a tiny hold into the end of each one, so you can use the ends to draw with the icing and flood the cookies.
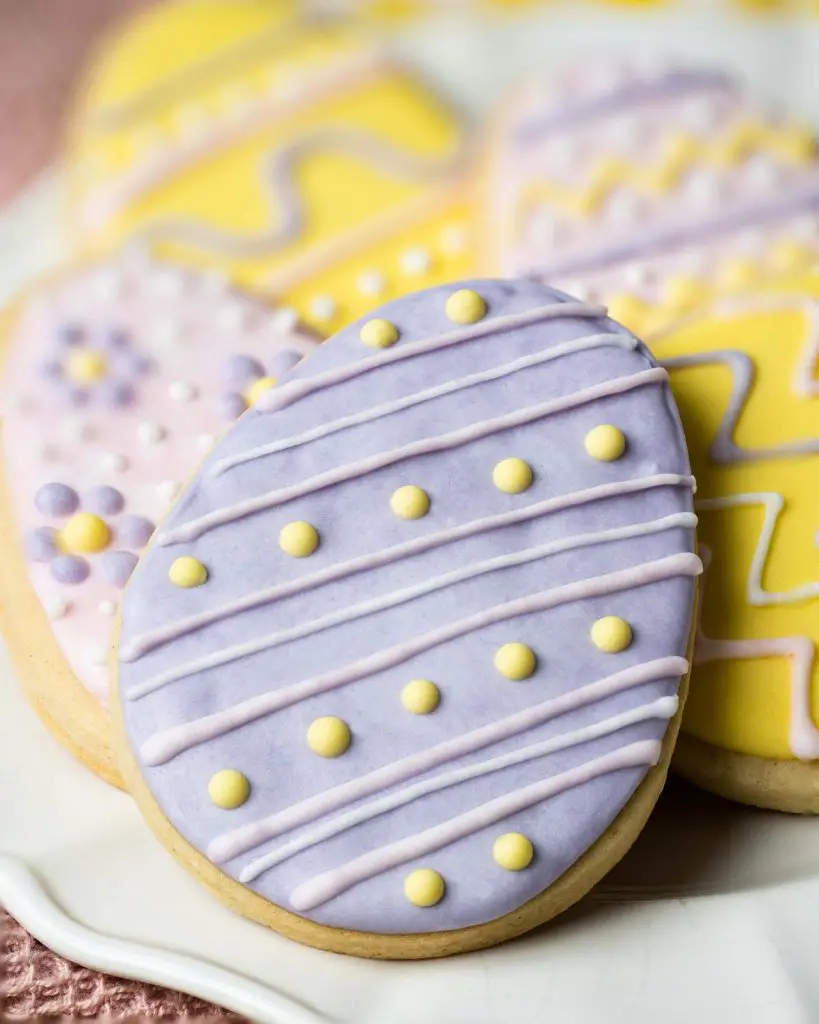
Step 3: Outline each cookie in a colour before flooding the middle to cover with icing. Give each cookie a little shake to level the icing, using a toothpick or pin to pop any air bubbles in the icing. Leave to set before adding further icing decoration and details over each cookie. Leave this final decoration to set and dry completely before storing or serving the biscuits. Enjoy!
How to make Easter cookies without cookie cutters
If you do not have any Easter themed cookie cutters, you can cut the dough using a circle cutter or even the rim of a glass. Once baked, simply decorate on the circle to create the design you wish, creating an outline of the shape you wanted to cut instead.
Alternatively, if you wish the cookies to be the correct shape too, you could cut your desired shape out of paper or card and cut around it on the rolled out dough using a sharp knife. Transfer the cut out cookie dough shapes to the prepared baking tray and bake as usual.
How thick do I roll sugar cookies?
I like to roll my cookies to about ¼” thickness, as I find this is a good thickness to work with for icing and decorating. However, if you prefer thinner sugar cookies, simply roll them thinner before stamping out and baking, making sure to adjust the baking time.
How to know when the biscuits are done baking
You will know they are done baking when the biscuits are matte and no longer shiny. They will have puffed up ever so slightly, and the edges will just be starting to turn golden. Remove them from the oven and allow to cool for a few minutes before transferring to a cooling rack to cool completely.
How to store sugar cookies
Store the decorated Easter sugar cookies in an airtight container at room temperature. Once baked and decorated, the Easter cookies royal icing will last for up to 5 days.
How long do sugar cookies last?
Once baked, sugar cookies should be stored in an airtight container and will keep for up to 5 days.
Can you freeze sugar cookies?
Absolutely! Freeze the wrapped disc of dough by placing it in a sealable freezer bag and freeze for up to a month. Defrost in the fridge overnight, then allow to come to room temperature for about 10 minutes before rolling, stamping and baking as per the recipe.
Once baked, the cookies again can be frozen for up to three months. If you have iced them already, make sure the icing is completely dry, then layer them between sheets of parchment paper before freezing.

Tips for making the best sugar cookies
- Use butter at room temperature, as it mixes better with all the other ingredients. If you have forgotten to take it out of the fridge, leave it out at room temperature for about an hour before making up the dough.
- Always use block butter when making these cookies. Spreadable butter will not firm up enough and will result in baked cookies that are likely to spread more and not hold their shape.
- When adding in the dry ingredients, mix until combined before squeezing the dough together into a disc. Over beating the dough can result in overworking the gluten, creating tough cookies and not soft, melt-in-your-mouth ones.
- Chilling the dough is important, for two reasons. It allows the gluten to relax, making sure the cookies are not tough when baked. And it also allows the butter to chill again, ensuring the cookies hold their shape during baking.
- Keep an eye on the cookies as they bake. They can catch on the edges very easily, so if you want the cookies to remain pale and not golden, it could be the difference in a minute of baking time!
- When making the royal icing, add in the water just a few drops at a time. A little goes a very long way when it comes to making icing! You are looking for a fairly thick texture that still flows back together and blends smooth after about 15 seconds.
- Always use gel colours when colouring royal icing. Gel colours are more concentrated so you will require less to achieve the colour you want. They also contain less water, so will not affect the consistency of the icing.
- You can use a nozzle if you prefer rather than cutting the end of the piping bag. If using a nozzle I would recommend not using a larger tip than no. 3.
- Pipe the outline of the cookie shape before filling it in with icing. Once filled in, gently shake the cookie to spread the icing out and level it. Use a toothpick or a pin to remove any air bubbles and smooth the icing over before leaving the base layer to set.
- The way I have decorated the cookies here is by allowing the main base colour to dry completely before adding details on top. You can add the details to the wet base colour of course. However, this would result in the icing all being one layer, not textured.
- Leave the icing to dry completely for a few hours before storing the Easter cookies decorated in an airtight container.
Troubleshooting
If you have any questions about this Easter eggs sugar cookies, please comment below and I will do my best to help. And do remember: if you enjoy this recipe for Easter sugar cookies, please leave a rating and review below. You could even post a picture on Instagram and tag me when you share it with the world. You already know I would love to see!
What are the best recipes for Easter?
If you are looking for more Easter themed recipes, check out some of my other recipes below I think you will love!
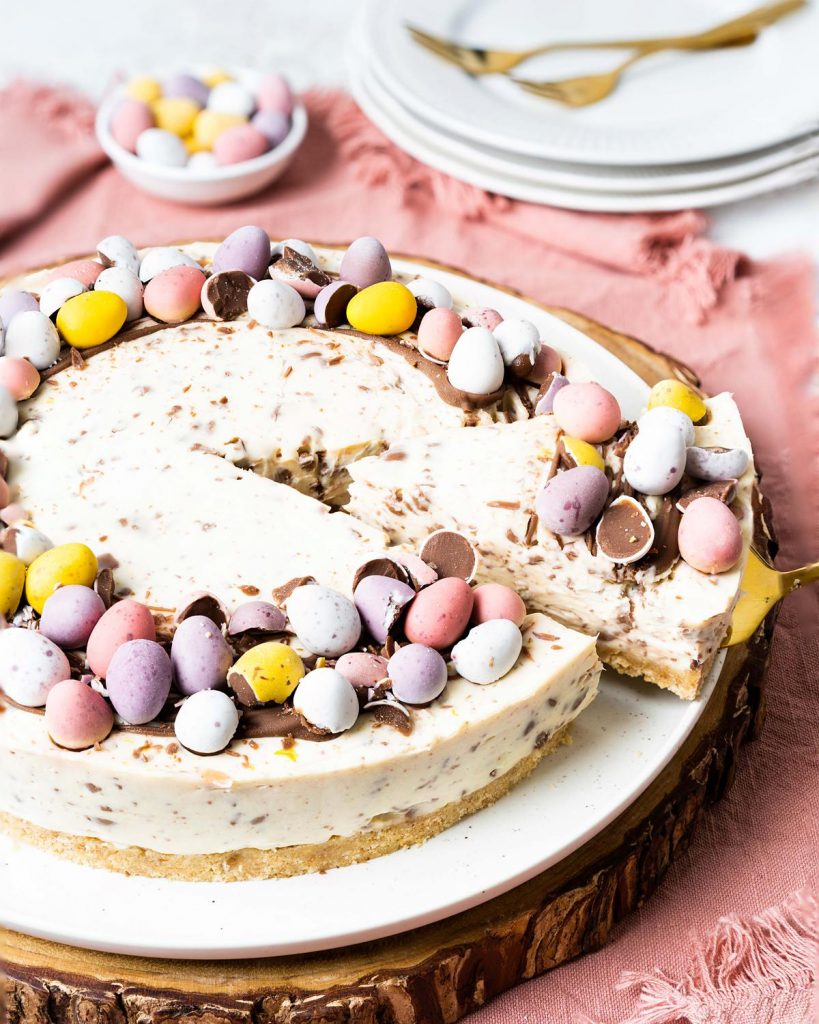
Mini egg cheesecake: My no bake mini egg cheesecake is so simple to make and uses just seven ingredients! This perfect Easter no bake cheesecake could not be easier to make!

Hot cross bun cookies: These tempting hot cross bun cookies will be the ones you need this Easter. Packed with sultanas, orange and cinnamon, they have crisp edges, a chewy middle, and are just divine!
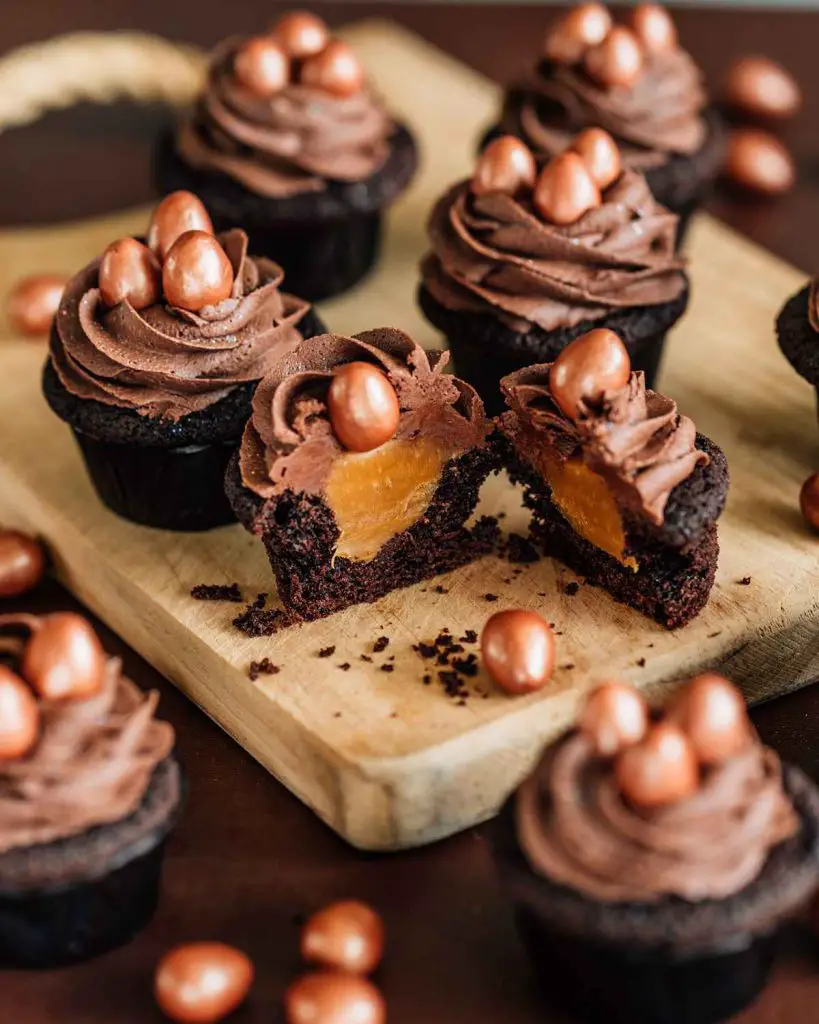
Enchanted Eggs chocolate caramel cupcakes: Inspired by the beautiful Galaxy Enchanted Eggs, my Enchanted Egg chocolate caramel cupcakes are just stunning! Chocolate cupcakes, caramel filling, chocolate buttercream and a crowning of those beautiful rose gold enchanted eggs. This is one Easter bake everyone will love!

Mini egg cookies: Beautiful chewy cookies with a wonderful crispy crust. Plenty of gooey and melty chocolate chips. And lots and lots of mini eggs too. Have these Easter mini egg cookies got your attention yet?
Recommended equipment I used *
| Baking tray | Digital kitchen scales |
| Measuring spoons | Mixing bowl |
| Handheld electric mixer | Rolling pin |
| Cookie cutter | Piping bag |

Easter Sugar Cookies
Ingredients
- 110 g (½ cup) unsalted butter
- 100 g (¼ cup + 3 tbsp) caster sugar
- 1 large egg
- 1 tsp vanilla
- 280 g (2 cups) plain (all purpose) flour
- 0.25 tsp baking powder
- 0.25 tsp salt
- 250 g (1 ¾ cups + 2 tbsp) royal icing sugar
- food colouring (I used pink, purple and yellow)
Equipment
- Baking tray
- Digital kitchen scales
- Measuring spoons
- Mixing bowl
- Handheld electric mixer
- Rolling Pin
- Cookie cutter
- Piping bag
Instructions
- In a large mixing bowl, beat together the butter and caster sugar until pale and fluffy, about 3-5 minutes. Add in the egg and vanilla and beat again until combined.110 g (½ cup) unsalted butter, 100 g (¼ cup + 3 tbsp) caster sugar, 1 large egg, 1 tsp vanilla
- Sift in the flour, baking powder and salt. Beat again until the mixture comes together into a stiff dough.280 g (2 cups) plain (all purpose) flour, 0.25 tsp baking powder, 0.25 tsp salt
- Press the dough together, shaping into a flat disc. Wrap it tightly in cling film and place in the fridge to chill for at least two hours.
- Once the dough has chilled, preheat the oven to 160C/320F and line two baking trays with parchment paper.
- On a lightly floured surface, roll the dough out to roughly ¼" thickness and stamp out biscuits using a cookie cutter. Place them on the prepared baking tray, leaving a little space between for even baking.
- Bake the biscuits in the preheated oven for 9-10 minutes until firm and the edges are just turning golden. Cool for a few minutes on the baking tray, then transfer to a cooling rack to cool completely before decorating.
How to decorate sugar cookies with royal icing
- After all the biscuits have been baked and are cool, its time to make some icing and decorate! Mix the royal icing sugar with enough water to form the icing. It should have the consistency of lightly whipped cream. When drizzled off a spoon back into the bowl, the icing should take about 15 seconds to blend back in. This is the consistency you are looking for.250 g (1 ¾ cups + 2 tbsp) royal icing sugar
- Divide the mixture into four separate bowls, colouring them each a different colour, as you wish (I used pink, purple, yellow and left one white). Place each colour of icing into four separate piping bags. Snip a tiny hold into the end of each one, so you can use the ends to draw with the icing and flood the cookies.food colouring (I used pink, purple and yellow)
- Outline each cookie in a colour before flooding the middle to cover with icing. Give each cookie a little shake to level the icing, using a toothpick or pin to pop any air bubbles in the icing. Leave to set before adding further icing decoration and details over each cookie. Leave this final decoration to set and dry completely before storing or serving the biscuits. Enjoy!