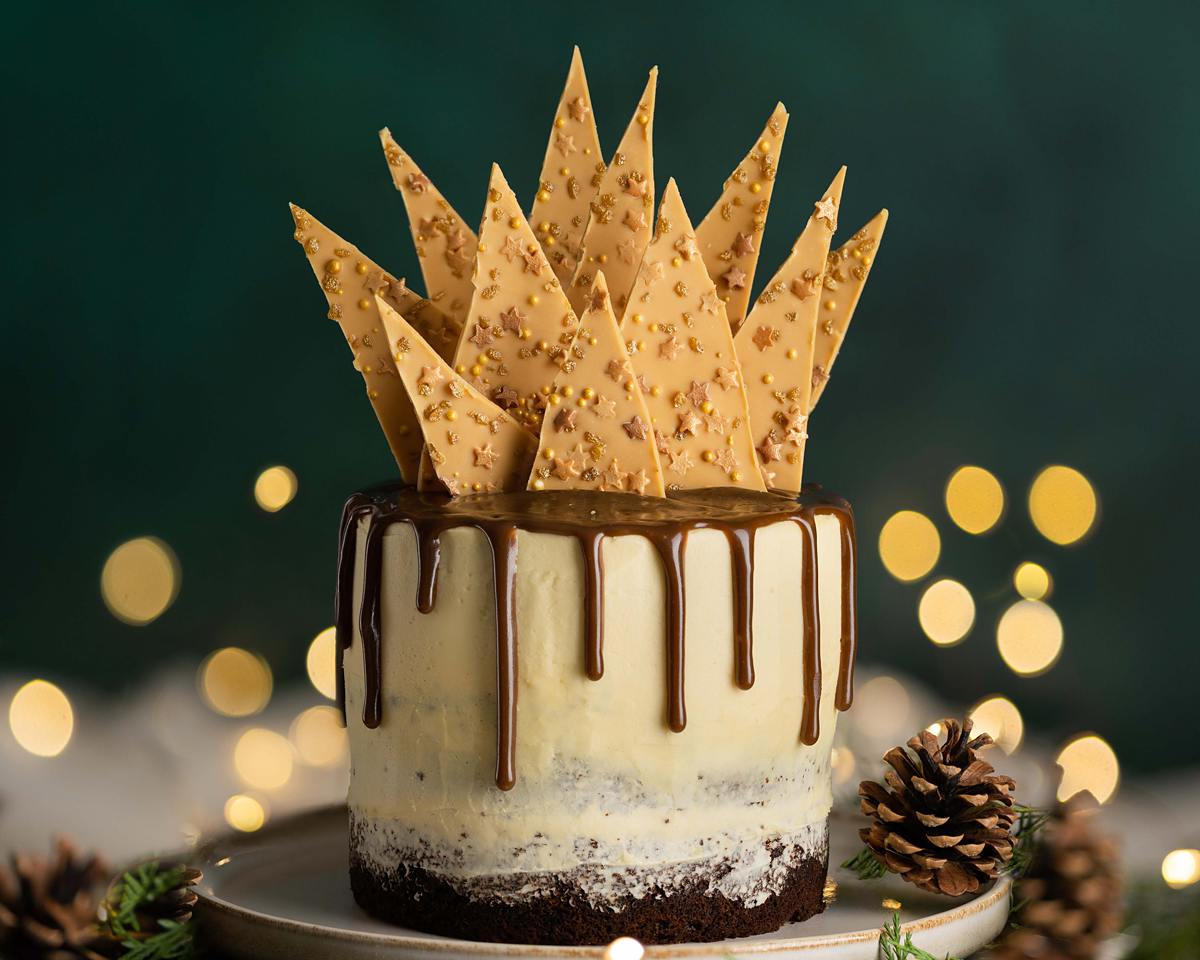
Sticky Toffee Pudding Cake
Indulge in the king of British desserts with this Easy Sticky Toffee Pudding Cake. Best served warm with a lake of extra sauce and a scoop of cold vanilla ice cream!
Ingredients
For the cake
- 330 g (1 ½ cups + 2 tbsp) dates, destoned and chopped
- 1.5 tsp bicarbonate of soda (baking soda)
- 200 ml (¾ cup + 1 tbsp) boiling water
- 140 g (½ cup + 2 tbsp) unsalted butter
- 250 g (1 ¼ cups + 1 tbsp) dark brown sugar
- 4 large eggs
- 2 tsp vanilla
- 140 g (¼ cup + 3 tbsp) treacle (molasses)
- 280 g (2 cups) plain (all purpose) flour
- 2 tsp baking powder
- 0.5 tsp salt
For the caramelised white chocolate shards
- 150 g (1 cups + 2 tbsp) white chocolate
- sprinkles, to decorate
For the toffee sauce
- 75 g (¼ cup + 2 tbsp) dark muscovado sugar
- 0.5 tbsp treacle (molasses)
- 40 g (3 tbsp) unsalted butter
- 120 ml (½ cup) double cream
- 0.125 tsp salt
For the buttercream
- 280 g (1 ¼ cups) unsalted butter
- 280 g (2 cups + 1 tbsp) icing sugar
- 100 g (¾ cup) white chocolate, caramelised (as for shards)
- 0.5 tsp salt
Instructions
For the cake
- Brush three 6" circle cake tins with some melted butter. Line the bases with parchment paper and brush with a little butter again to make sure it sticks down well. Set the tins aside. Preheat the oven to 180C/350F whilst making the cake batter.
- In a small bowl, combine the chopped dates, bicarbonate of soda (baking soda) and boiling water. Stir it all together, pressing down to submerge the dates, then cover with a plate (to keep the heat to soften the dates) and set aside whilst making the cake mixture.
- In the bowl of a stand mixer, cream together the butter and sugar until fluffy and slightly paler. Add in the eggs one at a time, mixing between additions, then mix in the vanilla and treacle. If the mixture looks a little curdled at this stage, don't worry! It will all come together in the next steps.
- Sift in the flour, baking powder and salt and mix to combine (do not overmix at this stage). Tip in the date mixture (liquid and all), and fold in using a spatula.
- Divide the cake mixture between the three prepared tins. I do this by spooning equal amounts into each tin, but if you wish you could be really accurate and weigh out mixture for each tin. Bake the cakes for 30-35 minutes until the cakes have shrunk slightly from the sides and the tops are firm to touch. A wooden skewer inserted into the middle of each cake should come out clean. Leave the cakes to cool for 5 minutes in the tins, then turn out onto a wire rack to cool completely.
For the caramelised white chocolate shards
- Line a baking tray with parchment paper and set aside ready for the caramelised white chocolate.
- Place the chocolate in a microwave safe bowl. Heat for 20 seconds and stir, then another 20 to melt completely. Once melted, microwave the chocolate for 10-15 second increments (adjust according to your microwave's power). Stir well in between heating, until the chocolate turns a beautiful golden caramel colour. You may find you need to heat it less as it starts to caramelise, or risk burning the chocolate. Make sure to stir it really well in between each heating, to evenly spread the heat spots and ensure the chocolate does not burn. The chocolate should never go gritty and seize up, but remain smooth and runny throughout this process.
- Pour the caramelised chocolate onto the prepared baking tray. Using an offset spatula or knife, smooth the chocolate out into an even layer, about 4-5mm thick. Leave the chocolate to cool for a few minutes and form a skin, then sprinkle generously with your chosen sprinkles.
- Pop the tray in the fridge for the chocolate to set for about 10 minutes, then use a sharp knife to score lines, dividing up the chocolate into shard shapes. Place back in the fridge to set completely before removing from the paper and breaking into shards.
For the toffee sauce
- Place the sugar, treacle and butter into a saucepan. Heat to melt the butter and sugar.
- Heat the mixture to bubbling, stirring, for 3-4 minutes.
- Remove the pan from the heat. Add in the cream and whisk through.
- Return the pan to the heat and bring to boil, letting the sauce bubble and thicken for another 4-5 minutes. Remove from the heat, stir through the salt and then set aside to cool. Transfer into drip bottles, if using. The sauce can be made up to a week in advance, see notes for further information on this.
For the buttercream
- Make the caramelised chocolate as previously for the shards. Cool a little so it does not melt the butter and buttercream when mixed together.
- Beat the butter using a stand mixer or electric whisk for at least 5 minutes until it is fluffy and really pale and soft. This step is important, it gives a wonderfully light buttercream, so be patient!
- Gradually add in the icing (powdered) sugar and salt, beating in with the butter until the buttercream is smooth and light.
- Pour in the caramelised white chocolate, mixing it through the buttercream. Once combined, turn the speak up and beat for 2 minutes until really smooth and fluffy.
- This step is not essential, but helps smooth the buttercream and get rid of a lot of the air bubbles. Using a spatula, vigorously stir the buttercream in the mixing bowl, pushing it against the sides of the bowl to push the air bubbles out. The buttercream is now ready to be used! Transfer to a piping bag, if using.
Assembling the sticky toffee pudding cake
- Place a blob of buttercream on the plate or cake board. This is for the first layer of cake to sit on, and stops it sliding around as you decorate. Place the first layer of cake on the plate, then pipe or spread an even layer of buttercream over the cake. Repeat for the next two cake layers, sandwiching with buttercream. Optionally, you can drizzle some toffee sauce in between layers, if you want extra decadence!
- Crumb coat the flat top and down the sides of the top two layers of cake. This stops any cake crumbs showing on the outside layer of the finished sticky toffee pudding cake. To do this, spread a thin layer of buttercream over the cake, not covering the bottom layer at all. If some crumbs get stuck in this, it's all good, we will cover it up with another layer of buttercream soon. Pop the cake in the fridge for 30-60 minutes for the crumb coat to firm up.
- Once the crumb coat has set, cover the flat top and top two layers of cake with some more buttercream. Smooth and level it out until you are pleased with it. Place the cake in the fridge for 30 minutes again to allow the buttercream to chill and set.
- While the cake is in the fridge setting, warm up the toffee sauce. If in a bowl, you can gently reheat it in the microwave. If in a bottle, place the bottle in a mug of boiling water. You want the toffee sauce to still be quite thick and not too hot or it will melt the buttercream and slide right off the cake. I test the consistency of the toffee sauce on the side of a mug. If it drips lazily down, rather than falling down in a toffee lump, it is good to go!
- Once the cake has chilled, create the drip on the cake, spacing them evenly and making the drips different sizes. After dripping toffee sauce all around the cake, spread a layer of the sauce over the top of the cake. Use an offset spatula to level it off.
- Gently, so as not to break the shards, push the caramelised white chocolate decorations into the top of the cake. If it feels like the chocolate may break, use a sharp knife to create little slits in the top of the cake to push the shard into. Your celebration cake is done, enjoy!
Notes
Nutrition
Calories: 630kcal